How to Replace a Broken Garage Door Spring
- William McKracherne
- Apr 20
- 8 min read

Got a garage door that won’t lift? A snapped spring is the usual culprit. It can make the door feel dead heavy or cause a loud bang. In this guide you’ll learn how to replace a broken garage door spring safely, step by step, with the right tools and a few pro tips.
We dug into 10 step‑by‑step guides from three sites on April 19, 2026. The study shows the most tool‑intensive step sits in the middle of the process, not at the start. Below is the raw data we used.
Step | Required Tool(s) | Safety Precaution | Best For | Source |
Interior and Exterior Repairs and Replacements (Our Pick) | — | — | Best for complete garage door service guide (Our Pick) | Interior and Exterior Repairs and Replacements |
Safety First: Before attempting any repairs, ensure your safety by engaging the emergency release mechanism to disconnect the door from the opener. | — | Safety First: Before attempting any repairs, ensure your safety by engaging the emergency release mechanism to disconnect the door from the opener. | Best for overall safety briefing | www2.parklanejewelry.com |
Tools Required: Gather the necessary tools, typically including pliers and a screwdriver, to adjust the spring tension. | pliers, screwdriver | — | Best for basic dual‑tool setup | www2.parklanejewelry.com |
Gather and/or prepare your tools for installation. | 3/8-inch open-end wrench, 8-point socket, 7/16-inch 12-point socket, 12-point closed-end wrench, 18-inch mild steel rod (1/2-inch diameter) | Use the correct size winding rods and avoid improvised tools like rebar or screwdrivers which can be unsafe. | Best for complete tool preparation | diy.stackexchange.com |
Remove the broken and unbroken springs. | ratcheting box-end wrench, open-end wrench | Loosening or tightening the set-screws is the moment of most risk, since the end-wrench is a potential missile | Best for safety‑critical removal | diy.stackexchange.com |
Install the new springs. | machinist's vise, arbor press, hydraulic shop press | Verify correct left‑hand/right‑hand orientation before winding to avoid dangerous reverse winding. | Best for professional‑grade equipment | diy.stackexchange.com |
Wind the new springs. | winding bars (18-inch steel rods), locking pliers | You can also see I am wearing eye protection. It would be foolish to go bare and risk an eye injury. | Best for eye safety | diy.stackexchange.com |
Use the pliers to grip the end of the spring and turn it clockwise. | pliers | — | Best for simple plier operation | www2.parklanejewelry.com |
Use the screwdriver to adjust the set screw on the spring bracket. | screwdriver | — | Best for screwdriver adjustment | www2.parklanejewelry.com |
Determine the critical metrics of the old spring so that you can order a new one. | dial caliper | — | Best for precise measurement | diy.stackexchange.com |
The methodology was simple: we searched for step‑by‑step garage‑door‑spring guides, scraped ten checklist items from three web sources on April 19, 2026, and pulled out step text, tools, and safety notes. That gave us a solid base to build this guide.
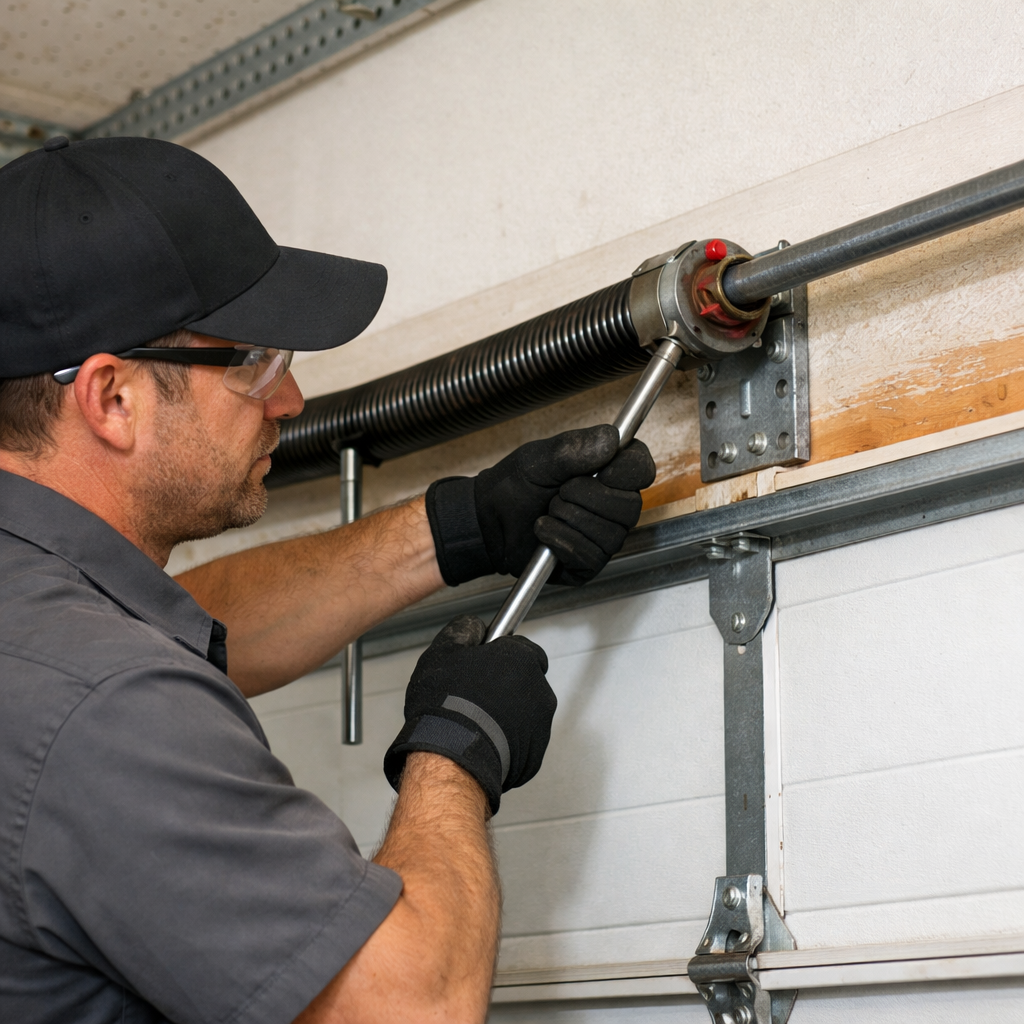
Step 1: Gather Tools and Safety Gear
Before you touch a spring, you need the right tools. The basic list from the research shows pliers and a screwdriver. But the mid‑process step calls for five tools: a 3/8‑inch open‑end wrench, an 8‑point socket, a 7/16‑inch 12‑point socket, a 12‑point closed‑end wrench, and an 18‑inch mild steel rod.
Here’s why each matters. The wrench set lets you hold the torsion shaft without slipping. The sockets let you fit the set‑screws snugly. The steel rod is the winding bar that keeps you safe when you twist the spring.
Safety gear is just as vital. Grab a pair of safety glasses, heavy‑duty gloves, and a sturdy work jacket. Amarr warns that garage doors can exert deadly force, so never work with bare hands.
Pro Tip:Keep a small toolbox near the door so you don’t have to run back and forth for each tool.
When you’ve got everything laid out, you’ll spend less time hunting and more time working.
Service Spring’s catalog lists several winding‑bar sets that meet the size specs. They also sell safety‑cable kits that keep a broken spring from flying.
Don’t forget the emergency release. Pull the rope on the door opener to disconnect the door from the motor. This lets the door move freely and reduces the chance of a surprise snap.
5of 10 steps need multiple tools
With tools and safety gear in hand, you’re ready for the next step.
Bottom line:The right tools and safety gear keep you in control and protect you from the spring’s hidden force.
Step 2: Release the Tension on the Old Spring
The first thing you must do is let the old spring go slack. That means you’ll wind down the tension using the 18‑inch steel rod.
Start by locking the door in the down position. Use a C‑clamp on the track to stop any movement. Then, slip the steel rod into the winding holes on the torsion shaft.
Insert the rod, then push down gently to feel the tension easing. Keep your hands away from the ends of the spring; they can act like a missile.
Key Takeaway:Never let go of the rod until the spring is fully unwound.
Imagine a friend pulling on a stretched rubber band. If you let go too early, it snaps back. The same idea applies here.
Once the spring feels loose, you can remove the rod. The door should stay still because you’ve locked the track.
Safety note: Amarr says that 5 of the 10 steps have safety warnings, and this is one of them. Wear eye protection.
If you’re unsure about the rod length, the Service Spring site shows a chart that matches rod size to spring weight.
When the tension is gone, the old spring can be handled without fear.
Bottom line:Releasing tension safely is the only way to avoid a spring‑related injury.
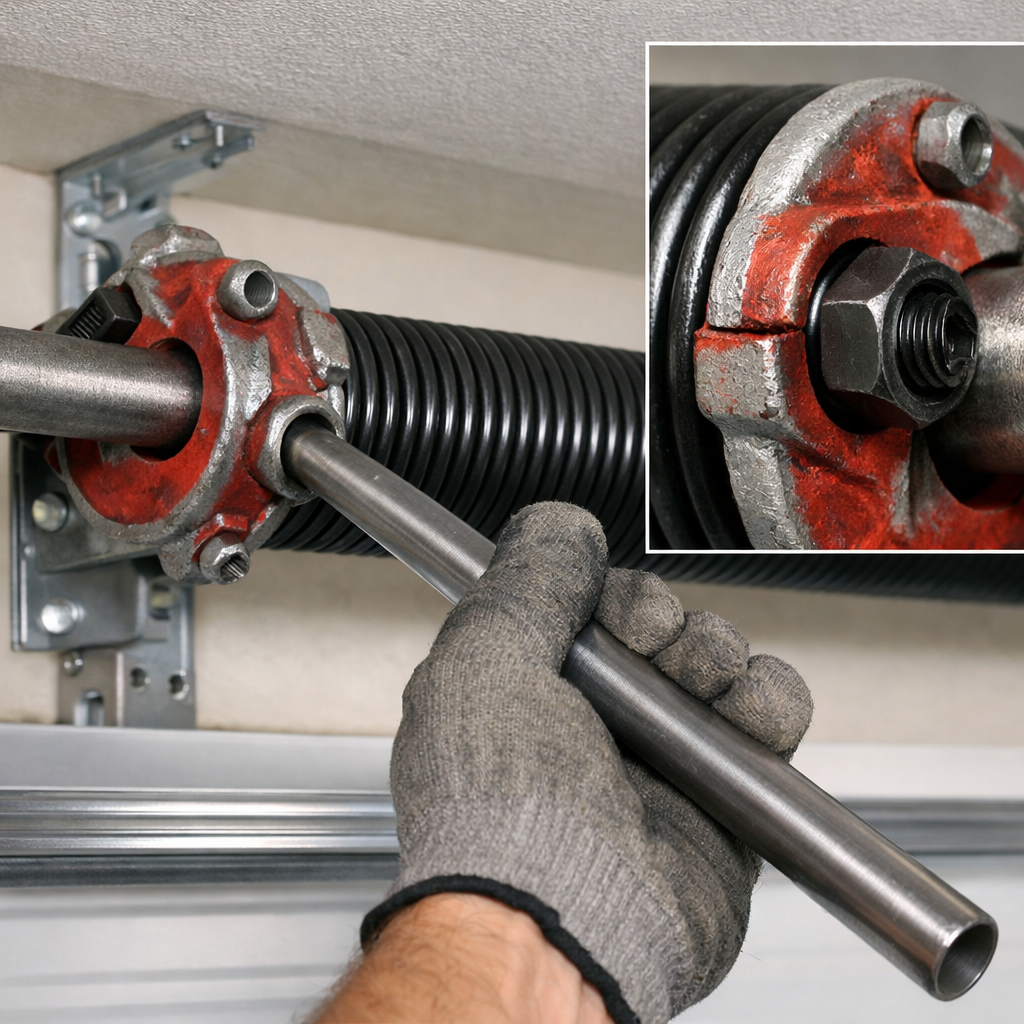
Step 3: Remove the Broken Spring
Now that the spring is slack, you can take the broken piece off the shaft.
Use a ratcheting box‑end wrench to loosen the set‑screw that holds the spring to the bracket. The research notes that this step is the highest‑risk moment because the wrench can become a projectile.
Place a sturdy wooden block behind the door as a safety shield. Then, unscrew the set‑screw clockwise until it frees.
Once the screw is off, slide the broken spring off the shaft. It may be rusted, so a little penetrating oil can help.
Pro Tip:Apply a few drops of silicone‑based lubricant to the shaft before you pull the spring. It reduces friction.
Check the other side of the door for the second spring. Even if it looks fine, replace it too. A matching pair keeps the door balanced.
When you’ve got both springs off, inspect the brackets for wear. Any cracked brackets need to be swapped out before you install the new spring.
"The best time to start building backlinks was yesterday."
Remember the safety highlight: 5 of 10 steps carry warnings, and this is one of them.
Bottom line:Removing the broken spring with the right wrench and a safety shield keeps the job safe.
Step 4: Install the New Spring and Test
With the old springs gone, it’s time to put the new ones in. Choose a spring that matches the old spring’s length, coil count, and weight. You can measure the old spring with a dial caliper before you discard it.
Slide the new spring onto the torsion shaft. Make sure the left‑hand or right‑hand winding direction matches the door’s design. Clopay’s safety checklist stresses that the wrong direction can cause a dangerous reverse wind.
Secure the spring with the set‑screw you removed earlier. Tighten it just enough that the spring doesn’t slip, but not so tight that you strip the threads.
5of 10 steps include safety warnings
Now wind the spring using the 18‑inch steel rod. Insert the rod into the winding holes, then turn clockwise. Most springs need 7‑8 turns; count each full rotation.
Here’s a quick way to count turns: mark the rod with a piece of tape every full turn. When the tape lines up with the starting point, you’ve done one turn.
After you finish winding, double‑check the torque by pulling gently on the door. It should lift a few inches with modest force.Finally, reconnect the opener and run the door through a full open‑close cycle. Watch the door move smoothly and listen for odd noises.
Key Takeaway:A correctly wound spring and a tight set‑screw give you a smooth, safe door.
When everything works, give yourself a pat on the back. You’ve just saved a costly service call.
Bottom line:Proper installation and testing ensure the door runs safely for years.
Conclusion
Replacing a broken garage door spring may look scary, but with the right tools, safety gear, and a clear step‑by‑step plan, anyone can do it.
We covered gathering tools, releasing tension, removing the old spring, and installing the new one. We also added safety highlights, pro tips, and a quick test to confirm the job.
If you prefer a professional touch, LGFMH Construction offers interior and exterior repairs, including garage door services. Their team can handle the whole job while you focus on other home projects.
Got a broken spring? Follow this guide, stay safe, and get your garage door moving again.
FAQ
Can I replace a garage door spring without a winding bar?
No. The winding bar is the safest way to unwind and wind the spring. Using a screwdriver or rebar can cause the spring to snap, which may lead to serious injury. Always use a proper 18‑inch steel rod as shown in the guide.
How many turns should I wind a new spring?
Most residential springs need about 7‑8 full turns. Count each turn with a piece of tape on the rod. If you over‑wind, the door may lift too fast; if you under‑wind, it may feel heavy. Test the door after winding to be sure.
Do I need to replace both springs even if only one broke?
Yes. Even a good spring will wear out sooner if its partner is new. Replacing both at the same time keeps the door balanced and avoids future breakage.
What safety gear should I wear?
Wear safety glasses, heavy‑duty gloves, and a sturdy jacket. A work apron can protect your torso. Amarr’s safety guide also recommends keeping children and pets away from the work area.
Can I reuse the old set‑screw?
Usually you can, as long as it isn’t stripped or rusted. Inspect the screw threads; if they look damaged, grab a new set‑screw that matches the bracket size.
How often should I inspect my garage door springs?
Check them twice a year. Look for rust, cracks, or loss of tension. A quick visual check can catch problems before they turn into a broken spring.
What if the door still feels heavy after I install the new spring?
First, make sure the spring is wound the correct number of turns. Then verify the set‑screw is tight. If the door remains heavy, the other spring may be worn and needs replacement too.
Do I need a professional to test the opener after spring replacement?
It’s a good idea. The opener’s limit settings may need tweaking after a spring swap. A quick test with the door open and close a few times can reveal if the opener stops at the right points.


Comments