How to Replace a Broken Vinyl Siding Board
- William McKracherne
- May 10
- 8 min read

Got a cracked vinyl siding board ? It looks bad and can let water sneak in. You don’t need a pro for a simple fix. In this guide you’ll learn how to replace a broken vinyl siding board from start to finish. We’ll walk through safety, tools, removal, cutting, fitting, sealing, and a final check. By the end you’ll feel ready to make your home look like new again.
Step 1: Gather Safety Gear and Tools
Before you lift a single board, put on safety gear. Gloves stop cuts, goggles block debris, and sturdy boots protect your feet. A simple safety kit costs less than a weekend pizza night, but it saves you a trip to the ER.
Next, pull the right tools from your toolbox. The most‑used tool is a vinyl siding removal tool , it slips under the board and lifts without cracking neighbors. A pry bar works too, but the removal tool gives you better control. A sharp utility knife is a must for trimming; keep extra blades handy so the cut stays clean.
Accurate measurements need a durable tape measure. Choose one with both metric and imperial markings , you’ll never know which side the siding specs use. A pop‑rivets gun can speed up fastening, but a hammer and corrosion‑resistant nails also do the job.
Pro Tip:Keep a spare pair of safety gloves in the car. Weather can change, and you might need to step outside again.
When you buy tools, look for ergonomic handles. A comfortable grip reduces hand fatigue, especially if you’re cutting several panels. The K&D Roofing guide lists the vinyl siding removal tool, a quality utility knife, and a pop‑rivets gun as the top three must‑haves.
Also, check the weather. Mild, dry days let the vinyl expand and contract naturally. Extreme cold makes it brittle; heat makes it warp. Plan your work for a calm day.
Key Takeaway:Safety gear and the right removal tool are the foundation of a smooth siding repair.
Bottom line:Gather gloves, goggles, a sturdy removal tool, and a sharp knife before you start.
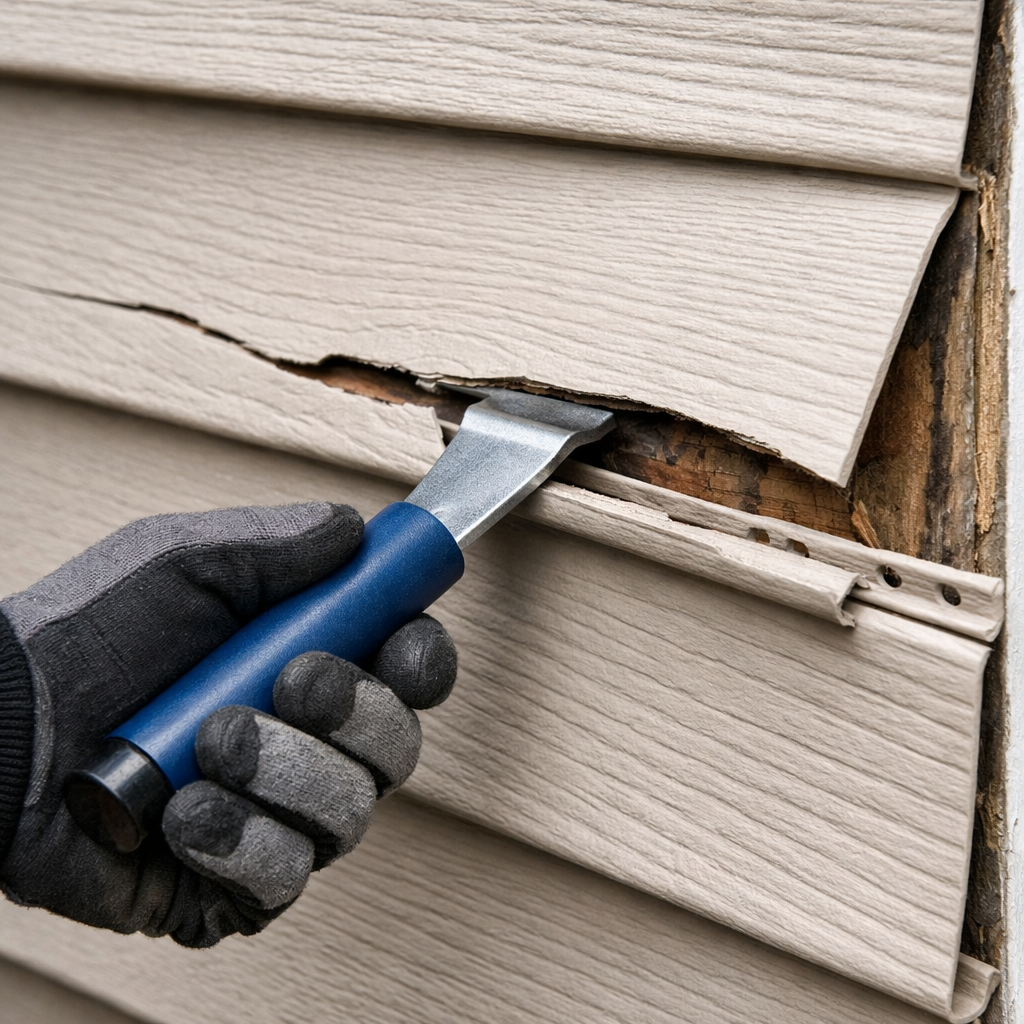
Step 2: Remove the Damaged Vinyl Siding Board
First, locate the broken board. Look for cracks, dents, or a board that won’t lock into the one below. Give the board a gentle tap with a rubber mallet to see if it’s loose. If it resists, you’ll need the removal tool.
Slide the tip of the removal tool under the top lip of the board. Press down to release the locking channel. Work the tool along the length of the board, lifting just enough to free the nails. If a nail sticks out, use a pry bar to pull it out without bending the surrounding panels.
Take care not to yank the board too fast. A slow, steady lift keeps the neighboring boards intact. When the board comes free, set it aside on a clean surface. You’ll reuse the nails if they’re still in good shape.
73%of DIY siding repairs list tool choice as the biggest success factor
The This Old House video shows Tom Silva using a zip tool to pop the board out. Watching the clip helps you picture the motion before you try it.
Once the board is off, inspect the studs behind it. Look for rot or water damage. If you see any, patch the area before installing the new panel.
Pro Tip:Keep a small bucket for loose nails. It saves you from stepping on them later.
Bottom line:Carefully lift the broken board with a removal tool, watching for hidden damage behind it.
Step 3: Measure and Cut the Replacement Board
Accurate measurements avoid waste and gaps. Measure the length of the opening twice , once from the top edge of the lock to the bottom, and once from the side of the stud to the opposite side. Write the numbers down before you cut.
Use a fine‑tooth circular saw for long, straight cuts. A 7‑inch blade with a high‑speed steel edge works best on vinyl. Place the panel on a stable workbench, line up the cut guide, and feed the saw slowly. If you prefer a hand tool, snap the board with a utility knife: score the surface, then bend back and forth until it breaks cleanly.
For corners or around windows, tin snips give you the control you need. Cut a little extra, then trim back with the utility knife for a perfect fit.
Cutting Method | Best For | Pros | Cons |
Circular Saw | Full‑length panels | Fast, clean cuts | Requires power |
Utility Knife | Small adjustments | Low cost, portable | May need multiple scores |
Tin Snips | Curves, edges | Precise control | Hand fatigue |
After cutting, dry‑fit the board. Snap it into the lock of the board below. If the fit is tight, sand the edge lightly with fine‑grit sandpaper.
Remember the golden rule: measure twice, cut once. A tiny mis‑measure can mean buying another board.
Key Takeaway:Double‑check each measurement before you cut; it saves time and material.
Bottom line:Measure accurately, then cut with a saw or knife to match the opening exactly.
Step 4: Install the New Vinyl Siding Board
Start by sliding the new board into the lower lock. The bottom edge should snap into the nailing strip of the panel below. Press firmly until you hear a click.
Next, align the top lip with the lock of the board above. If the board sits a little high, tap it gently with a rubber mallet. The goal is a smooth line that follows the existing siding’s slope.Secure the board with fasteners. Follow the manufacturer’s spacing , usually every 16 inches for horizontal panels. Use corrosion‑resistant nails or screws that are at least 5/16" in diameter. Leave about 1/32" of space between the nail head and the vinyl; this lets the board expand in heat.
Pro Tip:If you can’t reach the middle of the nail slot, use a nail punch to widen it without damaging the siding.
When you reach a corner, use a J‑Channel or an outside corner post. Measure the length, double it for the channel, and cut to size. Snap the new board into the channel, then fasten.
After all fasteners are in, step back and look for any gaps. Small gaps let water in, so fill them with a foam backer rod before caulking.
According to the Westlake Royal best‑practices guide, proper nail spacing and leaving a tiny gap under each nail head are key to avoiding oil‑canning.
Key Takeaway:Snap the board into place, fasten loosely, and keep a small nail‑head gap.
Bottom line:Fit the new panel, nail it loosely at correct intervals, and check for gaps.
Step 5: Seal Joints and Paint
Even a perfect fit can let air sneak through the seams. Use a high‑quality exterior caulk to seal the edges where the new board meets the old. A silicone‑based caulk works well on vinyl because it stays flexible.
Apply a thin bead of caulk with a caulking gun, then smooth it with a wet finger or a caulk‑smoothing tool. Don’t overfill , excess caulk can crack as the siding expands.
If you want a fresh color, painting is an option. Check the siding’s warranty first; some manufacturers say painting voids the guarantee.
Pick a paint formulated for vinyl, such as Sherwin‑Williams Emerald® Exterior Acrylic Latex. The paint adheres well without a primer on sound vinyl. Clean the board with a mild detergent, let it dry, then tape off windows and trim.
Use a paint sprayer for the fastest coverage, or a roller for large flat areas. One coat is enough on already painted siding; two coats are best on new panels.
2026year sees a rise in DIY vinyl painting projects
After the final coat, remove painter’s tape while the paint is still wet for crisp lines.
For more on paint choices, see Sherwin‑Williams’ guide , which explains why a vinyl‑safe paint matters.
Pro Tip:Lightly mist the board with water before spraying paint; it helps the coat level evenly.
Key Takeaway:Seal every joint with flexible caulk and use vinyl‑safe paint for a lasting finish.
Bottom line:Caulk the seams, then paint with a vinyl‑approved product for a durable look.
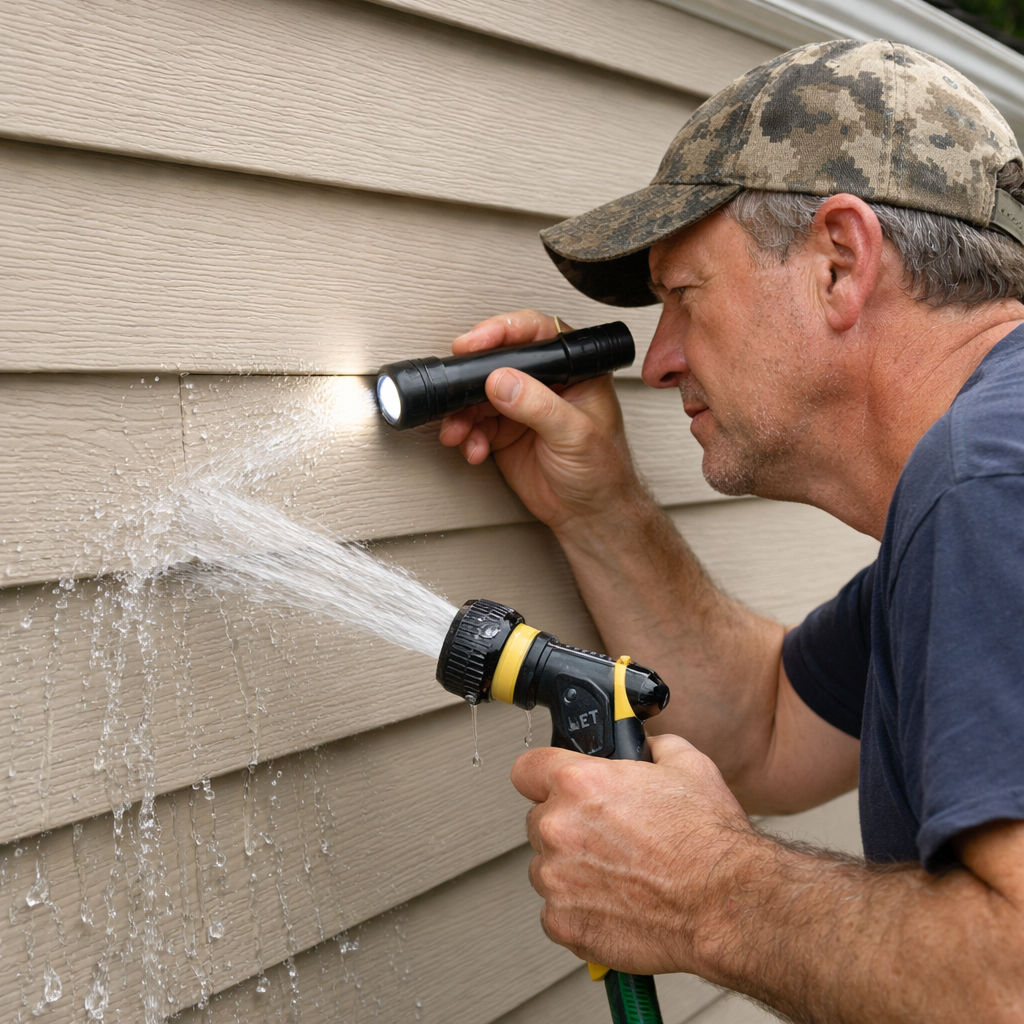
Step 6: Final Inspection and Cleanup
When the paint dries, walk the house and look for any loose nails, gaps, or excess caulk. Use a flashlight to see under the board edges.
Check the lock between the new board and the one above it. It should sit flush with no visible space. If you spot a gap, add a bit more caulk and smooth it.
Remove any protective tape and clean up debris. Sweep the area, then collect nails with a magnet. Dispose of old siding pieces responsibly , many recycling centers accept vinyl.
Finally, test the seal by running a garden hose along the repaired wall. Watch for water leaking behind the new board. If you see a leak, re‑caulk that spot.
Pro Tip:Keep a small notebook of the tools you used and any adjustments you made; it helps future repairs.
When you’re satisfied, store any extra siding panels in a dry place. They may come in handy for future touch‑ups.
Key Takeaway:A thorough inspection catches missed spots before they become problems.
Bottom line:Inspect, test for leaks, clean up, and store leftovers for future use.
FAQ
Can I use regular nails instead of corrosion‑resistant ones?
Yes, you can, but regular steel nails may rust over time. Rust stains the vinyl and can weaken the hold. Corrosion‑resistant nails, like galvanized or aluminum, stay clean and keep the warranty intact. If you only have standard nails, coat them with a rust‑preventive spray before installation.
How do I know if the damaged board can be repaired instead of replaced?
If the crack is small and the board isn’t warped, you can fill the crack with a vinyl‑compatible filler and sand it smooth. However, most cracks compromise the lock, so replacing the board ensures a watertight seal. Check the manufacturer’s guidelines for repair limits.
Do I need to remove the old nails before installing the new board?
Leave nails that are still solid and not bent. Pull out any that are loose or protruding. New fasteners should be driven into clean, solid wood or sheathing for a strong hold.
What temperature is best for installing vinyl siding?
Mild weather between 50°F and 80°F is ideal. In cold, the vinyl becomes brittle and may crack when you cut or snap it. In extreme heat, it softens and can warp. Check the forecast and aim for a dry, moderate day.
How often should I repaint vinyl siding?
Vinyl siding holds its color for many years, but exposure to sun can fade it. Most experts recommend repainting every 5‑7 years if you want a fresh look. Use a paint labeled VinylSafe® to avoid warping.
Is it safe to install siding over existing insulation?
Yes, as long as the insulation is in good condition and the wall sheathing is flat. Insulation adds energy efficiency, but make sure the studs are exposed at the nail points so fasteners can reach the structural surface.
What should I do if water leaks after the repair?
First, locate the source. Look for gaps around the new board’s lock or around nails. Apply more caulk or replace any damaged flashing. If the leak persists, you may need to check the interior water barrier.
Can I hire a professional instead of doing it myself?
Absolutely. If the steps feel overwhelming, a pro can handle tool selection, material purchase, and installation. Siding Installation services from LGFMH Construction cover everything from removal to finishing, saving you time and reducing mistakes.
Conclusion
Replacing a broken vinyl siding board is a doable DIY task when you follow a clear plan. Start with safety gear, pull the right tools, remove the old board gently, measure twice, cut precisely, snap the new piece in, fasten loosely, seal joints, and finish with a paint that’s safe for vinyl. A final inspection catches any missed spots before the next rain arrives.
If you prefer to skip the guesswork, LGFMH Construction offers a full‑service siding repair that handles every step for you. Either way, you’ll end up with a smoother, water‑tight exterior that boosts curb appeal.


Comments