How to Replace a Cracked Basement Wall
- William McKracherne
- Jun 22
- 9 min read

A cracked basement wall isn't just an eyesore. Left alone, it lets in water, weakens your foundation, and turns a small fix into a very expensive problem. This guide walks you through every step of replacing a damaged basement wall section yourself , and tells you honestly when to stop and call a pro.
Step 1: Assess the Crack and Determine Repair Scope
Before you touch a tool, you need to know what you're dealing with. Not every crack needs a full wall replacement. Some just need patching. Get that call wrong and you either waste money tearing out good concrete or you patch over a structural failure that gets worse every season.
Start by measuring the crack's width. A hairline crack under 1/16 inch wide is usually cosmetic. A crack wider than 1/4 inch, especially one that runs horizontally or shows inward bowing, is a red flag for structural movement.
Look at the pattern too. Vertical cracks often come from settling and can sometimes be sealed. Horizontal cracks along the mid-height of a block wall point to lateral soil pressure , that's the type that causes inward buckling and typically needs more than a patch job. Stair-step cracks in block walls suggest differential settlement.
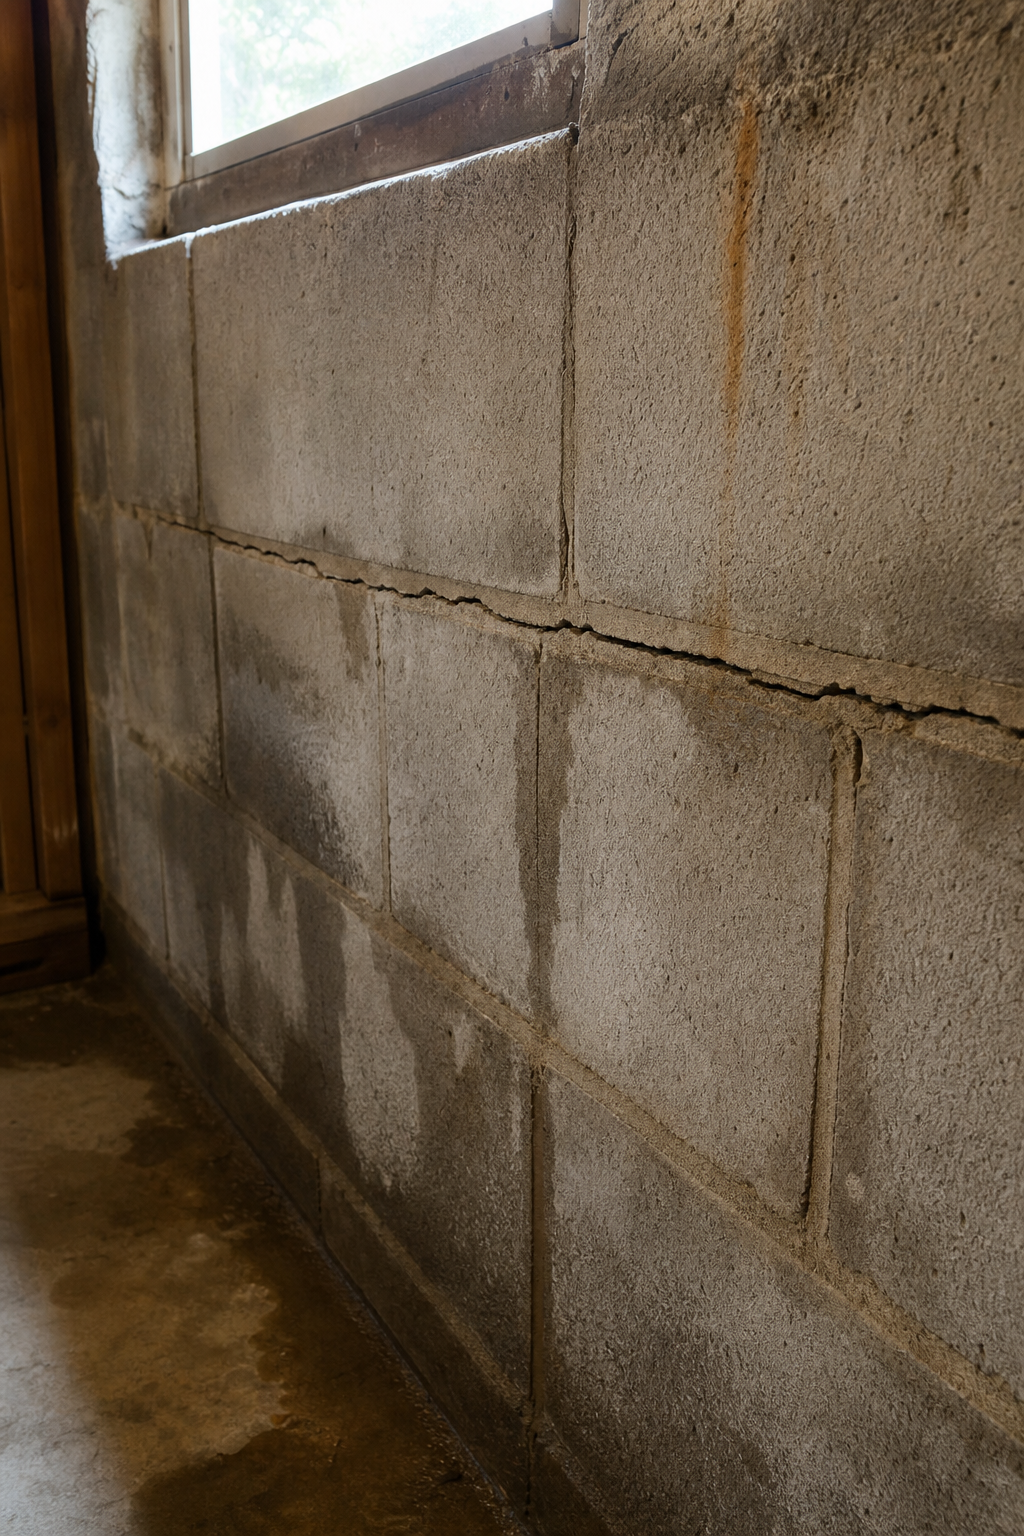
Push gently on the wall near the crack. If it flexes or you can see daylight, the section is past patching. Mark the full extent of the damaged area with chalk , go at least 12 inches beyond visible cracks in each direction. That's your actual repair zone, and it's almost always bigger than the crack you first noticed.
According to Wikipedia's overview of building foundations , basement walls carry both vertical load from the structure above and horizontal load from soil pressure outside , which is why horizontal cracks are treated more seriously than vertical ones.
Key Takeaway:A crack's direction tells you more than its size , horizontal cracks and inward bowing signal structural failure, not just surface damage.
Step 2: Gather Tools, Materials, and Safety Gear
Get everything on-site before you start demolition. Running to the hardware store mid-job with a half-open wall is a bad situation, especially in wet weather.
Here's what you'll need for a concrete block wall replacement. Adjust quantities based on your marked repair zone.
Item | Purpose | Notes |
Rotary hammer drill | Breaking out mortar joints | Rent if you don't own one |
Cold chisel and hammer | Detail demolition | Use with eye protection |
Concrete blocks (matching size) | Replacement wall section | Measure existing blocks first |
Type S mortar mix | Bonding new blocks | Rated for below-grade use |
Mason's trowel and level | Setting and aligning blocks | 4-foot level recommended |
Hydraulic cement | Sealing active leaks | Sets even in wet conditions |
Waterproof membrane or paint | Interior moisture barrier | Apply after mortar cures |
Safety glasses, dust mask, gloves | Personal protection | N95 minimum for concrete dust |
Temporary wall bracing lumber | Supporting structure above | 2x6 or 2x8 depending on load |
Rebar (optional) | Reinforcing new section | Required if original had rebar |
Type S mortar is the right choice for below-grade work. It handles moisture better than Type N and bonds well to existing masonry. Don't substitute with all-purpose mortar from the tile aisle , it's not rated for structural or wet applications.
If your floor system sits directly on top of the damaged wall section, you'll also need adjustable steel columns or temporary stud walls to carry that load while the wall is open. Skip this and you risk a floor joist dropping during the repair. That's a much bigger problem than a cracked wall.
For homeowners planning to haul in large quantities of block, sand, and mortar, coordinating material delivery in advance saves a lot of effort. Reputable freight carriers , including specialized regional haulers like Newman Trucking , who handle heavy construction freight , can get bulk materials to your site faster than multiple hardware store runs.
Step 3: Excavate and Remove the Damaged Wall Section
This step is where most DIYers underestimate the work. Removal has to be controlled. You're not just swinging a sledgehammer , you need the surrounding blocks intact so the new section bonds to them properly.
First, install your temporary bracing. Set adjustable columns under any beams or joists within 4 feet of the repair zone. Crank them up snug , not tight enough to lift the floor, just enough to carry the load when the wall section comes out.
Next, cut the mortar joints around your marked area using the rotary hammer with a chisel bit. Work the horizontal joints first, then the verticals. Go slow along the boundary blocks , those stay in place and you need clean faces for the new mortar to grip.
Once the joints are cut, remove blocks from the top of the section down. Use the cold chisel to break the remaining mortar bond on each block. Set blocks aside if they're still in good shape , you may be able to reuse the undamaged ones, which helps match the existing wall texture.
Clean the cavities and exposed edges thoroughly. Remove all loose mortar with a wire brush. Any dirt, dust, or crumbling material left on the bonding surfaces will weaken the new mortar joint. Dampen the surfaces with water before you start laying new blocks , dry masonry pulls moisture out of fresh mortar too fast and weakens the bond.
If you're working on an exterior wall and the damage goes below grade, you may need to dig outside the foundation to fully expose the problem area. That means temporary excavation, soil removal, and eventually backfilling , which adds scope, time, and cost. Factor that in before you start.
Pro Tip:Photograph the wall before any block comes out. Note the original block orientation, any rebar positions, and how the courses line up with your floor system. That reference saves real time when you start laying the replacement section.
Step 4: Install the New Wall Section
This is the most precise part of the job. Blocks set out of level or plumb now become problems you can't fix later without tearing it out again.
Mix your Type S mortar to a peanut-butter consistency , stiff enough to hold a trowel mark but workable enough to spread without crumbling. Start at the bottom course and work up. Lay a full mortar bed on the footing or the existing block below, set your first block, and check it with your level in both directions before moving on.
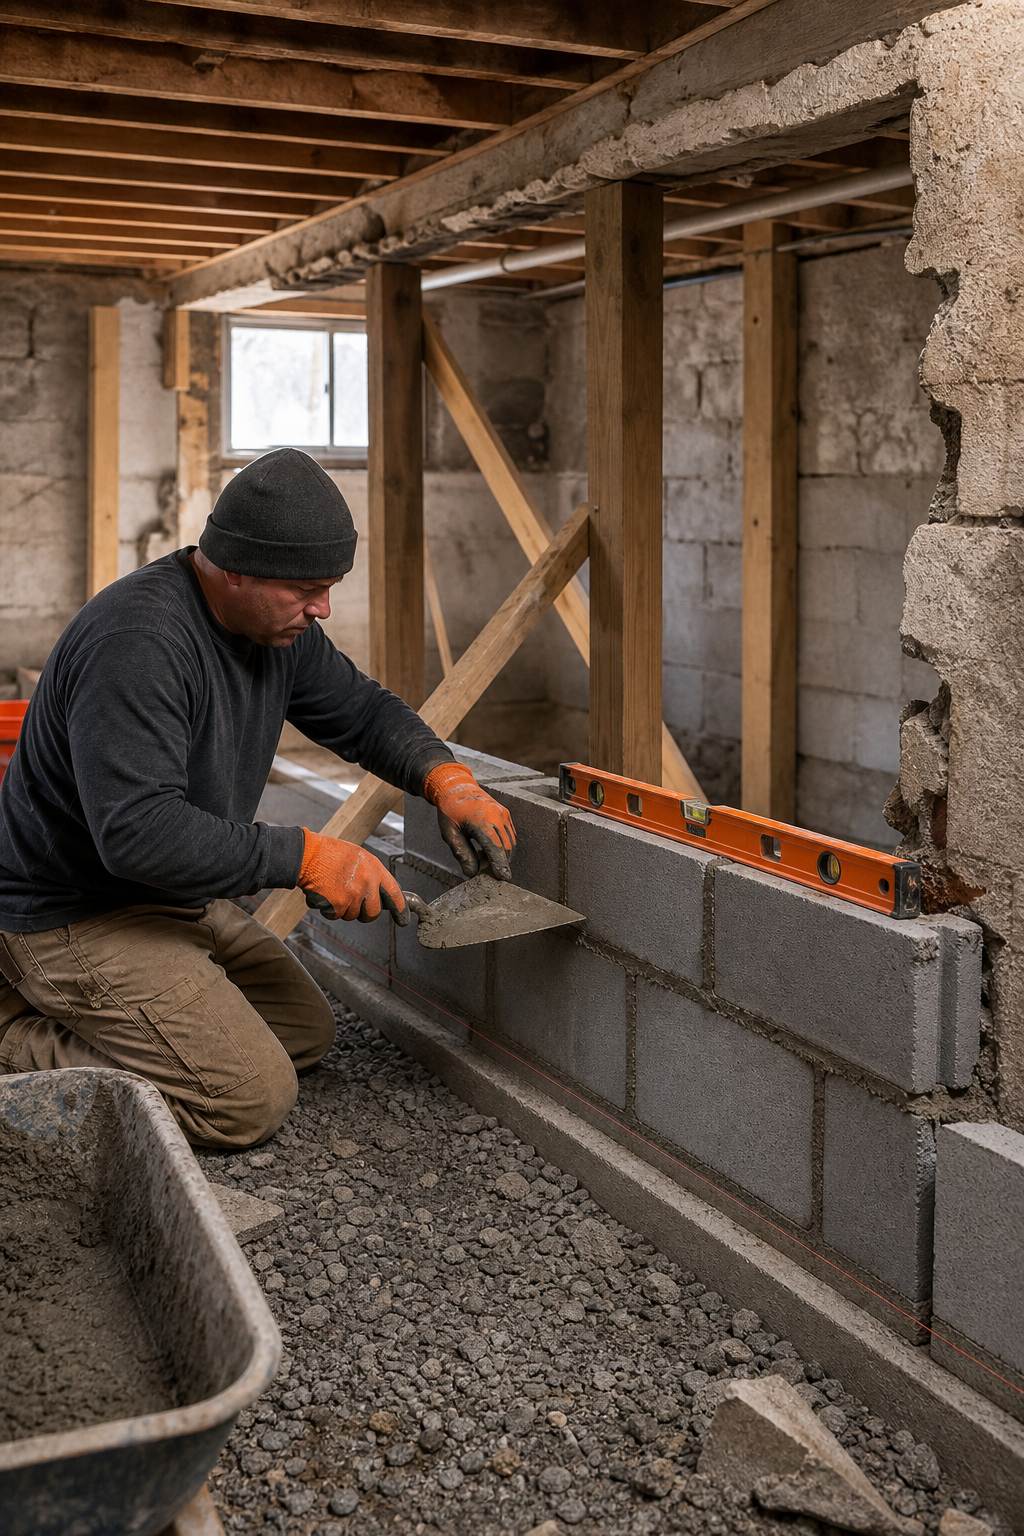
Keep mortar joints between 3/8 and 1/2 inch thick. Thicker joints are weaker. Butter the face shells of each block , you don't need to fill the entire web cavity with mortar unless you're planning to grout the cores for added strength, which is worth doing if the original wall had solid grouted cores.
If your original wall had rebar, match it. Set vertical rebar in the block cavities every 24 inches and fill those cores solid with cement grout. This brings the repair up to the same structural standard as the rest of the wall. A wall section that's weaker than what surrounds it becomes the next failure point.
Check plumb and level after every two courses. Small errors compound fast. If a course is off by 1/8 inch, the next course amplifies it. A wall that's out of plumb at the top won't seat properly against the floor system, and your temporary bracing won't come down cleanly.
At the top course, pack mortar firmly between the new wall and the floor structure above. This is the connection point that transfers load from the house down through the wall , it needs to be solid with no voids. Let the mortar cure for at least 48 hours before removing temporary bracing. In cold weather, cover the repair with plastic sheeting and give it 72 hours minimum.
The LGFMH Construction team handles repairs exactly like this one , full replacement of damaged sections with properly matched materials, not just surface patching that fails in a season. If your wall has rebar requirements or the repair zone touches your footing, that's when having experienced hands on the job makes a real difference. You can see examples of this kind of structural repair work in the LGFMH Construction project portfolio .
Step 5: Waterproof and Backfill the Repaired Wall
A structurally solid repair that leaks is still a problem. Water is what broke the wall down in the first place , between freeze-thaw cycles, hydrostatic pressure, and the salt content of most soils, an unprotected concrete block wall has a limited lifespan.
Once the mortar has fully cured (at least 48 to 72 hours), apply a waterproofing membrane to the exterior face of the new section before backfilling. Brush-applied crystalline waterproofing products bond to the concrete matrix and block water at the surface. For more serious water exposure, a peel-and-stick waterproofing membrane gives you an additional physical barrier.
On the interior side, a coat of hydraulic cement over any joints that showed active leaking, followed by a penetrating waterproof sealer on the whole repaired area, keeps moisture vapor out of the basement space.
When you backfill, do it in layers. Add 6 to 8 inches of fill at a time and compact each layer before adding more. Dumping all the excavated soil back in one go creates voids and uneven pressure against the fresh repair. Use granular fill (crushed stone or gravel) directly against the wall for the first 12 inches , it drains better than clay and reduces hydrostatic pressure significantly.
Grade the soil away from the foundation at a slope of at least 6 inches over the first 10 feet. Poor grading is one of the most common reasons basement walls fail , water pools against the foundation and never drains away. Check your downspout extensions too. Gutter discharge that dumps right next to the foundation undoes all this work within a few wet seasons.
When to Call a Professional Instead
Some basement wall problems are genuinely beyond DIY. Knowing where that line is saves you from making a dangerous situation worse.
Call a structural engineer or an experienced contractor like LGFMH Construction if you find any of these:
Horizontal cracks with visible inward bowing , even 1 inch of deflection in a block wall is a structural emergency
The wall has moved or tilted at the base, indicating footing failure
Cracks reappear within weeks of patching, which means active movement is still happening
The repair zone is longer than 8 to 10 feet, or it spans a corner
Water is entering under pressure, not just seeping through
The floor system shows signs of distress , bouncy floors, gaps at the sill plate, doors that won't close
Bowing walls in particular are not a DIY repair. According to Penn Valley Engineering's structural assessment guidance, horizontal cracking at mid-height combined with inward buckling is a common defect in unreinforced masonry block walls and warrants repair as soon as possible , the recommended fix involves steel rebar installed every 24 inches through the full length of the affected wall, filled solid with cement grout. That's a job for a licensed contractor with the right equipment.
The cost of professional repair scales with severity. Minor reinforcement with carbon fiber straps runs a few hundred dollars per strap. Wall anchors requiring excavation can reach $400 to $700 each. Full replacement on an extensively damaged wall runs into the thousands. Acting early, before a repairable crack becomes a failed wall, is where you save real money.
A structural engineer's report , typically $250 to $500 , gives you an unbiased assessment and often satisfies permit requirements before a contractor starts work. Some municipalities require it. It's money well spent before committing to a major repair scope.
FAQ
Can I patch a cracked basement wall instead of replacing the whole section?
Yes, if the crack is narrow (under 1/4 inch wide), vertical, and shows no signs of movement or bowing. Hydraulic cement or a polyurethane injection can seal those cracks effectively. But if the crack is horizontal, wider than 1/4 inch, or accompanied by any inward deflection, patching won't fix the underlying structural problem , you need to replace the damaged section or call a contractor.
How long does it take to replace a cracked basement wall section?
A typical DIY repair covering 4 to 8 feet of wall takes a full weekend , one day for demolition and prep, one day for laying new block. Add another day for waterproofing and backfilling once the mortar cures. Professional crews with the right equipment can do the same scope in a single day. Cold weather or active water intrusion can extend the timeline.
What type of mortar should I use for a basement wall repair?
Use Type S mortar for any below-grade masonry repair. It handles moisture better than Type N and has the compressive strength needed for structural applications. Pre-mixed bags labeled for masonry or block work are fine. Avoid tile grouts or general-purpose construction adhesives , they're not rated for below-grade structural use and will fail.
Do I need a permit to replace a section of my basement wall?
In most jurisdictions, yes , any work that affects the structural integrity of your foundation requires a building permit. Some areas also require a stamped structural engineer's report before work begins. Check with your local building department before starting. Working without a permit can create problems when you sell the property and may void your homeowner's insurance if something goes wrong.
How do I stop water from coming through a repaired basement wall?
Apply a crystalline waterproofing membrane to the exterior face before backfilling, and use a penetrating waterproof sealer on the interior. Beyond the wall itself, grade soil away from the foundation at a 6-inch drop over 10 feet, extend downspouts at least 6 feet from the house, and use granular backfill directly against the wall to reduce hydrostatic pressure. Interior drainage systems can manage any remaining seepage.
Conclusion
A cracked basement wall is fixable if you catch it early and work methodically , assess the damage honestly, prep the site carefully, and don't skip the waterproofing after the blocks are in. For anything involving bowing, horizontal cracking, or a repair zone longer than 8 feet, get a professional involved before the problem doubles in scope. LGFMH Construction handles exactly this kind of structural repair work, from single-section replacements to full foundation assessments. If you're not sure whether your wall qualifies as a DIY fix, reach out for an evaluation before picking up the chisel.


Comments