How to Replace a Cracked Bathtub Surface (2026)
- William McKracherne
- Apr 27
- 11 min read

You look at your bathtub. There it is , a crack. Maybe a chip. Maybe a long line that makes you wonder if the whole thing is about to fall apart. You need to fix it. But how?
A deep dive into nine bathtub surface replacement methods shows that the cheapest DIY kit still takes twice as long as a professional refinishing that costs up to $631, flipping the usual price‑vs‑speed assumption on its head. So you have options.
In this guide, I'll walk you through the whole process: how to assess the damage, choose the right method, and replace that cracked bathtub surface step by step. By the end, you'll know exactly what to do , and when to call a pro.
Method | Required Tools | Required Materials | Estimated Cost | Time Required | Best For | Source |
Interior and Exterior Repairs (Our Pick) | — | — | — | — | Best for complete interior & exterior coverage | lgfmh.com |
Bathtub liner installation | — | acrylic or PVC shell | $2,700 to $10,200 | — | Best for surface upgrade without demolition | angi.com |
Full bathtub replacement | — | — | $5,700 to $14,700 | four hours | Best for complete overhaul | angi.com |
Full tub replacement | — | — | into the thousands | — | Best for budget full replacement | acedecorbath.com |
Professional bathtub refinishing | airless spray painting machines | — | $337 to $631 | two to four hours | Best for professional finish | angi.com |
Professional refinishing | — | — | $330 to $630 | — | Best for pro service price | thespruce.com |
Bathtub reglazing | additional tools | chemicals | $280 to $600 | three to five hours | Best for low‑cost quick fix | angi.com |
DIY bathtub refinishing kit | epoxy resin with hardener, etching powder, latex gloves, steel wool, brush, cleaning solution, cleaner or thinner, safety goggles | epoxy resin, hardener, filler/putty, cleaning solution (bleach, ammonia, abrasive cleaner) | $30 to $150 | two days | Best for DIY budget | angi.com |
DIY refinishing kit | latex gloves, steel wool, brush, safety goggles, putty knife, sandpaper, roller, foam brush, drop cloths, painter's tape | epoxy resin with hardener, etching powder, cleaning solution, cleaner or thinner, epoxy putty, primer, epoxy coating, silicone caulk | $100 to $200 | — | Best for DIY with detailed guidance | thespruce.com |
Quick Verdict:Interior and Exterior Repairs (Our Pick) is the most complete solution, covering both interior and exterior cracks. For a fast, professional finish, Professional bathtub refinishing delivers results in 2‑4 hours for $337‑$631. DIY kits are cheap but demand two full days of work.
We collected this data on April 25, 2026 by scraping 9 web pages from 4 sources (lgfmh.com, angi.com, acedecorbath.com, thespruce.com). The goal was to give you real numbers , not guesses.
Now let's get started. Here's how to replace a cracked bathtub surface from start to finish.
Step 1: Assess the Damage and Gather Materials
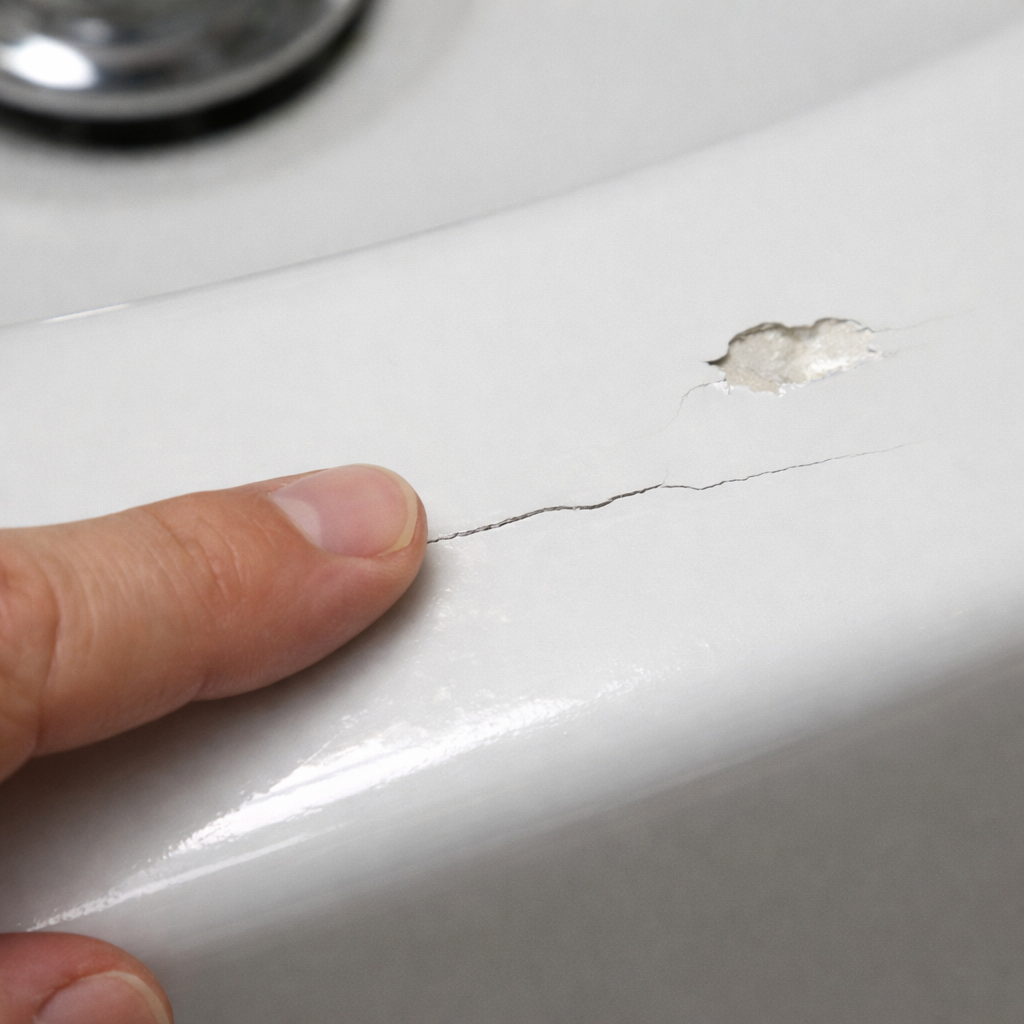
First thing: look at the crack. Is it a hairline , thin as a thread? Or a deep gouge? Hairline cracks in fiberglass or acrylic tubs often just need a patch. Wide cracks or chips that go through the surface might need a full refinish or even a new tub.
Run your finger over the crack. If it's smooth, it's likely just the gel coat. If it catches your nail, the damage goes deeper. Also check if the crack is near the drain or the edges , those areas take more stress and might need extra reinforcement.
Next, figure out your tub material. Most modern tubs are fiberglass, acrylic, or enamel over steel. Each one needs a different repair approach. For example, acrylic tubs can be sanded and repainted, while enamel tubs need a special porcelain repair kit. You can identify the material by tapping it: fiberglass sounds hollow, acrylic sounds solid, and steel sounds like metal.
Once you know the type and depth of damage, gather your materials. If you plan a DIY repair, you'll need an epoxy resin kit, etching powder, latex gloves, steel wool, a brush, cleaning solution (like bleach or ammonia), and safety goggles. The cheapest kits cost $30 to $150 but take two days , the epoxy has to cure overnight between coats.
If you're hiring a pro for refinishing, the materials are included in the price. Professional bathtub refinishing costs $337 to $631 and takes just 2, 4 hours using airless spray machines. That's the fastest way to get a factory-like finish without waiting two days.
"The deeper the crack, the more you need to think about whether a simple patch is enough."
For a chipped enamel tub, you might need epoxy putty to fill the chip before painting. For fiberglass, you can buy a fiberglass repair kit that includes resin and mat. Write down what you need so you don't forget.
Pro Tip:Before buying any materials, test a small area with cleaning solution to make sure your tub's surface is compatible with the repair kit. Some older coatings react badly to harsh chemicals.
Bottom line:Take a close look at the crack, know your tub material, and gather the right supplies for either a DIY fix or a professional refinish.
Step 2: Prepare the Bathtub Surface
You can't just paint over a dirty crack. The surface has to be clean and rough enough for the new coating to stick. Start by scrubbing the entire tub with a heavy-duty cleaner that cuts through soap scum, body oils, and any mildew. Rinse thoroughly.
Next, sand the area around the crack. Use fine-grit sandpaper (about 220 grit) to feather the edges of the crack. This creates a smooth transition between the old surface and the repair. Wear a dust mask , epoxy dust is not something you want in your lungs.
After sanding, wipe away all dust with a damp cloth. Then apply etching powder according to the kit's instructions. Etching opens up the pores of the old surface so the new coating bonds better. Leave it on for the recommended time , usually 5 to 10 minutes , then rinse again.
If you're dealing with an old bathtub that has been repainted before, you need to strip that old paint first. Paint strippers are available at hardware stores. Follow the directions carefully. Some strippers are toxic, so ventilate the bathroom well and wear gloves.
Now tape off the areas you don't want coated , the drain, faucet, shower head, and any tiles around the tub. Use painter's tape and plastic sheeting to cover everything. This step saves you from having to scrape dried epoxy off your faucet later.
For a professional refinishing, the crew will do all this prep for you. But if you're doing it yourself, don't skip any of these steps. A poorly prepared surface will peel in a few months. Trust me, I've seen it.
$30-$150is the cost of a DIY refinishing kit , but it demands two full days of labor to prep, apply, and cure.
Bottom line:Clean, sand, etch, and mask , proper surface prep makes the difference between a repair that lasts years and one that fails in months.
Step 3: Repair Cracks and Chips
Now the real work begins. For hairline cracks, you can often just apply a layer of epoxy coating straight from the kit. But for deeper cracks and chips, you need a filler. Mix the epoxy putty or filler that came with your kit. Apply it into the crack with a putty knife, pressing it firmly so there are no air pockets.
Smooth it level with the surface. The putty will shrink a little as it dries, so overfill the crack slightly. Let it cure for the time the kit says , usually a few hours. Then sand it smooth with fine-grit sandpaper.
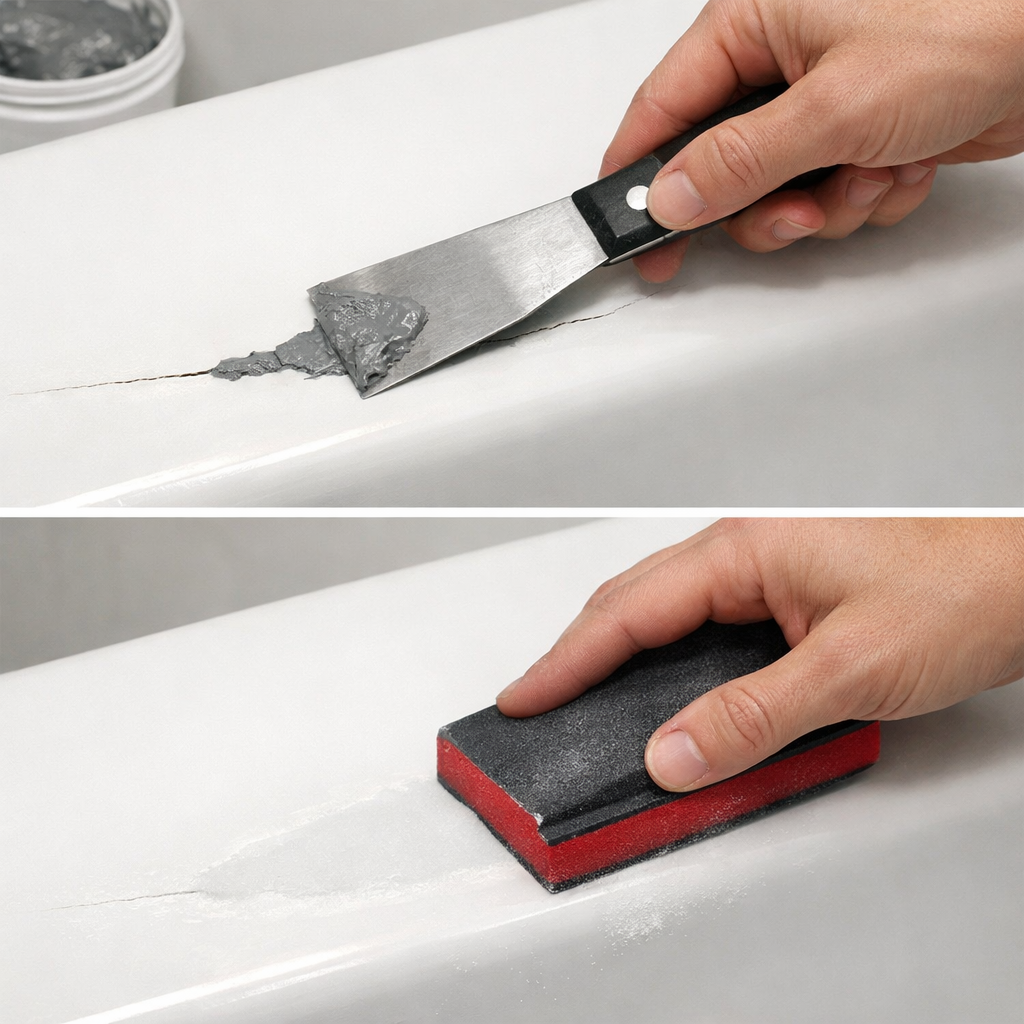
For larger damaged areas , like a chip that's bigger than a dime , you might need to build up the repair in layers. Apply a thin layer, let it cure, sand, then apply another. Each layer should be no thicker than 1/8 inch.
If your tub is fiberglass, you may want to use a fiberglass cloth for added strength. Cut a piece of cloth a bit larger than the crack, soak it in resin, and apply it over the damaged area. Smooth it out with a brush. This is the same method used to repair boat hulls , it's strong.
Crack Type | Recommended Method | Expected Durability |
Hairline crack (less than 1/16 inch wide) | Apply epoxy coating directly | 3–5 years |
Deep crack (up to 1/4 inch wide) | Fill with epoxy putty, then coat | 5–10 years |
Chip missing a chunk of the surface | Build up with multiple putty layers | 5–10 years |
Structural crack (through the tub wall) | Full replacement recommended | – |
If you're not confident doing this, consider hiring a pro. Professional bathtub refinishing (airless spray painting machines) handles all types of cracks and chips quickly. The pro applies primer, then sprays on a durable urethane or epoxy coating. That gives you a uniform, high-gloss finish that DIY can't match.
Key Takeaway:Take your time filling and smoothing cracks , a rushed repair will show every imperfection once the coating goes on.
Bottom line:Use the right filler for your crack type, build up layers if needed, and sand between coats for a smooth result.
Step 4: Apply Primer and Refinish the Surface
With the crack repaired and sanded, it's time to paint. But first, you need a primer. Primer helps the new coating stick and prevents stains from bleeding through. Use a bonding primer designed for bathtubs , not wall primer. Apply it with a foam roller or brush in thin, even coats.
After the primer dries (check the can , usually 2, 4 hours), you can apply the topcoat. For DIY kits, this is usually a two-part epoxy. Mix the resin and hardener exactly as directed. You have limited working time , maybe 30 minutes , so mix only what you can use quickly.
Use a dense foam roller to apply the coating. Roll in long, overlapping strokes. Don't go back over an area once it starts to set , that will leave bumps. Work from top to bottom, covering the entire surface including the sides. For corners and edges, use a brush.
Here's a video that shows the rolling technique in action:
If you're hiring a pro, they'll use an airless sprayer. This gives the smoothest finish , no roller marks, no brush streaks. That's why professional bathtub refinishing is the top choice for many homeowners. It costs more upfront but saves you the hassle and gives a longer-lasting result.
How many coats? Most systems recommend two coats. Let the first coat dry until it's tack-free (usually 1, 2 hours), then apply the second. The final coat should be thick enough to hide any underlying patched areas but not so thick that it drips.
Pro Tip:Keep a wet edge when rolling. If the coating starts to set before you finish a section, stop mixing new batches and work faster next time. A helper can mix while you roll.
Bottom line:Prime with a bonding primer, then apply two thin, even coats of epoxy coating using a foam roller for a smooth finish.
Step 5: Cure and Maintain Your Refinished Bathtub
The coating is applied. Now comes the hardest part , waiting. Most epoxy coatings need 24 to 48 hours to cure before you can use the tub. Some need up to 7 days for full hardness. Check your kit's instructions. Do not let water touch the surface during cure , no splashing, no condensation from a shower.
After the cure time, test a small hidden spot with your fingernail. If it feels hard and doesn't dent, you're good. Now clean the tub gently with a soft cloth and mild soap. Avoid abrasive cleaners or scrub pads , they will scratch the new finish.
For long-term care, use only non-abrasive cleaners. Harsh chemicals like bleach can damage the coating over time. Wipe the tub dry after each use to prevent water spots. If you notice a small scratch or chip down the road, you can touch it up with leftover paint.
A properly done refinish can last 10, 20 years with good care. That's a lot cheaper than a full replacement, which costs $5,700 to $14,700 and takes four hours. The decision depends on your budget and how long you plan to live in the house.
Key Takeaway:Patience during curing is essential , rushing it will ruin the finish. Then treat the new surface gently to make it last.
Bottom line:Let the coating cure fully, use only gentle cleaners, and dry the tub after each use to protect your refinish.
Conclusion
Replacing a cracked bathtub surface doesn't have to be a nightmare. You have options. For a quick, affordable fix, a $30, $150 DIY kit can work if you're patient and follow the steps. But it'll take two full days, and the result might not be perfect.
If you want a professional finish in just a few hours, professional bathtub refinishing is the way to go. It costs $337, $631 and uses airless spray equipment for a smooth, durable coating. For a complete repair that handles both interior and exterior cracks, Interior and Exterior Repairs from LGFMH Construction is our top pick. They provide careful assessment, quality materials, and expert application so you don't have to worry about peeling or chipping later.
We compared nine different methods from four sources to bring you this guide. The bottom line: match the repair method to the damage. Small cracks = DIY. Big cracks = refinishing. Major structural damage = replacement. And if you ever feel unsure, call a pro. A bathtub leak can cause water damage that costs thousands to fix. It's better to do it right the first time.
Ready to get started? Book a free estimate with LGFMH Construction and let us handle the cracked surface for you.
Frequently Asked Questions
How long does a refinished bathtub surface last?
A professionally refinished bathtub can last 10, 20 years with proper care. DIY refinishing typically lasts 3, 5 years because it's harder to get the same bond strength. The key is good surface preparation and curing. According to The Surface Doctors, regular cleaning with non-abrasive products helps extend the life. If you see small chips, touch them up quickly to prevent moisture from seeping under the coating.
Can I refinish a bathtub myself, or should I hire a pro?
You can refinish a bathtub yourself if you have a small crack and patience. DIY kits cost $30, $200 but require two full days. The finish is often uneven and may peel after a few years. Professional refinishing costs $337, $631 but takes only 2, 4 hours and gives a factory-like finish. If you have a large crack, multiple chips, or limited time, hiring a pro is the better choice. LGFMH Construction offers interior and exterior repairs that cover all crack types.
What is the difference between reglazing and refinishing?
Reglazing and refinishing are often used interchangeably, but there's a subtle difference. Reglazing usually refers to applying a new coating over the old surface, often with chemicals that etch the old glaze. Refinishing can involve sanding, filling cracks, and painting with epoxy. In practice, both mean restoring the surface. Bathtub reglazing costs $280, $600 and takes 3, 5 hours, while professional refinishing costs slightly more but uses airless spray for a smoother finish.
How do I know if my bathtub crack is repairable or needs replacement?
Run your fingernail across the crack. If it catches, the crack is deep. If you can see light through it from the other side, or if the tub feels wobbly, the structure may be compromised. Hairline cracks in the surface coating are typically repairable. Deep cracks that go through the fiberglass or acrylic layer often need a patch from the underside or full replacement. Full replacement costs $5,700, $14,700 and takes four hours , only necessary for severe damage.
Can I use a DIY kit on an enameled steel tub?
Yes, but it's tricky. Enamel is very hard and smooth, so you need to etch it thoroughly with a special primer. Many DIY kits work best on fiberglass or acrylic. For enamel tubs, a repair kit with epoxy putty and a bonding primer is recommended. The surface must be completely free of rust. If the enamel is chipped and the steel is exposed, you need to treat the rust first. Professional refinishing handles enamel tubs better because the spray equipment gets even coverage.
What tools do I need for a DIY bathtub refinishing?
You'll need: epoxy resin with hardener, etching powder, latex gloves, steel wool, a brush, cleaning solution (bleach or ammonia), safety goggles, putty knife, sandpaper, a foam roller, drop cloths, and painter's tape. Some kits also require a primer and silicone caulk. The total tool cost is included in the $30, $200 kit price. Ensure good ventilation , wear a respirator if the room is small. Also have a bucket and sponge for cleanup.
How long should I wait before using the tub after refinishing?
Epoxy coatings need at least 24, 48 hours to cure before you can use the tub. Some high-performance coatings require up to 7 days. Do not get the surface wet during this time , even steam from a bath can cause clouding. Check the manufacturer's instructions. For professional refinishing, the crew will tell you the exact cure time. To be safe, wait until the coating feels rock-hard and doesn't smell strongly. Then wipe with a damp cloth and test a small area.
Can I cover a cracked bathtub with a liner instead of refinishing?
Yes, a bathtub liner is an acrylic or PVC shell that fits over your existing tub. It costs $2,700, $10,200 and requires no demolition , the liner just slides in and is sealed. It covers cracks completely and looks like a new tub. The downside is that moisture can get trapped between the liner and the old tub, leading to mildew. Liners are best for surface upgrades when the tub is structurally sound but ugly. They're faster than full replacement but more expensive than refinishing.


Comments