Roof Leak Repair Virginia Beach: A Complete Step‑by‑Step Guide
- William McKracherne
- Dec 28, 2025
- 20 min read

Ever woken up to the sound of water dripping from your ceiling, wondering how a sunny Virginia Beach morning turned your bedroom into a mini indoor pool?
You're not alone. Many homeowners on the coast discover that a tiny spot on the roof can become a full‑blown leak the moment a gust picks up sand and salt, and before you know it you’re scrambling for buckets and towels.
What we’ve seen most often is a combination of aging shingles, clogged gutters, and those sneaky wind‑driven hailstones that punch tiny holes you can’t see from the ground. The result? Roof leak repair Virginia Beach becomes an urgent task, not a weekend project.
So, how do you stop the drip before it damages your floors, walls, or even your favorite family photos?
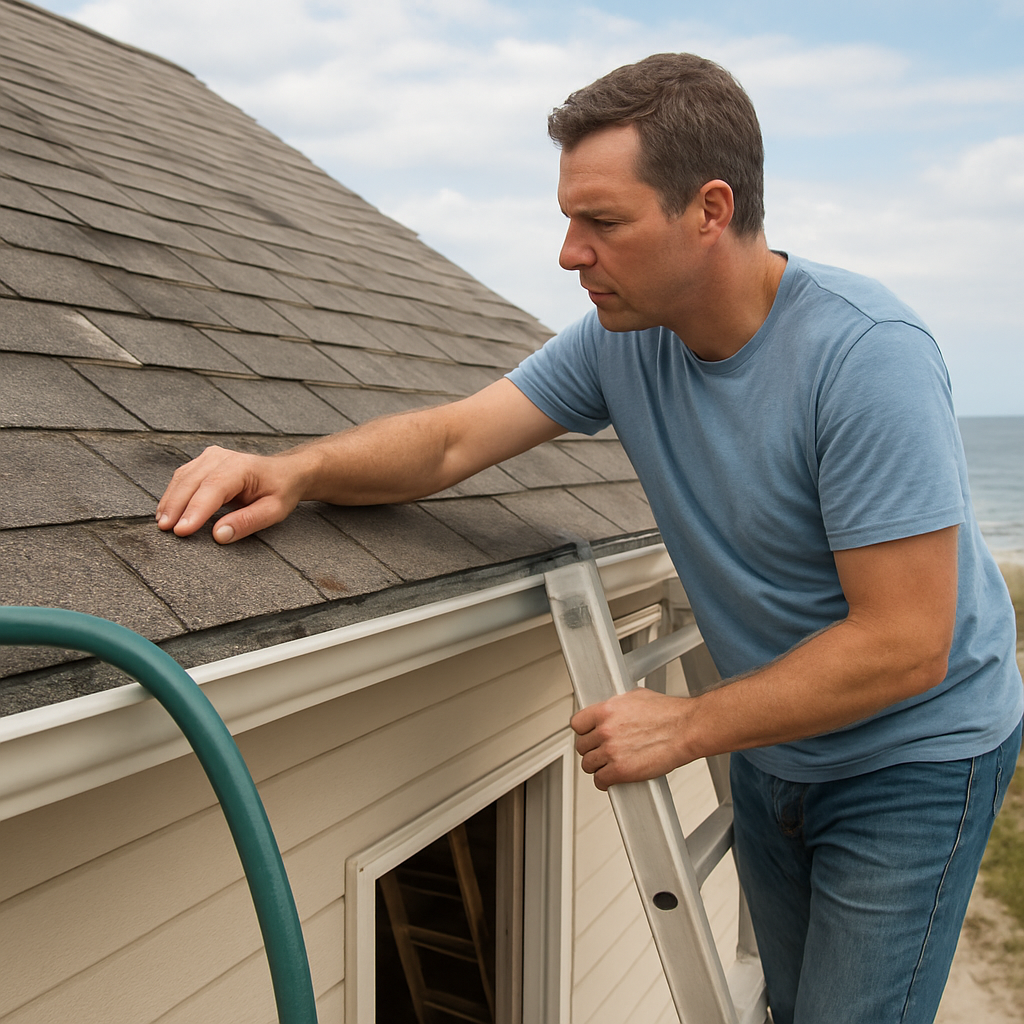
First, give the roof a quick visual scan from the safety of the ground. Look for cracked or missing shingles, especially around roof penetrations like vents or chimneys. Next, check your gutters – a pile of leaves can force water under the shingles and into the attic.
If you spot any of those red flags, the smartest move is to call a local pro who knows the quirks of coastal weather. In our experience, a timely inspection can pinpoint the exact entry point, saving you from costly water damage later.
But you don’t have to wait for a contractor to arrive to start protecting your home. Grab a garden hose, run a gentle stream over the suspected area, and watch for any seepage inside. That simple test often reveals hidden cracks that a casual glance would miss.
And here’s a quick tip: keep a small bucket and a towel handy in the attic during the rainy season. It buys you time to call for help and prevents a small puddle from turning into a swollen ceiling.
At the end of the day, roof leak repair Virginia Beach is all about catching the problem early, understanding the local weather’s impact, and taking decisive steps before the water spreads.
Ready to take control? Let’s dive into the step‑by‑step guide that will walk you through assessing the damage, DIY safety measures, and when it’s time to bring in the experts.
TL;DR
A roof leak in Virginia Beach can turn a storm into a ceiling flood, but a hose test and a bucket in the attic often catches it early.
Act fast, call LGFMH Construction if water persists, and you’ll save costly damage and protect your home today for peace of mind.
Step 1: Identify the Leak Source
First thing’s always to stop wondering where that drip is coming from and actually go looking for it. In Virginia Beach the salty air and occasional gusts can hide a tiny roof breach behind a pile of leaves, so you need a game plan that feels more like a detective hunt than a quick glance.
Visual sweep from the ground
Grab a sturdy ladder, stand back, and scan the roof like you’d scan a grocery aisle for that one missing ingredient. Look for cracked, curling, or missing shingles, especially around roof penetrations – vents, chimneys, skylights. Those are the usual suspects. If you see a black streak or a patch of moss, that could be a clue that water is lingering longer than it should.
And don’t forget the gutters. A clogged gutter forces water to back‑up under the shingles, creating a sneaky entry point that often shows up as a ceiling stain a few days later. A quick scoop of leaves and a rinse with the hose can save you a lot of guesswork.
Hose test – your portable rainstorm
Now grab a garden hose and turn it into a controlled rainstorm. Start at the lowest point of the suspected area and work your way up, keeping the water flow steady but not blasting. Watch the interior – the attic, the ceiling, the walls – for any sign of moisture. If a drop appears, you’ve just found the leak’s address.
It feels a bit like a science experiment, but it’s actually the fastest way to pinpoint a hidden crack without waiting for the next storm. Pro tip: have a friend hold a flashlight inside the attic while you run the hose; the beam will highlight any damp spots instantly.
Attic inspection – the hidden theater
Climb up into the attic with a flashlight and a dry towel. Look for water stains, dark rings, or even a faint smell of mildew. Those are the breadcrumbs that tell you which part of the roof is letting water in.
Sometimes the water will run down a joist and pool in a low spot, creating a “wet patch” that can be several feet away from the actual breach. Trace the drip back toward the roof edge – you’ll often find a tiny puncture or a loose shingle right where the water starts its journey.
Does this feel a little messy? That’s intentional. A roof leak isn’t tidy, and embracing the chaos helps you see the problem clearly.
Here’s a quick checklist you can print out and tape to the back of the door while you work:
Check shingles for cracks or missing pieces.
Clear gutters and downspouts.
Run a hose test from low to high.
Inspect attic for stains, drips, or moldy smells.
If you need a printable version of that checklist, a simple custom print shop can crank it out in minutes. I’ve used Jiffy Print Online for fast, affordable prints when I’m on the job.
While the video walks you through the hose test step‑by‑step, keep an eye on the attic after you finish. A single drop that seems harmless can turn into a ceiling collapse if you ignore it for too long.
And remember, you don’t have to be a roofing contractor to do the basics. If you’re buying a home in a nearby market like Woodmere, NY, the same inspection mindset applies. A handy guide like the Woodmere home‑buying guide reminds buyers to look for roof health early, saving thousands down the line.
Once you’ve isolated the source, you can decide whether a simple shingle replacement will do or if the damage has spread to the decking. In either case, having the exact spot documented makes the conversation with a pro – like LGFMH Construction – far smoother and less pricey.
Lastly, if you need a quick way to carry tools up to the roof without juggling a heavy bag, check out the Plug n Carry store . They specialize in lightweight tool belts that stay put even on a breezy day.
Identify the leak source, document it, and you’ve already cut the repair timeline in half. The next step will show you how to safely stop the water while you plan the full fix.
Step 2: Inspect Roof Materials and Damage
Now that you’ve zeroed in on the general leak area, it’s time to get up close and personal with the roof itself. Think of it like a doctor’s exam – you’re looking for the tell‑tale signs that something’s gone wrong, but you’re doing it with a ladder, a flashlight, and a healthy dose of curiosity.
Start on the surface: shingles, tiles, and metal panels
Walk the roof (or have a sturdy friend hold the ladder) and scan each row of shingles. In Virginia Beach, salty air and gusty winds love to pry at the edges, so pay extra attention to:
Cracked or curled shingles – a sign the material’s been stressed.
Missing granules – you’ll see a powdery residue in the gutters.
Loose metal panels or seams that have started to separate.
When you spot a problem, tap it gently with your knuckle. A solid “thud” means it’s still attached; a hollow sound often means the underlayment is compromised.
Check the flashing and roof‑to‑wall connections
Flashing is the thin metal that wraps around vents, chimneys, and roof‑line joints. In coastal towns, flashing can corrode faster than the surrounding shingles. Look for rust, cracks, or gaps where water could slip behind it.
Here’s a quick trick: run a thin garden hose over the flashing while a buddy watches the attic. If you see moisture seeping at the seam, that flashing is the culprit.
Don’t forget the roof deck and sheathing
Once you’ve examined the outer layer, peek under it. If you have an attic hatch, pull back the insulation and shine a bright flashlight onto the roof deck. You’re hunting for:
Water stains or dark patches on the plywood.
Soft spots that flex under pressure – a sign of rot.
Any mold or mildew growth, which tells you moisture has been hanging around for a while.
In one real‑world example, a homeowner in Virginia Beach thought a single cracked shingle was the whole story. A closer look at the deck revealed a small area of water‑logged plywood that would have led to a sagging ceiling if left untreated.
Gutter and downspout inspection
Gutters are the unsung heroes of roof leak repair in Virginia Beach. A clogged gutter forces water to back‑up under the first row of shingles, creating a hidden leak. Pull the gutters down, scoop out debris, and run water through them to make sure they flow freely.
While you’re at it, check the downspout extensions. If water is spilling right at the foundation, it can travel up through capillary action and show up on the roof interior.
Document everything
Grab your phone and take a photo of each issue you find. Label the image with a short note – “northwest ridge, cracked flashing near vent”. Jot down the exact location and the type of damage. This record will be gold when you call a pro or file an insurance claim.
Tip: create a simple spreadsheet with columns for “Location”, “Material”, “Damage Type”, and “Photo”. You’ll thank yourself when you need to reference it later.
When to call the pros
If you discover any of the following, it’s time to bring in LGFMH Construction for roof leak repair Virginia Beach:
Multiple shingle failures in the same area.
Rotting roof deck or extensive moisture on the sheathing.
Corroded flashing that can’t be resealed with a simple caulk.
Structural concerns like sagging roof lines.
These issues often require specialized tools, safety equipment, and a warranty‑backed repair.
Actionable checklist before you finish
1. Walk the roof and note any cracked, curled, or missing shingles.
2. Inspect all flashing for rust or gaps.
3. Look at the roof deck from the attic for stains or soft spots.
4. Clean gutters and verify proper drainage.
5. Photograph and label each finding.
6. Decide whether the repair is DIY‑friendly or needs a pro.
By the end of this inspection, you’ll have a clear picture of what’s broken, where it’s broken, and how urgent the fix is. That clarity makes the next step – actually sealing the leak – a lot less stressful.
Step 3: Choose the Right Repair Method
Now that you’ve catalogued every cracked shingle, rusted flash, and soggy deck board, the real decision begins: do you roll up your sleeves and DIY, or call in the pros? The answer isn’t one‑size‑fits‑all – it hinges on the damage’s severity, your comfort level with a ladder, and how quickly you need the leak sealed.
Assess the damage before you pick a method
Take a step back and ask yourself: is the problem a single cracked shingle, a failing flashing, or a rot‑ridden roof deck? A tiny nail‑hole can often be patched with a roll of roofing cement, but a water‑logged deck usually means a full section replacement.
Write down the scope in plain language – “one shingle on the north side” versus “half the ridge line is soft”. That simple inventory will steer you toward the right repair path.
DIY‑friendly fixes
If the issue is limited to a few shingles or a loose flash, you can probably handle it yourself. Here’s a quick checklist:
Gather a pry bar, roofing cement, replacement shingle, and a utility knife.
Secure a sturdy ladder and wear a non‑slip harness if the roof is steep.
Lift the damaged shingle, slide the new piece under the existing row, and seal the edges with cement.
For flashing, clean the area, apply a high‑temperature sealant, and press a new metal strip over the seam.
When a professional is the safer bet
Multiple shingle failures, extensive deck rot, or corroded flashing that won’t seal are red flags. In those cases, a licensed contractor brings the right tools, safety equipment, and a warranty that protects your home for years. It’s also the fastest way to keep water out during the next storm.
Our experience at LGFMH Construction shows that homeowners who wait too long on structural damage often face higher repair bills down the road.
Pick the right materials for Virginia Beach
The salty sea breeze can accelerate corrosion, so choose materials rated for coastal conditions. Asphalt shingles with a fiberglass backing, aluminum flashing with a protective coating, and polymer‑based sealants all hold up better against salt spray.
If you’re unsure which product will survive another hurricane season, a quick glance at your water bill can give clues. An unexpectedly high usage might signal a hidden plumbing leak that’s compounding the roof problem – you can check your water usage to rule that out before you spend on roofing.
Safety first, always
Never underestimate the danger of a steep, wet roof. Keep a partner on the ground, use a harness, and avoid working in high winds. If the weather turns, pause and let a professional handle the exposure.
Ready for a visual guide? The video below walks you through sealing a single shingle and installing a replacement flash – perfect for a quick weekend project.
After watching, compare your situation to the decision table. It condenses the key factors into a quick reference you can print and keep in your toolbox.
Repair Method | When to Use | Pros / Cons |
DIY shingle patch | One‑to‑three isolated shingles, accessible roof slope | Low cost, fast; limited lifespan if underlying deck is compromised |
Professional flashing replacement | Corroded or cracked flashing around vents, chimneys, or roof lines | Warranty‑backed, handles complex geometry; higher price |
Full deck/section replacement | Rotting plywood, widespread water damage, structural concerns | Long‑term solution, restores structural integrity; most expensive, requires pro |
Bottom line: match the method to the damage, your skill set, and the urgency of stopping water. If you’re comfortable with a ladder and the repair is small, go DIY with the right coastal‑grade materials. If the roof shows signs of systemic failure, call LGFMH Construction – a quick professional fix saves you headaches later.
Step 4: DIY Repair Techniques
So you’ve pinpointed the leak, checked the deck, and decided you’re comfortable enough to roll up your sleeves. Great! DIY roof leak repair in Virginia Beach can feel like a small victory, especially when the weather’s calm and you’ve got the right tools on hand.
Gather the right kit before you climb
First thing’s first: safety and materials. Grab a sturdy ladder with a wide base, a non‑slip harness if the pitch is steep, and a pair of slip‑resistant shoes. For the repair itself you’ll need a utility knife, pry bar, roofing cement or polymer‑based sealant, a bundle of matching shingles (coastal‑grade fiberglass‑backed is best), a hammer, and a few galvanized nails.
Don’t forget a bucket of water, a tarp to protect the area below, and a chalk line to mark your work zone. If you’re in a historic district, you might also need to schedule a quick inspection through the Virginia Beach residential building permits portal – the city often requires a sign‑off for structural changes, even if it’s just a shingle swap.
Step‑by‑step: patching a single shingle
1.Loosen the damaged shingle.Slide the pry bar under the edge and gently lift it. If the nail heads are rusted, back them out with the hammer’s claw.
2.Remove the old nail.Pull it straight up – you don’t want to rip the surrounding shingles.
3.Prep the underlayment.Sweep away any debris, then apply a thin bead of roofing cement where the shingle sat. This acts as a moisture barrier.
4.Slide the new shingle into place.Align it so the tabs overlap the row below. Press down firmly and nail it with two galvanized nails, spaced about an inch from the edge.
5.Seal the seams.Run a generous line of sealant over the nail heads and the shingle edges. Smooth it with a putty knife so water can’t sneak under.
6.Test it.Grab the garden hose, set it to a gentle spray, and run water over the repaired area for five minutes. Peek inside the attic – no new drips? You’re good.
When the flashing is the culprit
If the leak traces back to metal flashing around a vent or chimney, the approach shifts a bit. Start by cleaning the flash with a wire brush to remove rust and old sealant. Then, apply a high‑temperature, marine‑grade sealant (they’re formulated for salty air). Press a new piece of aluminum flashing over the seam, overlap the old piece by at least two inches, and fasten it with corrosion‑resistant screws. Finish with a bead of sealant around every screw head.
In our experience at LGFMH Construction, homeowners who replace flashing with a proper sealant see the problem disappear for years, especially when they choose the “coastal‑grade” aluminum that resists salt‑induced corrosion.
Dealing with a small roof deck rot
Sometimes you’ll find a soft spot in the plywood beneath a shingle. If it’s less than a square foot, you can patch it without a full deck replacement. Cut a clean rectangle around the damaged area, pry out the rotted wood, and slide in a new piece of pressure‑treated plywood. Secure it with deck screws, then re‑install the roofing felt and a new shingle on top.
Remember, this is a temporary fix – if the rot is extensive, it’s better to call the pros before the water finds a bigger opening.
Quick checklist before you call it a day
• Ladder stable, harness on, buddy on the ground.
• All tools accounted for and clean.
• Shingles match the existing roof color and profile.
• Sealant applied evenly, no gaps.
• Five‑minute hose test passed.
• Document the repair with a photo for insurance records.
Does that feel doable? Most homeowners in Virginia Beach say the first patch gives them peace of mind until the next rain. And if a second leak shows up, you’ll already know the exact process to follow.
Bottom line: DIY roof leak repair in Virginia Beach isn’t magic, but with the right prep, safety gear, and a step‑by‑step plan, you can stop water in its tracks without waiting for a crew. When the job feels beyond a single shingle or a bit of flashing, that’s the cue to reach out to LGFMH Construction – we’ll handle the heavy lifting while you enjoy a dry home.Step 5: Hire a Professional When NeededSo you’ve patched that leaky shingle, cleared the gutters, and even gave the deck a quick skim. It feels good, right? But there’s a moment when you realize the problem is bigger than a weekend project – that’s when you call in a pro.Ever stood on the ladder, heart racing, and thought, “What if the roof gives way under my weight?” That fear isn’t just drama; it’s a real safety signal. If you’re unsure, it’s better to err on the side of caution.When DIY isn’t enoughDIY repairs work great for isolated issues: one cracked shingle, a loose vent flash, or a small patch of roof deck rot. They start to break down when you encounter any of the following:Multiple failed shingles in a row.Soft, spongy spots on the plywood that flex under pressure.Corroded flashing that won’t seal no matter how much caulk you squeeze.Visible water trails that snake across more than one attic joist.In those cases, you’re basically trying to patch a sinking boat with duct tape – it won’t hold for long.Red flags that signal a pro is neededHere are three tell‑tale signs that you should stop the ladder and pick up the phone:Structural concerns.If the roof deck feels hollow or you hear a creak when you step, the integrity of the whole roof could be compromised.Extensive water damage.Stains that are larger than a dinner plate, mold growth, or warped drywall mean water has been inside for weeks.Code or permit issues.Coastal Virginia Beach has strict building codes. If you need a permit for a repair, a licensed contractor will handle the paperwork.When any of these pop up, it’s time to bring in the experts.How to choose the right contractorNot all roofers are created equal, especially when salt‑air corrosion is in the mix. Start by checking that the company is licensed, insured, and has a solid track record in Virginia Beach. Then, compare at least three estimates – the lowest bid isn’t always the best value.Our Comprehensive Roof Repair Virginia Beach Guide walks you through the exact questions to ask: “Do you use coastal‑grade materials?” “What warranty do you offer on labor and materials?” and “Can you provide references from nearby neighborhoods?”Ask for a written scope of work. It should list every step – from removing the damaged deck sections to installing new underlayment and flashing – so you know exactly what you’re paying for.What to expect from a professional roof leak repairA reputable crew will start with a thorough inspection, often using infrared cameras to locate hidden moisture. They’ll then set up safety gear, protect your landscaping with drop cloths, and carefully remove the compromised shingles or deck sections.Once the damaged area is exposed, they’ll replace any rotted plywood with pressure‑treated boards, lay down a waterproof underlayment, and reinstall new shingles that match your existing roof profile. Finally, they’ll seal all flashings with marine‑grade sealant to withstand the salty breeze.The whole process usually takes a full day for a modest repair, but larger sections can stretch to two or three days – especially if they need to coordinate with the city for permits.Checklist before the pro arrives1. Clear the work zone. Move furniture, cover plants, and ensure there’s a clear path for trucks.2. Gather documentation. Pull out any photos you took during your DIY attempts, the roof inspection checklist, and any warranty info you have on existing materials.3. Prepare a payment plan. Most contractors ask for a modest deposit up front, then the balance upon completion. Know the terms before you sign.4. Set expectations. Confirm the start and finish dates, and ask how they’ll protect your interior from dust and debris.Documenting the job for your recordsAfter the crew finishes, take a fresh set of photos – before, during, and after. This visual record is gold when you file an insurance claim or need to reference the work later.And don’t forget to keep the paperwork tidy. A well‑filled service order form or invoice can make all the difference when you’re dealing with an adjuster. For ready‑made forms and labels, check out JiffyPrintOnline – they have templates that make the paperwork painless.Bottom line: knowing when to hand the ladder to a professional saves you time, money, and a lot of sleepless nights. When the roof starts whispering “I’m not built for this,” listen, call a licensed contractor, and get the job done right the first time. Step 6: Prevent Future Roof LeaksWe all know that feeling – you hear a drip, grab a bucket, and wonder why your roof decided to turn the attic into a pool. The good news? Most of those leaks can be stopped before they even start, and the steps are simpler than you think.Make inspections a habit, not a chorePicture this: you’re sipping coffee on a Saturday morning, looking up at the roof, and you notice a few curled shingles on the north side. Does that spark panic? Not if you’ve already built a quick visual scan into your routine.Every 6‑12 months, walk the perimeter, run your hand over the shingles, and check for loose or missing pieces. A flashlight in the attic can reveal water stains before they spread. Jot down the spots – a tiny note in your phone is enough.So, what should you look for? Cracked flashing, rusted metal, or granule loss in the gutters. If you see any of those, flag them now and tackle them later.Gutters aren’t just for rain‑water – they’re leak preventersGutters are the first line of defense against water that wants to sneak under your roof deck. Clear out leaves, twigs, and sand at least twice a year. When you’re at it, run water from a hose through each downspout to make sure it flows freely away from the foundation.Did you know that a clogged gutter can push water back onto the roof, forcing it under the first row of shingles? That’s a classic cause of roof leak repair virginia beach calls. A quick clean‑out saves you a lot of headache later.Seal the weak points before the next stormFlashing around vents, chimneys, and skylights is like the stitching on a jacket – if it frays, the whole thing leaks. Use a marine‑grade sealant that can handle salty sea breezes. Apply a bead of sealant, then smooth it with a putty knife for a tight seal.And don’t forget the roof‑to‑wall transition. Those little gaps where the roof meets the siding can become water highways. A thin strip of foam backer board topped with sealant does wonders.Mind the landscape – water loves to find a low spotLook at your yard like a map of water flow. If the ground slopes toward your house, rainwater will pool near the foundation and eventually find its way under the roof deck. Add a few soil berms or re‑grade the yard so water runs away.Installing splash blocks or extending downspouts a few feet from the house is a cheap but effective trick. It’s the kind of detail you’d find in a Virginia Beach public utilities guide on water management, and it works just as well for roofs.Seasonal prep: winter, summer, and everything in betweenWinter brings ice dams, summer brings heat‑expansion, and fall brings leaves. Each season demands a quick check‑list. In winter, clear snow off the roof to prevent ice buildup. In summer, look for sun‑bleached shingles that have become brittle.Fall is the perfect time for a deeper inspection – after the leaves fall, you’ll see exactly where debris is gathering. Use that moment to clean gutters, tighten loose fasteners, and replace any cracked flashing.Create a simple maintenance calendarGrab a printable calendar (or a note app) and mark these dates:April – gutter clean‑out and downspout check.July – mid‑summer roof inspection for heat damage.October – leaf removal and flash‑seal review.January – snow and ice removal plan.When you have a set schedule, you’re less likely to forget, and you’ll catch problems before they become expensive roof leak repair virginia beach emergencies.Adopt a preventative‑maintenance mindsetThink of your roof like a car. Just as you wouldn’t skip oil changes, you shouldn’t skip roof check‑ups. The same preventative maintenance mindset that keeps a vehicle running smooth also keeps a roof dry.Bottom line: a few minutes each season, a little cleaning, and a quick visual scan can stop a small leak from turning into a costly repair. You’ve got the tools, the checklist, and the know‑how – now it’s time to protect your home for the long haul.ConclusionWe've walked through everything from spotting that first drip to sealing the spot and setting up a seasonal checklist. If you’ve followed the steps, you now have a clear roadmap for roof leak repair virginia beach that saves you time, stress, and money.Remember, big leaks start with a tiny curl or a clogged gutter. A quick seasonal visual scan, a few tools, and a five‑minute hose test can stop a problem before it turns costly.So, what’s the next move? Mark April, July, October and January on your calendar and stick to the simple routine we outlined. Catch an issue early and you can DIY a patch or know exactly when to call a pro.In our experience at LGFMH Construction, homeowners who stay proactive avoid surprise water damage and keep their roofs performing for years. If you ever hit a snag that feels beyond a weekend project, give us a call – we’ll assess, repair, and get you back to enjoying a dry home. Our team is just a call away, ready to assess and fix any leak fast.Bottom line: a few minutes of attention now means peace of mind later. Your roof protects your home—treat it accordingly, always today.FAQHow can I tell if I have a roof leak in Virginia Beach?First, check the interior for water stains on ceilings or walls, especially after a rainstorm. Look for a musty smell in the attic or damp insulation – those are classic tell‑tale signs. Outside, inspect the roof for curled or missing shingles, rusted flashing, and clogged gutters that can push water back under the first row of shingles. If you notice any of these clues, it’s time to start a systematic hunt for the source.What’s the best way to locate the exact source of a roof leak?Grab a garden hose and run a gentle stream over the roof while a partner watches the attic for any drips. Start at the lowest point of the suspected area and work upward, marking the spot where moisture first appears with chalk. This “hose test” lets you pinpoint the exact shingle, flash, or deck spot that’s letting water in, saving you from guessing and unnecessary demolition.How often should I schedule roof leak inspections?In a coastal town like Virginia Beach, we recommend a visual roof check four times a year – after winter, after summer, and before the heavy fall rains and spring storms. Pair each check with a quick gutter clean‑out and a five‑minute hose test on any suspect areas. Consistent seasonal inspections catch small issues before they become costly roof leak repair virginia beach emergencies.Can I fix a roof leak myself or should I call a professional?If the problem is limited to one or two shingles, a loose vent flash, or a tiny patch of deck rot, a DIY repair with the right tools and marine‑grade sealant can hold up for years. However, once you see multiple failed shingles, soft plywood, or corroded flashing that won’t seal, it’s safer to call a pro. In our experience, attempting a major structural fix without proper safety gear often leads to bigger headaches.What materials work best for roof leak repair in the salty Virginia Beach climate?Choose coastal‑grade asphalt shingles with a fiberglass backing, aluminum flashing coated to resist corrosion, and polymer‑based sealants formulated for marine environments. These products tolerate salty breezes and high humidity better than standard roofing cement. When replacing a shingle, match the profile and color to keep the roof’s appearance consistent, and always use galvanized or stainless‑steel nails to avoid rust.How do I prevent future leaks after repairing my roof?Keep the roof’s “first line of defense” clean: clear gutters and downspouts twice a year, and trim overhanging branches that can drop debris. Apply a thin bead of marine‑grade sealant to all flashing and roof‑to‑wall transitions after each repair. Finally, create a simple maintenance calendar – April for gutters, July for heat‑related checks, October for leaf removal, and January for snow/ice monitoring – to stay ahead of the next storm.What should I look for in a roofing contractor for roof leak repair virginia beach?Start by verifying the contractor’s license, insurance, and local references. Ask specifically about their experience with coastal‑grade materials and whether they offer a written warranty on both labor and products. A reputable crew will conduct an infrared moisture scan, provide a detailed scope of work, and explain the repair timeline. In our experience, clear communication and a transparent estimate are the biggest indicators of a trustworthy partner.


Comments