Roof Repair Norfolk VA: A Comprehensive Guide for Homeowners
- William McKracherne
- Dec 23, 2025
- 17 min read

Picture this: you’re sipping coffee on a rainy Norfolk morning, and you hear that familiar drip‑drip from the kitchen ceiling. Your heart sinks because you know it’s not just a leak—it’s a sign your roof is begging for attention.
We’ve all been there. One minute you’re proud of that fresh paint job, the next you’re scrambling for buckets and towels. The truth is, roof repair in Norfolk, VA isn’t something you can put off forever. The salty air, occasional storms, and the age of many homes here make roofs especially vulnerable.
So, why does it matter now? Because a small crack can turn into a costly water‑damage nightmare in just a few weeks. And let’s face it, nobody wants to watch their living room floor warp or their insulation turn to mush while the tide rolls in.
In our experience at LGFMH Construction, the most common issues we see are cracked shingles, clogged valleys, and flashing that’s lost its seal. Those problems often look harmless at first, but they’re the silent culprits behind mold, structural rot, and skyrocketing energy bills.
What can you do before the damage spreads? Start with a quick visual check after any big rain. Look for dark stains on the interior ceiling, missing granules on shingles, or any sagging sections. If you spot anything, don’t wait for the next storm—call a local pro who knows Norfolk’s climate quirks.
Here’s the good news: roof repair Norfolk VA doesn’t have to be a headache. A timely repair can extend the life of your roof by years and keep your home safe and dry. And when you work with a crew that’s familiar with the area’s building codes, you avoid costly re‑work down the line.
Ready to protect your home before the next downpour? Let’s dive into the steps you can take, the signs to watch for, and how to choose a trustworthy contractor who understands Norfolk’s unique roof challenges.
TL;DR
If you’ve noticed stains, missing shingles, or a drip after a storm, you’re facing roof repair norfolk va issues that can snowball into costly damage.
A visual check, then a call to a local pro, can seal problem early, protect your home, and save you hundreds on energy and repairs.
Assessing Roof Damage in Norfolk VA
Okay, you’ve just noticed a drip, a dark spot, or a shingle that looks like it’s been through a hurricane. First reaction? Panic. Second reaction? A quick, methodical walk‑around to see how bad it really is. Let’s walk through that together, step by step.
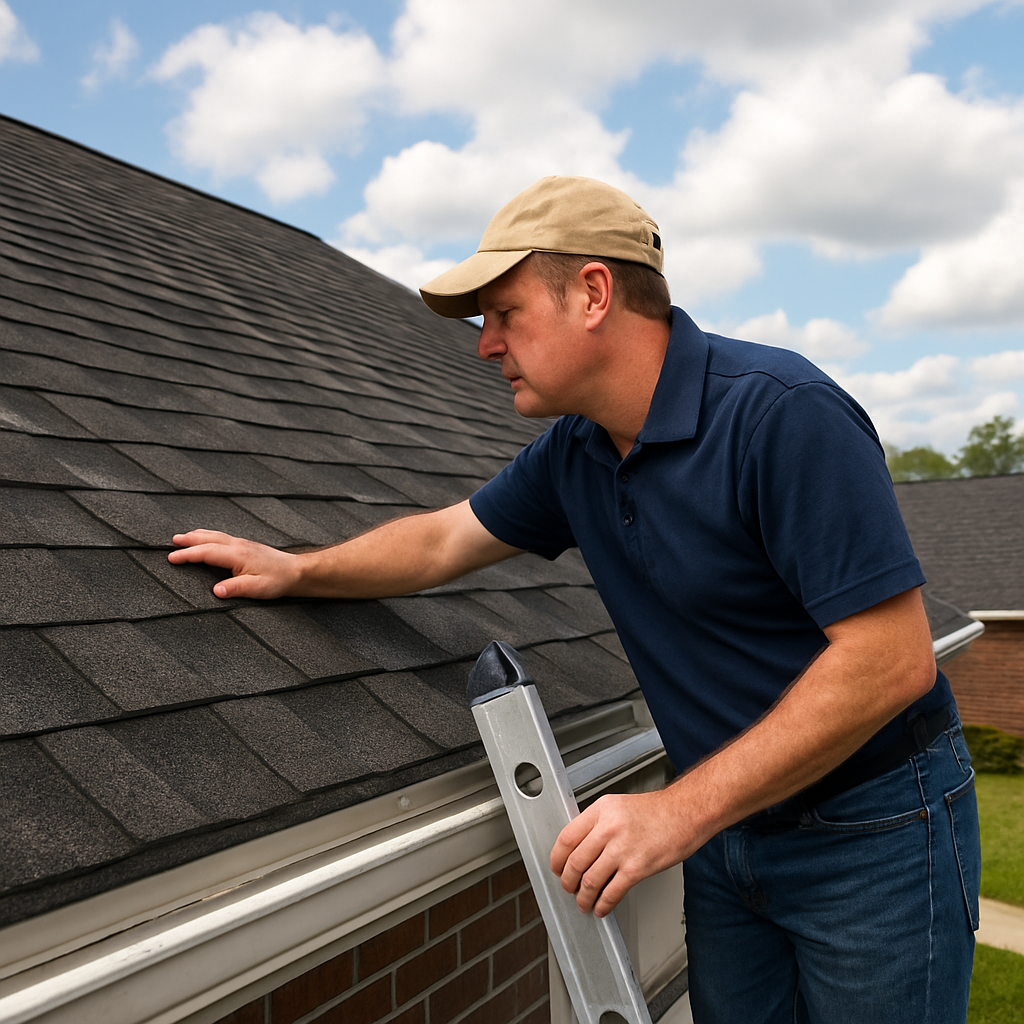
1. Get a safe, high‑level view
Grab a sturdy ladder, make sure it’s on stable ground, and never work alone if you’re uncomfortable with heights. From up there, do a slow 360° scan. Look for cracked, curled, or missing shingles – those are the obvious red flags. Also keep an eye on flashing around chimneys, vents, and skylights; any gaps there can turn a light drizzle into a full‑blown leak.
And what about the roof’s surface texture? If the granules feel gritty under your hand, the shingles might be near the end of their life. In Norfolk’s salty, breezy climate, granule loss can happen faster than you think.
2. Check the valleys and gutters
Valleys are where two roof planes meet, and they’re natural water channels. Debris buildup or rusted metal in these areas can cause water to pool and seep underneath. While you’re up there, peek into the gutters – a clogged gutter is often the silent partner in roof damage. If water can’t escape, it backs up into the roof deck.
Does this sound familiar? Maybe you’ve seen water streaks on your garage door after a heavy rain. That’s often a sign the gutter isn’t doing its job.
3. Bring the inspection inside
Now head back inside and look at the ceilings and walls directly beneath the roof sections you just examined. Dark water stains, bubbling paint, or a musty smell are all clues that moisture has already made its way inside. If you spot any of these, take a photo – it’ll be handy when you talk to a contractor.
And here’s a tip: keep an eye out for mold growth. In Norfolk’s humid environment, mold can spread quickly. If you suspect mold, you might want to read up on how mold remediation can be covered by homeowners insurance so you’re not caught off‑guard later.
4. Do a quick moisture test (optional)
If you have a moisture meter, press the probe against the ceiling or wall near a suspect area. A reading above 15% usually means water’s lurking where you can’t see it. No meter? No problem – a simple “paper towel test” works too. Tape a dry paper towel to the spot for a few hours; if it’s damp when you remove it, you’ve got a leak.
So, what’s the next move? If you’ve found any of these warning signs, it’s time to call a local pro who knows Norfolk’s building codes and weather quirks. A qualified contractor can confirm the damage, recommend repairs, and help you avoid costly surprises down the road.
Watching the video above gives you a visual walkthrough of a typical roof inspection – it’s like having a seasoned roofer in your backyard, pointing out what to look for and what to ignore.
Now that you’ve got the basics down, grab a notebook, jot down any issues you spot, and schedule that professional assessment before the next big storm rolls in.
Choosing the Right Roofing Materials
When you’re staring at a leaky ceiling in Norfolk, the first thing that comes to mind is “fix it fast.” But the real fix starts with picking a roof that can stand up to salty air, summer heat, and the occasional hurricane. That’s why the material you choose matters just as much as the repair itself.
What matters most in Norfolk?
Our climate is a mix of humid subtropical summers and breezy winters. That means you need a roof that won’t blister under 90‑degree sun and won’t let wind lift the shingles. Think durability, cost, maintenance, and how the material plays with the look of your home.
Does your budget stretch for a 50‑year lifespan, or do you need something that’ll hold up for the next decade? Let’s break down the most common options you’ll see on a Norfolk street.
Asphalt shingles – the classic choice
Asphalt shingles dominate the market because they’re affordable and come in a rainbow of colors. In Norfolk, they typically last 15‑20 years before you’ll see granule loss or curling from wind and rain.
They’re easy to install, which keeps labor costs low, but they’re also the most vulnerable to wind uplift. If you’ve had a recent storm that rattled the neighborhood, inspect your shingles for any that look lifted or cracked.
Metal roofing – built for the coast
Metal roofs shine (literally) in the summer, reflecting heat and keeping your attic cooler. They’re tough against wind and hail, and they can last 50 years or more. The trade‑off is a higher upfront price and a bit of noise when rain hits the panels—though proper underlayment mutes most of it.
One Norfolk homeowner swapped their aging shingle roof for standing‑seam metal after a 2019 wind event. Within a year, their energy bills dropped about 12%, and the roof still looked brand new after a harsh summer.
Tile and slate – beauty with baggage
Tile (clay or concrete) and slate bring timeless elegance and excellent fire resistance. They also add natural insulation, which is a bonus in humid summers. The downside? They’re heavy. Before you order, have a structural engineer confirm your home can support the extra pounds. Installation is pricier, but the lifespan can exceed 75 years if you stay on top of broken pieces.
Picture a historic Norfolk bungalow with a slate roof that’s been there for generations. The homeowner says the roof “just feels right” because it blends with the neighborhood’s character while requiring minimal upkeep.
Eco‑friendly alternatives
If you’re leaning green, consider solar‑integrated panels or synthetic shingles made from recycled plastics. They’re lighter than tile, can lower your electricity costs, and often qualify for state rebates.
Just remember: even the most sustainable material needs proper flashing and ventilation to avoid moisture problems.
Quick decision checklist
Assess your budget: upfront cost vs. long‑term savings.
Check structural capacity: especially for tile or slate.
Consider maintenance: how often are you willing to inspect and clean?
Match aesthetics to your home’s style and neighborhood vibe.
Think about climate resilience: wind, rain, salt air.
Use this list when you chat with a roofing pro. It helps keep the conversation focused on what matters to you, not just what they’re trying to sell.
Comparing the top options
Material | Typical Lifespan | Cost (per sq ft) | Maintenance |
Asphalt shingles | 15‑20 years | $2‑$4 | Annual inspection, replace damaged shingles |
Metal roofing | 50+ years | $6‑$12 | Check for rust, ensure proper underlayment |
Tile/Slate | 75‑100+ years | $10‑$20 | Inspect for cracked tiles, verify structural support |
When you line up the numbers, you’ll see why many Norfolk families choose metal for its durability and energy savings, while others stick with shingles because they’re easier on the wallet.
In the end, the right material is the one that fits your home’s structure, your budget, and your peace of mind. Once you’ve made that choice, the next step is a proper installation—something LGFMH Construction can handle with local expertise, ensuring your roof repair norfolk va needs are met without a hitch.
Hiring a Reliable Roof Repair Contractor
Finding someone you can trust to fix a leaky roof in Norfolk feels a lot like looking for a good neighbor – you want someone who shows up on time, knows the local weather quirks, and actually listens to what you’re worried about.
Why the right contractor matters for roof repair norfolk va
We’ve seen a storm‑driven leak turn into a costly mold problem within weeks when the repair crew cut corners. In Norfolk’s salty air, a shoddy seal can rust fast, and that rust spreads to the rafters. The difference between a short‑term fix and a lasting solution often comes down to three things: local code knowledge, proper material handling, and clear communication.
Step‑by‑step: Vetting a contractor
1. Verify licensing and insurance.Ask to see a copy of the Virginia contractor’s license and a certificate of insurance. A legitimate roofer will provide this without hesitation. If they’re vague or need to “check later,” it’s a red flag.
2. Check local experience.Norfolk roofs face unique challenges – wind‑driven rain, occasional hurricanes, and the corrosive effect of sea breezes. Ask the contractor how many roof repair norfolk va projects they’ve completed in the last year. A crew that’s serviced homes on the same street as yours will know the common flash‑point failures in your neighborhood.
3. Ask for references.A trustworthy pro will gladly share phone numbers of recent homeowners. When you call, listen for details: Did the crew arrive on schedule? Were they respectful of property? Did the repair hold up after the next rain?
4. Get a written estimate.The estimate should break down labor, materials, and any permit fees. Look for line items like “roof deck inspection” or “flashing replacement” – vague “labor” charges often hide extra work later.
5. Confirm warranty coverage.Most reputable roofers offer at least a one‑year workmanship warranty on repairs. Some even extend it if you choose premium materials. Make sure the warranty is in writing and includes the contractor’s contact info.
Real‑world examples from Norfolk homeowners
Take the Jackson family on Granby Street. Their original asphalt shingles started curling after a harsh winter. They hired a contractor who only offered a “quick patch.” Within two months, the patch failed, and water seeped into the attic. After calling us, we inspected the roof, discovered that the flashing around the chimney was rusted, and replaced both the damaged shingles and the flashing. Six months later, the Jacksons still have a dry ceiling, and they tell their neighbors that the “whole‑home check‑up” saved them $2,000 in water‑damage repairs.
Another story: a small business on the Elizabeth River had a flat commercial roof that started leaking after a heavy rain. The owner initially tried a DIY sealant, but the leak kept coming back. The contractor they eventually chose performed a full membrane inspection, identified a failed TPO seam, and installed a new membrane with proper edge detailing. The business avoided a costly shutdown and reported a 15% reduction in cooling costs because the new roof reflected more heat.
Quick checklist before you sign a contract
License number matches Virginia’s contractor registry.
Insurance certificate lists coverage for both property damage and worker injury.
References include at least two recent residential or commercial roof repair norfolk va jobs.
Written estimate breaks down labor, materials, permits, and warranty terms.
Contract includes a clear timeline and cleanup plan.
Expert tip: Ask about “wind‑uplift testing.”
Because Norfolk’s wind speeds can exceed 70 mph during a hurricane, a reputable roofer will test roof deck fasteners and flashing for uplift resistance. It’s a small extra step that can make the difference between a roof that lasts 20 years and one that needs a redo after the next storm.
Finally, trust your gut. If a contractor seems eager to start before you’ve asked the right questions, pause. A good roofer knows that a well‑informed homeowner is a partner, not an obstacle.
Choosing the right professional for roof repair norfolk va may feel overwhelming, but breaking it down into these concrete steps turns the process into a manageable checklist. With the right partner, you’ll protect your home, your wallet, and that peace of mind you deserve when the next rain hits.
DIY Roof Repair Tips and Safety
Okay, you’ve spotted a leaky shingle or a cracked flashing and you’re thinking, “Can I just fix this myself?” In Norfolk, the answer is often “yes, if you’re careful,” but only when you respect the safety rules and follow a solid step‑by‑step plan.
First thing’s first: protect yourself. A sturdy ladder with slip‑resistant feet, a harness if you’re working over a two‑story height, and a pair of non‑conductive gloves are non‑negotiable. The last thing you want is a fall that turns a roof repair into a medical bill.
Step 1 – Gather the right tools. You’ll need a roofing hatchet or shingle remover, a pry bar, a utility knife, roofing nails, a caulking gun with a high‑quality sealant, and a hammer with a magnetic bit. If you’re swapping out a few shingles, grab a bundle of matching shingles from your previous roof—color and style should line up exactly.
Step 2 – Do a quick safety walk‑around. Before you climb, clear the work area of any loose debris, check the roof for obvious weak spots, and make sure the attic ventilation isn’t blocked. In Norfolk’s windy months, even a small loose shingle can become a projectile, so give the whole surface a gentle shake with a broom to see what might come loose.
Step 3 – Locate the problem area. Use a garden hose set on a moderate spray and walk the line of the roof while a friend watches the ceiling from inside. When water starts to seep in, you’ve pinpointed the exact spot. Mark it with a chalk line or a piece of tape so you don’t lose track.
Step 4 – Remove damaged material. Slide the pry bar under the shingle you need to replace, lift gently, and slide out the nail heads with the hammer’s magnetic bit. For flashing, cut away the old metal with the roofing hatchet, being careful not to gouge the deck underneath.
Step 5 – Prep the deck. Sweep away any old roofing cement, let the wood dry, and apply a thin coat of roofing primer if the deck looks porous. This step is often skipped, but it’s the reason a repair lasts months instead of weeks.
Step 6 – Install the new piece. Slide the fresh shingle into place, align it with the surrounding rows, and nail it down at the factory‑recommended spacing (usually four nails per shingle). For flashing, overlap each piece by at least two inches and seal the seams with roofing cement. Press the sealant in with a putty knife and smooth it out to avoid water channels.
Step 7 – Double‑check your work. Walk the ladder back over the repaired area, spray water again, and make sure no drips appear inside. If everything stays dry, you’ve earned a high‑five. If you see any moisture, re‑apply sealant or tighten a loose nail.
A quick reality check: if the damage extends beyond a handful of shingles, or if you notice rot in the decking, it’s time to call a pro. As Stevens Roofing points out, DIY fixes on compromised decks can void manufacturer warranties and lead to bigger headaches later.
Safety reminder: never work on a roof in wet or icy conditions, and always have someone hold the ladder steady. If you feel dizzy or notice a sudden gust, climb down immediately. Better safe than sorry.
When you finish, clean up the site. Collect all nails, scrap metal, and old shingles—leftover fasteners can become hazards for pets or kids. Store any extra shingles in a dry place for future touch‑ups.
For a more detailed pre‑repair checklist, take a look at our Roof Inspection Checklist: A Step‑by‑Step Guide for Homeowners . It walks you through the exact items to verify before you even lift a foot onto the roof.
Bottom line: a DIY roof repair in Norfolk can save you a few hundred dollars, but only if you respect the safety gear, follow each step, and know when to stop and call a licensed contractor. A well‑executed patch protects your home, your family, and your peace of mind when the next storm rolls in.
Cost Estimates and Financing Options
When you first ask yourself, “how much will this roof repair actually cost?” the answer can feel like a moving target. The good news is you don’t have to guess in the dark – there are clear benchmarks and several ways to make the numbers work for you.
Understanding the numbers
In Norfolk, the average price to replace an entire roof sits around $17,240 for a standard asphalt‑shingle roof . That figure comes from a typical 2,500‑square‑foot home, with material pricing at roughly $6.90 per square foot. It’s a solid reference point, whether you’re budgeting for a full replacement or just a patch job.
What drives the price?
Size is the biggest factor – a larger footprint means more decking, more underlayment, and more labor. Pitch matters, too; steeper roofs require extra safety equipment and take longer to work on. Material choice can swing the total wildly – metal or slate can double the material cost compared with asphalt, but they also last decades longer. Don’t forget permits, disposal fees, and any needed structural repairs – those hidden line items can add a few thousand dollars.
Repair versus replacement budgeting
If the damage is limited to a handful of shingles or a compromised flashing, a targeted repair might run $300‑$1,200, depending on accessibility and labor rates. However, once the roof deck shows rot or multiple sections need replacement, the cost quickly approaches that full‑replacement average. A quick way to decide is to ask yourself: will the repair hold up through the next storm season, or will you be back on a ladder in six months?
Financing options you can explore
Most homeowners start with a personal loan or a credit‑card promo if the amount is modest. For larger projects, a home‑equity line of credit (HELOC) often offers the lowest interest because the loan is secured by your property. Some banks also have specific “home improvement” loans with fixed rates and flexible terms. If you’re comfortable with a longer horizon, a 0% introductory credit‑card offer can buy you time to spread payments while you wait for the repair to pay for itself in avoided water damage.
Local assistance programs
Virginia’s Renovate Norfolk program provides grants to income‑qualified owners for essential exterior repairs, including roof work. The grant aims to keep homes safe and reduce long‑term maintenance costs. Eligibility hinges on income limits and a pre‑inspection that flags health or safety deficiencies. If you think you might qualify, start the process early – the program runs a quarterly lottery and limited funding, so timing is key. More details are available on the Renovate Norfolk website .
Smart ways to stretch your budget
Consider phasing the project: repair the most vulnerable sections now and schedule a full replacement for a slower season when contractors may offer off‑peak discounts. Ask your insurer if the damage qualifies for a claim; many policies cover sudden storm damage but not gradual wear. Look for manufacturer rebates on metal or cool‑roof products – they can shave a few hundred dollars off material costs. And don’t underestimate the value of a detailed written estimate: a line‑item breakdown helps you spot unnecessary add‑ons before you sign.
Finally, keep an eye on your home’s energy bills after the repair. A properly sealed roof improves insulation, which can lower heating and cooling costs – an indirect savings that adds up over the years.
When the numbers finally line up, you’ll feel more in control of the whole process.
Ready to get a realistic quote that reflects your home’s specific quirks? Give LGFMH Construction a call, and we’ll walk you through the estimate, financing options, and any local aid you might qualify for.
FAQ
What are the first signs that my roof needs repair in Norfolk, VA?
If you hear a steady drip after a rainstorm, notice dark water stains on your ceiling, or see missing, curled or cracked shingles from the yard, those are early warnings. In our experience, granule buildup in gutters, rusted flashing around chimneys, or a musty smell in the attic also point to water intrusion. Catching these clues quickly lets you schedule a repair before rot spreads or energy bills climb.
How often should a Norfolk homeowner schedule a professional roof inspection?
We recommend a full inspection at least once a year, preferably in the fall after the hurricane season, and again after any major storm. If your roof is over 15 years old or you’ve recently installed new windows or skylights, a bi‑annual check can spot hidden damage before it becomes visible. A quick visual walk‑around each spring helps you notice loose shingles, but a licensed pro will test flashing, underlayment and deck integrity.
Can I fix a small leak myself, or is it better to call a contractor?
For a single cracked shingle or a tiny flashing gap, a DIY patch can hold water out for a few months—provided you have the right tools, safety gear and a solid sealant. However, if the leak recurs, if you spot rot in the decking, or if you’re working on a steep roof, it’s safer and more cost‑effective to bring in a licensed contractor. Professional work includes proper underlayment, nail placement and warranty coverage that a DIY job rarely provides.
What factors affect the cost of roof repair in Norfolk, VA?
Material choice is the biggest driver— asphalt shingles are cheapest, while metal or slate can double material costs. The size of the affected area, roof pitch, and accessibility also matter; steeper roofs need extra safety equipment and more labor hours. Permit fees, disposal of old material, and any needed structural repairs add hidden costs. Getting a line‑item estimate helps you compare quotes and avoid surprise charges.
Are there any local programs or rebates that can help offset repair expenses?
Virginia’s Renovate Norfolk program offers grants to income‑qualified homeowners for essential exterior repairs, including roof work. The grant covers safety‑related fixes and can reduce out‑of‑pocket costs, but funding is limited and awarded through a quarterly lottery. Additionally, some manufacturers run seasonal rebates on energy‑efficient metal roofing or cool‑roof coatings. Check the city’s website early in the season so you can align your repair timeline with any available assistance.
How long does a typical roof repair take in Norfolk?
Most minor repairs—replacing a handful of shingles, resealing flashing, or fixing a gutter leak—can be completed in a single day. Larger patch‑ups that involve decking replacement or extensive flashing work usually take two to three days, allowing the crew to set up safety scaffolding, remove damaged sections, install new material and let any sealants cure. Weather can add delays, so we always build a buffer day into the schedule during the rainy months.
What warranty should I expect after a roof repair?
A reputable Norfolk roofer will offer at least a one‑year workmanship warranty that covers any leaks caused by the repair itself. If you choose premium materials like standing‑seam metal, many manufacturers also provide a 20‑ to 30‑year material warranty, but it only applies when the installation follows their guidelines. Ask for the warranty in writing, confirm what’s covered—materials, labor, flashing—and keep the paperwork for future home‑sale disclosures.
Conclusion
We've walked through everything from spotting the first drip to choosing the right material and hiring a crew you can trust.
So, what does that mean for you? It means you don't have to stare at a ceiling leak and feel stuck. By doing a quick visual scan, checking your gutters, and getting a written estimate, you can cut the guesswork out of roof repair norfolk va.
Remember, a solid repair isn’t just about patching a shingle – it’s about protecting your home’s structure, energy bills, and peace of mind for years to come.
Here’s a quick cheat‑sheet you can keep on the fridge:
Inspect after every big storm – look for missing shingles or rusted flashing.
Get at least a one‑year workmanship warranty.
Ask the contractor about wind‑uplift testing for Norfolk’s gusty weather.
Check if you qualify for Renovate Norfolk grants before you start.
When you’re ready to take the next step, give LGFMH Construction a call. We’ll walk you through a detailed quote, help you navigate any permits, and make sure the repair fits your budget.
Bottom line: a little attention now saves a lot of hassle later. Let’s get that roof sealed up and your home back to feeling safe and dry.


Comments