Roofing Guide: Essential Steps for a Durable, Leak‑Free Home
- William McKracherne
- Feb 19
- 13 min read

Ever stood under a leaky roof on a rainy afternoon and thought, “There has to be a better way?” You’re not alone – most homeowners feel that mix of frustration and urgency the moment water starts dripping onto the floor.
The good news is that the right roofing solution can turn that dread into peace of mind, and it doesn’t have to be a mystery.
At LGFMH Construction we’ve spent years patching up roofs, replacing whole systems, and watching families breathe easier once the job is done.
What we’ve learned is that successful roofing starts with three simple steps: assess the current condition, choose the material that matches your climate and budget, and keep up with regular maintenance.
Maybe you’ve heard about shingle, metal, or flat roofs and feel overwhelmed. Don’t worry – we break each option down in plain language, so you can picture what it looks like on your own home.
Imagine stepping outside after a summer storm and seeing a roof that stays dry, looks great, and adds value to your property. That’s the kind of confidence we aim to give every client.
So, what should you do next? Start by taking a quick look at your roof’s age, checking for missing shingles or rusted flashing, and jotting down any leaks you’ve noticed.
From there, give us a call or drop us a line. We’ll schedule a free inspection, walk you through the options that fit your home’s style, and lay out a clear plan with no hidden surprises.
In the end, roofing isn’t just about keeping the rain out – it’s about protecting the place where you make memories, relax after a long day, and feel safe.
Ready to turn that leaky worry into a sturdy, beautiful roof? Let’s get started together and give your home the protection it deserves.
TL;DR
Choosing the right roofing solution means a dry, beautiful home, peace of mind, and added value without the guesswork today. We break down shingle, metal, and flat options, give you a quick inspection checklist, and help you move from leaky worries to a sturdy, confidence‑boosting roof you can fully trust.
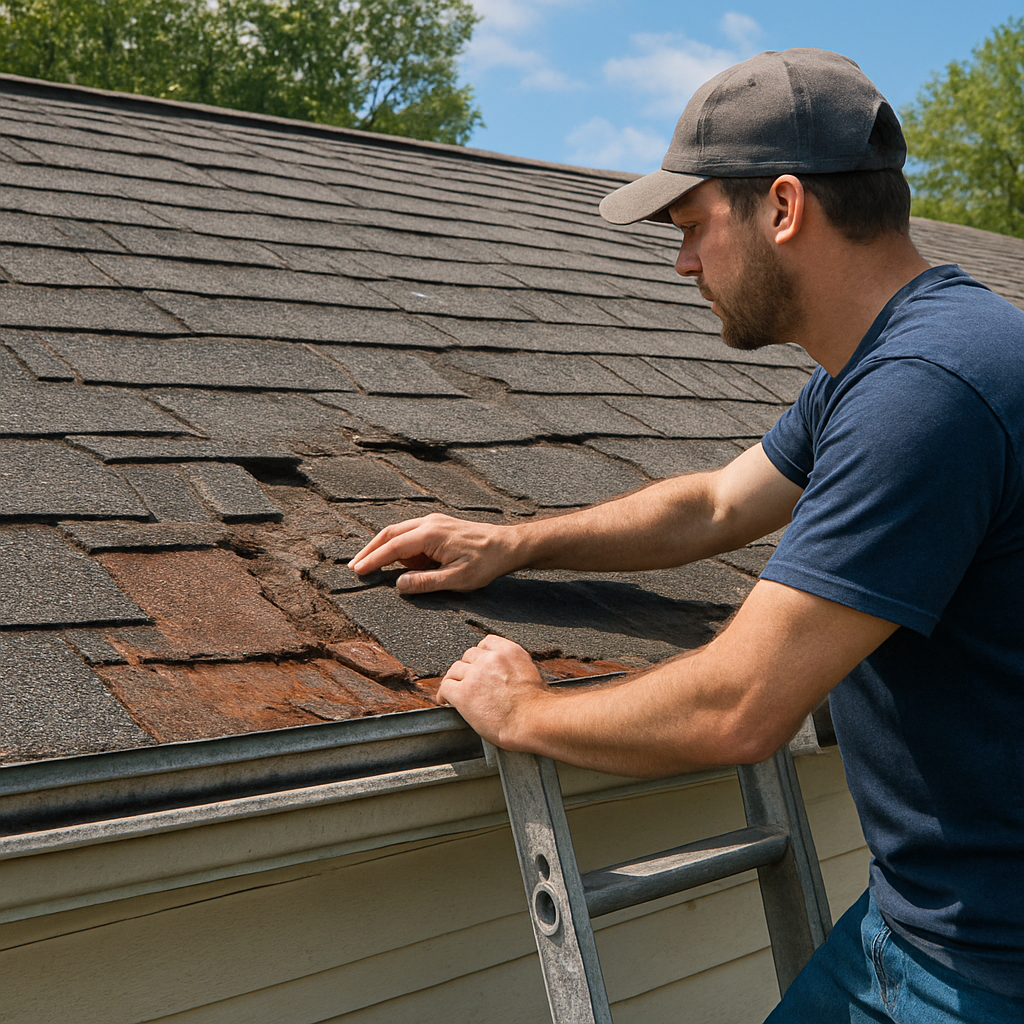
Step 1: Inspect Your Roof for Common Issues
Alright, picture this: you’re sipping coffee on the porch, looking up, and you notice a few shingles looking a bit sad. That tiny moment is the perfect cue to start a roof inspection before the next rain decides to test your ceiling.
Why bother? Because catching a problem early saves you from a frantic scramble when water starts leaking through the attic. A quick walk‑around can reveal the hidden culprits that turn a small drip into a major repair bill.
First thing’s first—safety. Grab a sturdy ladder, make sure it’s on stable ground, and never lean too far over the edge. If you’re uncomfortable, give LGFMH Construction a call; we’ll send a pro with the right gear.
Check the Shingles and Tiles
Start at the highest point and scan the surface. Look for missing, cracked, or curled shingles. Those little gaps are the first entry points for water. Also, glance at the granule loss on the shingle tops—if you see a lot of granules in the gutter, that’s a sign the shingles are wearing out.
Don’t forget the roof’s valleys, the V‑shaped channels that guide water. If debris is building up there, it can trap moisture and accelerate wear.
Inspect Flashing and Roof Edges
Flashing is the metal tape that seals joints around chimneys, vents, and skylights. Rusted or cracked flashing is a silent leak factory. Run your hand along the edges; if you feel rough spots or see bubbling paint, it’s time to replace that piece.
Also, check the eaves and soffits. Rotting wood or sagging sections often mean water has been seeping in for a while.
Peel Back the Gutters
Gutters might seem separate, but they’re the roof’s drainage system. Look for clogs, rust, or loose sections. A clogged gutter forces water to back up under the shingles, causing hidden damage.
Inside the house, peek at the attic ceiling after a rainstorm. Dark stains or water lines on the underside of the roof deck are clear red flags that something above isn’t sealing properly.
The video above walks you through a step‑by‑step visual of what to look for on the roof surface. Notice how the presenter uses a flashlight at dusk to spot subtle cracks that are invisible in bright daylight—that trick works wonders for a quick DIY check.
Another handy tip: bring a garden hose and gently spray a small section of the roof while someone watches from inside. If you see a drip inside, you’ve pinpointed the leak spot without tearing off a shingle.
To wrap it up, grab a clipboard and jot down what you find: missing shingles, flashing condition, gutter status, and any interior stains. This simple checklist becomes a powerful briefing when you call a professional, helping us focus on the exact problem and get you back to a dry, worry‑free home faster.
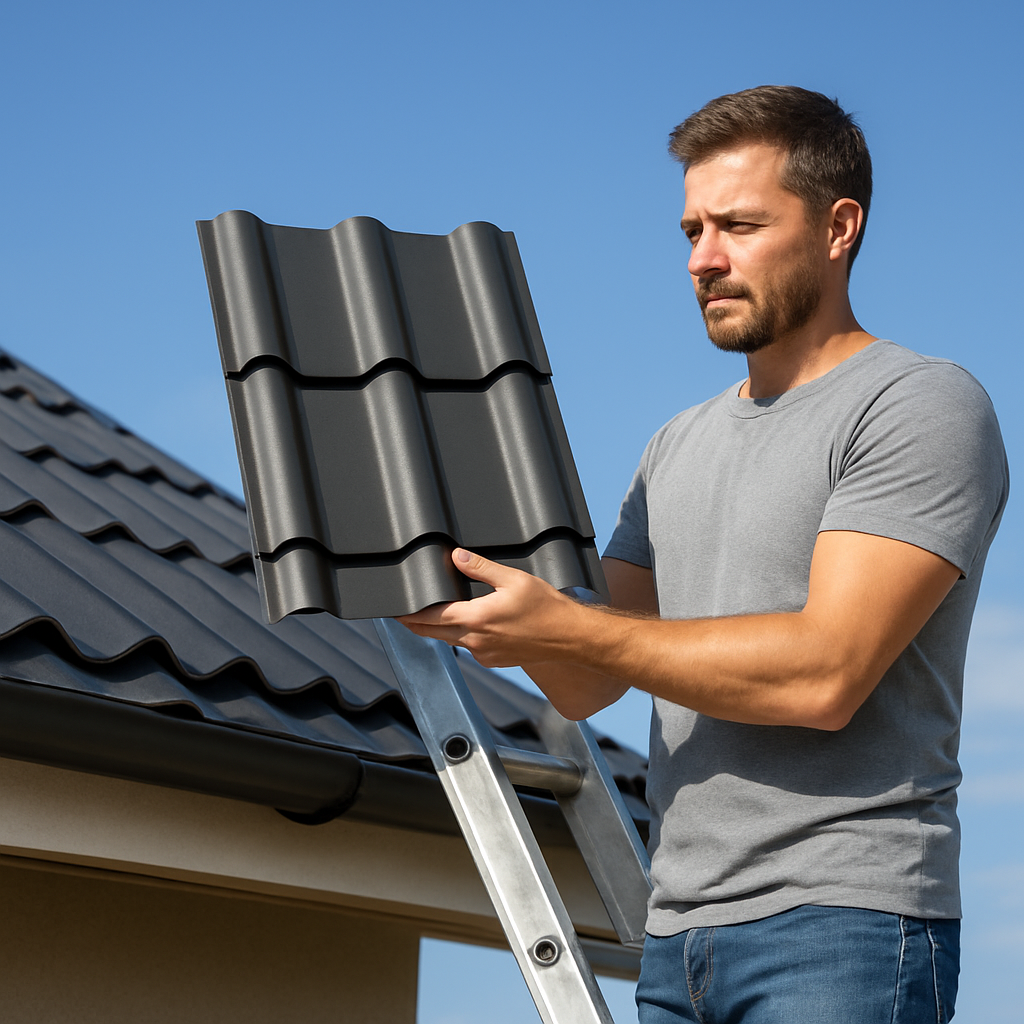
Step 2: Choose the Right Roofing Material
Alright, you’ve scoped out the problem – now comes the fun part: picking the material that’ll actually keep the rain out and look good while it’s doing it. It’s a bit like choosing the right coat for a winter walk – you want something that’s warm, durable, and fits your style.
First, ask yourself a quick question: what’s the climate like where you live? If you’re in a hot, humid zone, ceramic or clay tiles excel at keeping your home cool. In colder regions with heavy snowfall, metal roofing’s slick surface helps snow slide off, reducing the load on your structure.
1. Budget vs. Lifespan
Asphalt shingles are the go‑to for most homeowners because they’re cheap – you can expect to spend between $5,800 and $10,100 for a typical 1,700 sq ft roof, according to a recent cost estimator. They’ll last about 20‑30 years, which is fine if you don’t plan to stay in the house forever.
Metal roofs cost more upfront – roughly $10,200 to $41,600 for the same size – but they can stick around for 40‑70 years, sometimes even a century if you go copper. That longevity often balances out the higher price, especially if you factor in lower maintenance.
2. Aesthetic & Neighborhood Fit
Do you love the classic look of a shingle roof, or does the sleek shine of metal appeal to you? Maybe you’ve always dreamed of a Mediterranean vibe with terra‑cotta tiles. Your home’s architectural style matters; a Victorian with ornate trim often pairs well with slate or wood shakes, while a modern ranch looks sharp with standing‑seam metal.
Here’s a quick visual cue: imagine walking down your street and seeing a row of homes with matching roofs. If yours sticks out in a way you love, great. If not, you might want to blend in to preserve curb appeal and resale value.
3. Maintenance Commitment
Wood shakes have that warm, natural charm, but they demand regular sealing and can be a fire hazard if not treated. Metal and asphalt need far less attention – a simple inspection after a big storm is usually enough.
And don’t forget underlayment and flashing. Even the best material can fail if the layers underneath aren’t installed right. That’s why we always recommend a professional to check those details during installation.
4. Real‑World Examples
Case in point: a family in Norfolk swapped their 15‑year‑old asphalt roof for a metal system. The upfront cost was about $18,000, but they saved roughly $1,200 a year on energy bills because the metal reflected heat in summer and retained warmth in winter.
Another homeowner in Chesapeake chose clay tiles for their historic home. The tiles cost $12,700, but the homeowner says the property’s value jumped by an estimated $20,000 after the upgrade – a solid ROI.
What we’ve seen work best in our area is matching material to both climate and the homeowner’s willingness to invest time (or money) in upkeep. That’s why we often start a conversation with a quick budget worksheet and a climate‑compatibility chart.
Need a deeper dive? Our essential roofing guide for homeowners walks you through each option with pros, cons, and cost ranges.
So, what’s the next step? Grab a notebook and jot down three things: your budget ceiling, the climate challenges you face, and the look you love. Then compare that list against the material data we’ve just covered.
Once you’ve narrowed it down, reach out to a trusted installer – someone who knows how to handle the specific quirks of your chosen material. A proper install can be the difference between a roof that lasts decades and one that needs a replacement after a few seasons.
And remember, the right material isn’t just about cost; it’s about peace of mind. When the next storm rolls in, you want to feel confident that your roof will stand strong.
For a broader perspective on roofing trends and how technology is reshaping the industry, check out How Content Automation SEO Can Elevate Your 2026 Rankings . It’s a neat read on how automation is helping professionals stay ahead.
If you’re curious about tools that streamline content creation – which, believe it or not, can help you research roofing options faster – have a look at How to Use an SEO Blog Post Generator to Automate High‑Ranking Content . It’s surprisingly useful for homeowners doing DIY research.
Choosing the right roofing material is a blend of science, budget, and personal taste. Take the time to weigh each factor, and you’ll end up with a roof that protects your home, boosts its value, and lets you sleep easy when the clouds gather.
Step 3: Hire a Qualified Roofing Contractor
Now that you’ve narrowed down your material options, the real work begins: picking the right pro to install or repair your roof. In our experience, the contractor you hire can make or break the whole project—on time, on budget, and with a roof that actually protects your home for decades.
So, what should you look for first? A solid mix of credentials, transparency, and a clear plan that lines up with your schedule and budget.
1) Verify credentials and licensing
Ask for license numbers, insurance certificates, and proof of workers’ comp. Then take a minute to verify them with the state or local authorities. A reputable contractor won’t hesitate to show these documents. If they can’t provide them, walk away. Safety and compliance aren’t negotiable when you’re dealing with a roof over your head.
Does this step feel like overkill? Not really. It’s your safety net—you’re protecting your home, your finances, and your family’s comfort during a big project. And yes, these checks save you from surprises later on.
2) Review experience with your roof type
Ask to see recent projects similar to yours—same material, size, and climate conditions. Look for photos, timelines, and any notes about challenges they faced. Call a few references and ask about reliability, communication, and how they handled unexpected issues.
Think about it this way: you don’t want a team that treats your roof like a one‑size‑fits‑all job. You want someone who understands the specifics of your home and your neighborhood.
3) Get a detailed, written estimate
Insist on a written, itemized estimate. It should break out materials, labor, permits, disposal, and any flashing or underlayment work. Include a project timeline with milestone dates and a payment schedule. Be wary of vague “we’ll see how it goes” statements—those almost always hide surprise costs.
Ask about allowances for material upgrades and how change orders are handled. A credible contractor will spell out how substitutions are priced and how you’ll approve any changes before they happen.
4) Check warranties and after‑service support
Clarify the manufacturer warranties on the chosen materials and whether the contractor offers a workmanship warranty. Understand what’s covered, for how long, and what could void the warranty. Also ask how service calls are handled if problems arise after installation.
Warranty clarity saves headaches down the line. You’ll know exactly who takes responsibility when a leak or flashing issue shows up after a storm.
5) Understand the project plan and communication
Discuss site protections, daily cleanup, and dust or debris control. Confirm the exact crew size and who your on‑site supervisor will be. Set expectations for how you’ll receive progress updates—text, call, or email—and how you’ll reach the team if something changes.
Rhetorical question: will you get a single point of contact or a rotating crew that makes coordination harder? The answer should be straightforward and lead to reliable communication throughout the project.
Pro tip: ask how they handle permits and inspections. A good contractor coordinates these so you don’t have to chase down paperwork yourself.
If you’re in Virginia Beach or nearby, LGFMH Construction has deep experience with exterior repairs and replacements, and we’re happy to help you evaluate local contractors or coordinate a plan that fits your home’s needs. Our goal is to keep the process simple, transparent, and focused on long‑lasting results.
So, what’s your next move? Gather three written estimates, check licenses, and pick the team that feels most like an ally—because a great roof starts with a great partnership.
Step 4: Maintenance Checklist & Cost Comparison
Maintenance isn't glamorous, but it's the backbone of a trouble‑free roof. In our experience, a simple, consistent routine saves homeowners from big headaches and expensive repairs. Let's walk through a practical checklist and then compare the costs of common upkeep versus replacement options.
Seasonal upkeep essentials
Spring and fall are your windows to catch wear before it sneaks up on you. Check for moss, algae, and debris that can trap moisture. A quick wash or gentle rake can remove buildup without damaging shingles.
After a heavy storm, do a quick exterior walkaround. Look for lifted shingles, cracked flashing, or loose gutters. If you see anything suspicious, call a pro before the next rain comes.
Gutter and drainage care
Your gutters aren’t just for rainwater; they’re the roof’s first line of defense. Keep them clear of leaves and twigs. Clogged gutters pull water toward the shingles and can cause rot or leaks. If you see sagging sections or missing hangers, schedule repair—fast.
Flashing, vents, and roof edges
Inspect around chimneys, vents, skylights for rust, cracks, or gaps. Damaged flashing is a common source of leaks. Replacing a small section now beats tearing apart a whole roof later.
Ventilation and insulation checks
Balanced attic ventilation and insulation help prevent ice dams and mold. Look for damp spots in the attic after rain and check that soffit and ridge vents aren’t blocked. If you’re unsure, a quick professional assessment from LGFMH Construction can set you on the right track.
So, what about the cost? Let’s break down typical upkeep costs versus a full roof replacement, so you can decide what makes sense for your home and budget.
Maintenance Task | Frequency | Typical Cost (USD) | Notes |
Gutter cleaning & debris removal | 2× per year | $100–$250 | DIY possible; hire a pro if ladder safety is a concern. |
Roof inspection & minor surface checks | Annually | $150–$350 | Identifies loose shingles, flashing gaps, ventilation issues. |
Moss/algae control (humid climates) | Semiannual or annually | $100–$350 | Use approved treatments; avoid harsh chemicals near landscaping. |
Attic ventilation and insulation check | Annually | $150–$400 | Prevents ice damming and mold; ensure soffit/ridge vents clear. |
Ice-dam prevention prep (winter) | Seasonally in cold regions | Varies with scope | Often tied to insulation & ventilation improvements. |
Does this approach feel manageable? If you’re in Virginia Beach or nearby, LGFMH Construction can help set up a simple maintenance schedule, coordinate safe inspections, and keep your roofing on track without surprises.
For a deeper dive and a broader maintenance framework, Owens Corning roof maintenance guide offers a thorough, practical schedule you can adapt to your home.
Conclusion
After walking through inspection, material choices, contractor vetting, and maintenance, the picture becomes clear: a solid roof is less about a single decision and more about a series of small, confident steps.
Think about the relief you felt when you imagined that dry porch after a storm. That feeling is what we aim to lock in—by catching issues early, picking a material that matches your climate, and partnering with a crew that respects your home.
So, what’s the next move? Grab a notebook, jot down the age of your roof, any visible cracks, and the budget you’re comfortable with. Then schedule that free inspection we offer at LGFMH Construction; it’s a low‑pressure way to get a clear roadmap.
Remember, regular upkeep—clean gutters, annual checks, and prompt flashing repairs—keeps costs predictable and protects the value of your property. It’s not a chore; it’s a habit that pays off when the next big rain rolls in.
Ready to turn “maybe” into a confident “yes”? Reach out, and let’s put a roof over your head that lets you sleep easy.
And if you ever wonder whether a repair or a full replacement makes sense, compare the long‑term savings of a well‑maintained system against the upfront cost of a new roof. In most cases, staying proactive saves you thousands down the road.
FAQ
What are the common signs that my roof needs repair?
Look for a few tell‑tale clues. Missing or cracked shingles are the most obvious – they create little gateways for water. Check your attic after a rain; dark stains or a musty smell usually mean a leak. Granule buildup in the gutters signals shingle wear, and rusted flashing around chimneys or vents is another red flag. When you spot any of these, it’s time to call a pro before the problem spirals.
How often should I schedule a professional roofing inspection?
Most experts recommend a full inspection at least once a year, and after any major storm that drops a lot of rain or hail. In coastal areas like Virginia Beach, the salty air can accelerate wear, so a spring check before the summer heat hits is wise. If you’re a homeowner who’s just moved in, schedule an inspection within the first 30 days to spot any hidden issues early.
Can I safely clean my gutters myself, or should I hire a pro?
Cleaning gutters yourself can be safe if you have a sturdy ladder, proper gloves, and a good view of the roof line. The trick is to work from a stable ground surface and never overreach – a slip is never worth a clean pipe. For multi‑story homes or steep pitches, it’s smarter to hire a professional who has the right safety gear and can spot hidden damage while they’re up there.
What roofing material is best for the Virginia Beach climate?
In the humid, salty air of Virginia Beach, metal roofing – especially aluminum or steel with a protective coating – tends to hold up best. It sheds water quickly, resists corrosion, and reflects heat, keeping your home cooler in summer. If you prefer a traditional look, architectural shingles with a high wind‑rating are also a solid choice, but they’ll need more frequent inspections for granule loss.
How much does a typical roof replacement cost in my area?
A typical asphalt shingle roof replacement in the Virginia Beach area runs between $6,000 and $10,000 for a 1,700‑sq‑ft home, while a metal system can cost $12,000 to $18,000 depending on material and finish. Those numbers include tear‑off, underlayment, flashing, and disposal, but they don’t cover any structural repairs that might be needed. Getting three written estimates lets you compare not just price, but warranty terms and the contractor’s timeline.
What's the difference between a roof repair and a full replacement?
A repair focuses on fixing a specific problem – like replacing a few cracked shingles or resealing a flashing joint – and usually costs a few hundred dollars. A full replacement means stripping the entire roof, installing new underlayment, and putting on a fresh layer of material, which runs into the thousands. If more than 25 % of your roof shows wear, or if you’ve had multiple repairs in the past few years, a replacement often makes more financial sense.
How does regular roof maintenance save me money in the long run?
Regular maintenance is like a health check‑up for your roof. Cleaning gutters, inspecting flashing, and clearing debris cost a few hundred dollars a year, but they prevent water infiltration that can damage framing, insulation, and even your HVAC system – repairs that easily climb into the thousands. By catching issues early, you extend the roof’s service life by several years, which translates into lower overall ownership costs and protects your home’s resale value.


Comments