Siding Guide: Choosing, Installing, and Maintaining Your Home’s Exterior
- William McKracherne
- Feb 19
- 19 min read

Ever looked at your house and felt that something just wasn't right, like the siding was staring back at you with a tired sigh?
Maybe a crack in the vinyl caught your eye, or a patch of paint is peeling faster than you can say 'spring cleaning'.
You're not alone—most homeowners discover that siding issues creep up just when you least expect them, often right after a storm or a harsh summer.
The good news? Understanding why siding matters and what to do about it can save you time, money, and a lot of frustration.
In this guide we’ll walk through the basics of siding, from spotting early warning signs to choosing the right material for your climate.
We'll share the little tricks we've picked up over years of fixing exteriors, the kind of details you usually only hear from a seasoned contractor.
Think about the last time you rolled down the driveway and felt the breeze—good siding not only protects your home, it also adds curb appeal that makes neighbors pause.
If you've ever wondered whether to repair a dent or replace an entire panel, we’ll break down the pros and cons so you can make a confident call.
And yes, there are moments when DIY seems tempting, but we'll also point out when calling in the pros—like us at LGFMH Construction—makes the most sense.
By the end of this article you’ll have a clear roadmap: inspect, decide, and act, all without feeling overwhelmed.
Ready to turn that worn‑looking façade into a proud showcase? Let's dive in and get your siding back on track.
Whether you're protecting a family home, a rental property, or just a weekend getaway spot, the right siding strategy keeps everything dry, insulated, and looking fresh year after year.
TL;DR
In this guide we break down how to spot siding problems, choose the right material for your climate, and decide whether DIY fixes or professional help will save you time and money.
By the end you’ll have a clear, step‑by‑step roadmap to inspect, repair, or replace siding confidently, keeping your home protected and looking great year after year.
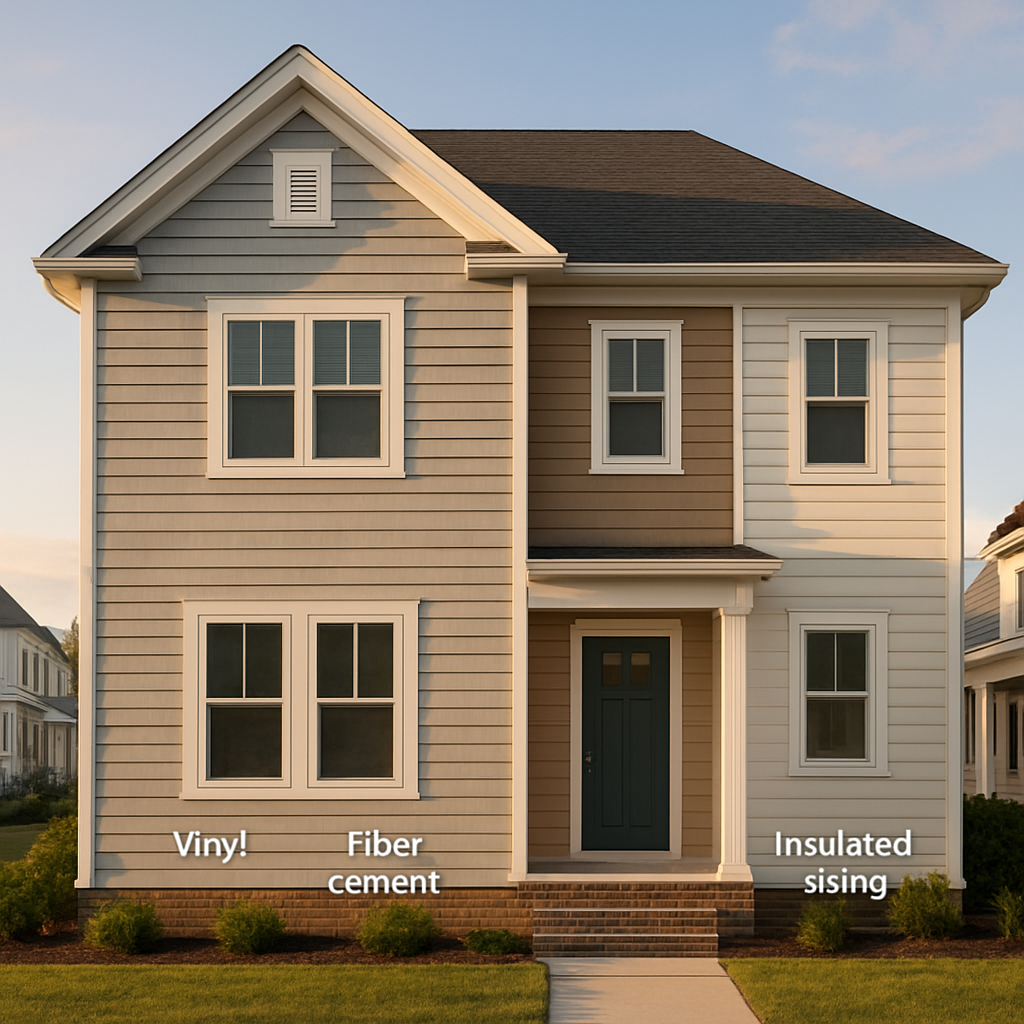
Understanding Siding Materials: Pros and Cons
Choosing siding isn’t just about color. It’s about weather resilience, maintenance mindset, and how long you want the exterior to look good without constant tinkering. In 2026, the market has solid, proven options, but the tradeoffs aren’t the same for every home.
Here’s a practical, no-nonsense breakdown that ties directly to real-world decisions you’ll face when planning an exterior job. We’ll walk through the main material families, explain what they’re best at, and share what we’ve seen work best in homes like yours.
Vinyl Siding: Pros and Cons
Vinyl is the budget-friendly workhorse that most homeowners consider first. It’s lightweight, quick to install, and comes in a wide range of colors and textures that mimic other materials.
Pros: low upfront costs, fast installation, and a broad palette. It’s also forgiving for DIY-friendly projects and relatively easy to maintain with an occasional wash-down.
Cons: in hail-prone areas or severe impact zones, vinyl can crack, and some textures may look less premium over time. Seasoned installers know that poor detailing at corners or gable ends can invite water intrusion if not sealed properly, so quality workmanship matters.
Real-world note: in hot, sun-drenched climates, color fade can occur if you choose darker shades without UV protection. If you’re aiming for long-term curb appeal, pick fade-resistant colors and verify warranty coverage against sun exposure. And yes, a good contractor matters—our team has found that proper flashing and a solid moisture barrier behind vinyl pays off for decades.
Fiber Cement Siding: Pros and Cons
Fiber cement is heavier and requires more robust installation, but it’s incredibly durable and resistant to rot, termites, and moisture compared with traditional wood.
Pros: excellent weather resistance, broad architectural versatility, and long-term value with minimal maintenance. You can achieve wood-like aesthetics without the ongoing painting cycle.
Cons: higher upfront cost and the need for skilled installation to avoid nail-head telegraphing or water intrusion beneath the cladding. If installed incorrectly, you can lose some of the benefit through maintenance issues later on.
Real-world example: coastal or storm-prone neighborhoods often benefit from fiber cement’s resilience, as it handles salt spray and wind-driven rain better than untreated wood. In our experience, a properly installed fiber cement system can outlast vinyl in harsh climates while delivering a more premium look with fewer ongoing projects.
Wood Siding: Pros and Cons
Wood offers a timeless, premium appearance and superb design flexibility. It’s favored when homeowners want a natural, warm texture that’s easy to customize.
Pros: authentic character, color customization, and a wide range of profiles—from shakes to clapboards—that can elevate architectural details.
Cons: it requires regular maintenance—staining or painting every few years, vulnerability to moisture and pests, and higher long-term upkeep costs. If you’re in a climate with humidity or termites, you’ll be paying closer attention to sealing and drainage details.
In our experience, cedar remains a go-to for curb appeal, but be prepared for ongoing upkeep. A well-maintained wood siding project can pay off in resale value, but you’ll need a realistic maintenance plan.
Engineered Wood and Insulated Siding: Pros and Cons
Engineered wood and insulated siding sit between wood’s aesthetics and fiber cement’s durability. They combine visual warmth with better protection against moisture and better insulating properties than basic vinyl.
Pros: wood-look appearances with improved dimensional stability and energy-efficiency benefits from insulation backing. Some lines offer enhanced impact resistance and quieter exteriors, which is a win in busy neighborhoods.
Cons: they can still carry a higher price tag than vinyl and may require professional installation to maximize warranty protections. Delamination or improper backing installation can undermine performance, so choose installers who understand the product line and climate considerations.
Tip: insulation backing can shave a few dollars off year-round energy bills, and a proper install reduces exterior noise. In regions with seasonal temperature swings, the combination of aesthetics and added R-value is appealing, but confirm warranty terms and regional performance data before buying.
So, what should you choose? Start by mapping climate, maintenance tolerance, and budget. If you prioritize low upkeep and cost, vinyl is tough to beat. If you want longevity and a premium look with less repainting, fiber cement or engineered wood can be ideal. For a warmth-and-character finish, wood is unmatched—just plan for ongoing care. For context on brands, materials, and current pricing trends, Modernize’s siding brands guide is a solid resource you can reference for 2026 data and options: Modernize: Siding Brands .
If you want a quick primer, this video helps visualize how different siding types perform in common conditions. Does this resonate with your home’s climate and style goals?
Remember, the best fit depends on climate, maintenance tolerance, and budget. At LGFMH Construction, we map tradeoffs and plan a replacement that protects your home and boosts curb appeal.
How to Evaluate Your Home’s Siding Needs
Ever stood on your porch and thought, “Is this siding still doing its job, or am I just looking at a tired coat?” That moment of doubt is the perfect place to start a practical evaluation. It’s not about guessing; it’s about gathering concrete clues that tell you exactly what your home’s exterior needs.
1. Scan for Visible Signs
Walk the perimeter with a flashlight in hand. Look for cracked panels, warped boards, or paint that’s peeling like old wallpaper. A common scenario in humid Virginia Beach neighborhoods is water staining at the base of the wall—usually a sign the moisture barrier has failed.
Take photos of any damage. When you compare before‑and‑after shots later, you’ll see whether a single panel needs replacement or the whole system is at risk.
2. Feel the Temperature Difference
On a chilly morning, place the back of your hand on different sections of siding. If one area feels noticeably colder, that could indicate poor insulation or a breach in the weather‑resistant barrier.
In our experience, homes with insulated vinyl or fiber‑cement often stay warmer inside, especially in the off‑season. That extra R‑value can shave a few dollars off your energy bill each month.
3. Test for Moisture Intrusion
Grab a moisture meter (you can rent one from most hardware stores). Press the probe against the siding, especially around windows, doors, and corners. Readings above 15% suggest water is seeping behind the cladding.
Here’s a quick tip: after a heavy rain, wait an hour before testing. If the reading spikes, you probably have a drainage issue that needs flashing repair.
4. Consider Your Climate
Climate dictates durability. Hot, sunny areas can fade darker vinyl pigments within a few years, while coastal salt spray can corrode metal fasteners on wood siding. The Homecraft guide on climate impact breaks down which materials thrive where.
For example, a family in the Appalachian foothills often chooses fiber cement because it handles temperature swings without expanding or cracking.
5. Budget Your Options
Set a realistic budget range before you start comparing materials. Remember to factor in removal, disposal, and the cost of a proper moisture barrier. A cheap vinyl job might look good now, but if it cracks in a hailstorm, the repair costs can quickly eclipse the savings.
Our own cost‑calculator worksheet (available on our site) helps you see the long‑term financial picture.
6. Prioritize Maintenance Tolerance
Ask yourself how much time you’re willing to spend on upkeep. Wood siding lovers enjoy the natural grain, but they also schedule a fresh coat of stain every 3‑5 years. If you’d rather set it and forget it, insulated vinyl or fiber cement are better bets.
We often tell homeowners, “Pick the material that fits your lifestyle, not the one that looks the coolest on a showroom floor.”
7. Get a Professional Assessment
Even with a thorough DIY walk‑through, a trained eye can spot hidden rot, nail‑head telegraphing, or inadequate flashing. That’s why we recommend a quick on‑site evaluation from a trusted contractor.
To see the full checklist we use when we assess a home, check out our Essential Siding Guide: Choose, Install, and Maintain the Best Exterior for Your Home . It walks you through each step, from initial inspection to final warranty review.
8. Make a Decision Matrix
Write down the three most important factors for you—climate resilience, maintenance, budget. Score each siding option (vinyl, fiber cement, wood, engineered wood) on a scale of 1‑5 for each factor. Multiply the scores by the weight you assigned to each factor, then add them up. The highest total points to the best fit.
This simple spreadsheet method takes the guesswork out of the equation and gives you a clear, data‑backed answer.
Once you’ve completed these steps, you’ll know whether a single panel repair, a full‑wall replacement, or an upgrade to insulated siding is the smartest move for your home.
Step‑by‑Step Siding Installation Process
1. Prep the Work Area
First thing’s first—clear the perimeter. Pull the lawn furniture, move the garden gnome, and tape off any landscaping you want to keep pristine. A clean workspace saves you from tripping over debris and keeps the siding panels from getting scratched.
Next, set up a sturdy scaffolding system or ladder that reaches the top of the wall safely. We always double‑check that the platform is level; even a slight tilt can throw off your flashing alignment later.
2. Remove Existing Siding
If you’re doing a full replacement, start at the bottom and pry off the old panels one by one. Use a zip tool or a siding removal bar—don’t just yank it, you’ll damage the sheathing underneath.
Watch for hidden nails or fasteners; they’re easy to miss and will pop up later as unsightly bumps. As you go, sort the scrap into a pile for recycling if your municipality accepts it.
3. Inspect and Repair the Sheathing
Now’s the moment to give the wall a once‑over. Look for water stains, rot, or warped plywood. If you spot any soft spots, cut them out and replace with new, pressure‑treated sheathing.
Seal every seam with a high‑quality house wrap or a self‑adhered moisture barrier. This is the unsung hero that stops wind‑driven rain from sneaking behind your new siding.
4. Install Flashing and Trim
Flashing is the little metal (or flexible) pieces that keep water from seeping around windows, doors, and roof edges. Start with the bottom flashing, then work your way up, overlapping each layer like shingles.
Don’t forget the drip edge at the eaves and the head flashing above openings. A well‑installed flashing system can add years to the life of your siding.
5. Lay Out the First RowMeasure twice, cut once. Snap a chalk line at the height you want the first course to sit—usually a few inches above the foundation to keep moisture out.Start with a starter strip or a piece of trim that gives you a straight, level base. This first row sets the tone for the whole project; if it’s crooked, the rest will follow.6. Hang the Siding PanelsPlace each panel into the nail slots, making sure the bottom edge rests snugly on the panel below. Leave a tiny gap (about 1/8 inch) for expansion—siding swells with heat, and that gap prevents warping.Nail the panels using corrosion‑resistant fasteners, driving them just enough to hold the panel without crushing the slot. A good rule of thumb: fasten every 16 inches horizontally and every 24 inches vertically.7. Cut Around OpeningsWhen you reach windows, doors, or vents, measure carefully and cut the siding with a circular saw or utility knife. Use a coping saw for tight corners.Fit the cut piece in, then seal the edge with a high‑quality exterior caulk. This little detail keeps drafts out and protects against water infiltration.8. Add Trim and Accent PiecesOnce the main panels are up, attach corner posts, soffit trim, and any decorative caps. These pieces not only finish the look but also hide the nail heads and give the wall a polished feel.Paint or stain the trim if it’s wood, or install pre‑finished PVC or aluminum pieces for a low‑maintenance option.9. Finish with a Clean‑Up PassStep back and walk the perimeter. Fill any missed nail holes, wipe down any dust, and check the level one more time. A quick visual inspection can catch a loose panel before the paint dries.Finally, dispose of the old siding responsibly and store any leftover material for future repairs.10. Let the Professionals Take the Reins (When Needed)Even the best DIYers hit snags—maybe a tricky roof intersection or a code‑required fire‑rated barrier. That’s where a seasoned crew like LGFMH Construction can step in, ensuring every flash, seal, and fastener meets local building codes.We’ve seen homes transform from leaky, tired exteriors to energy‑efficient, curb‑appeal powerhouses when the installation is done right the first time.Cost Factors and Budget Planning for Siding ProjectsWhen you start thinking about a siding makeover, the first thing that pops into your head is usually the price tag. That gut reaction is normal—no one wants a surprise bill after the work’s done. The trick is to break the cost down into bite‑size pieces so you can see exactly where your money’s going and where you might save.Material Costs: The Base LineVinyl, fiber‑cement, engineered wood, and real wood each sit in a different price band. In 2026 you’ll find entry‑level vinyl around $2‑$4 per square foot, while premium fiber‑cement can climb to $7‑$9. Engineered wood tends to hover in the $5‑$7 range, and cedar wood can push $8‑$12. Those numbers sound big, but remember they include the panel itself plus any factory‑applied finish.Imagine you have a 1,500‑square‑foot front elevation. Going with vinyl might cost roughly $4,500 for the material, whereas fiber‑cement could be $12,000. The difference isn’t just dollars; it’s durability, maintenance, and how long you’ll wait before the next replacement.Installation Labor: More Than Just Nailing PanelsLabor is where many homeowners get caught off guard. A skilled crew charges anywhere from $3 to $6 per square foot, depending on the complexity of the job. If you have a lot of windows, roof‑line cuts, or tricky corners, the rate leans toward the higher end.Let’s say you’re in Virginia Beach and the house has three dormers and a bay window. A straightforward vinyl install might run $4,500 in labor, but the same house with fiber‑cement could be $9,000 because the panels are heavier and need extra reinforcement.Prep Work and Hidden CostsBefore any new siding touches the wall, you’ll likely need to remove the old material, repair any damaged sheathing, and install a moisture barrier. Those steps can add $1‑$2 per square foot. If you discover rot behind the old siding, you might have to replace sections of plywood, which can quickly add a few thousand dollars.One homeowner we helped in the Appalachian foothills thought the only extra cost would be the new panels. After the old vinyl came off, we found water‑stained sheathing that needed replacement. The surprise repair added $1,800, but fixing it now prevented future mold issues.Finishing Touches: Trim, Flashing, and PaintTrim and flashing aren’t just cosmetic; they protect the building envelope. Aluminum or PVC trim costs about $2‑$4 per linear foot, while custom wood trim can be $6‑$8. Flashing materials—usually aluminum or flexible rubberized flashing—run $1‑$2 per square foot of roof or wall intersection.Don’t forget paint or stain if you choose wood. A quality exterior paint can be $1‑$2 per square foot, plus labor. Those numbers add up, especially on homes with many decorative details.Financing, Incentives, and Contingency BuffersMost contractors will ask you to set a hard ceiling for the project. A good rule of thumb is to add a 15‑20% contingency to cover the “what‑ifs.” If your estimated total is $20,000, plan for $23,000‑$24,000. That cushion keeps the project moving if an unexpected repair pops up.In some cases, you can offset costs with energy‑efficiency incentives. Insulated siding or fiber‑cement with a high R‑value may qualify for state rebates or utility‑company credits. Check with local agencies or ask your contractor to help you navigate those programs.Actionable Budget‑Planning Checklist1. List the siding material you prefer and note its per‑square‑foot cost.2. Measure the exterior square footage (include gables, but not the roof).3. Multiply material cost by square footage for a base figure.4. Add labor at $3‑$6 per square foot, adjusting for complexity.5. Estimate prep work (removal, sheathing repair, moisture barrier) at $1‑$2 per square foot.6. Include trim and flashing costs based on linear footage.7. Add a 15‑20% contingency buffer.8. Research local rebates for energy‑efficient siding and factor potential savings.9. Get at least three detailed quotes from reputable contractors and compare line items.Following this checklist lets you see the whole picture before you sign a contract, and it gives you confidence that you’re not overlooking hidden fees.Bottom line: budgeting for siding isn’t just adding up material prices. It’s a layered process that accounts for labor, prep, finishing, and a safety net for surprises. By breaking each factor down and using the checklist, you can walk into a contractor’s office with a clear number in mind and avoid the dreaded “budget overrun” panic.Maintenance Tips to Extend Your Siding’s LifespanEver notice how a quick rinse can make a tired porch feel brand new? Your siding works the same way – a little love now saves a lot of hassle later.We’ve seen homes in Virginia Beach where a simple yearly wash stopped water from seeping behind the panels, and we’ve also watched neglect turn a small stain into a costly repair. So let’s break down the habits that keep your siding looking sharp and protecting your home for years.1. Clean Regularly – The Simple Habit That Pays OffDust, pollen, and salty air love to cling to siding, especially after a big storm. James Hardie recommends pulling out the garden hose and using a soft‑bristle brush every 6‑12 months – no high‑pressure washers needed.Grab a bucket of warm water, a dab of mild dish soap, and a non‑metal brush. Work top‑to‑bottom, rinsing as you go so soap doesn’t dry on the surface. Cleaning tips from James Hardie walk you through the exact steps.Why does this matter? A clean surface lets you spot early mold, mildew, or cracks before they become hidden headaches.2. Inspect After Every StormStorms are nature’s stress test for your siding. After heavy rain, walk the perimeter with a flashlight and look for water stains, warped panels, or loose trim.Even a tiny gap can let moisture infiltrate the sheathing, leading to rot. A quick visual check, followed by a moisture‑meter swipe around windows, can catch problems early. Professional siding inspection guide explains what pros look for – but you can do the basics yourself.Pro tip: make a photo log. Snap before‑and‑after shots each season so you can compare changes over time.3. Keep Paint or Finish FreshIf you have wood or fiber‑cement with a painted finish, treat it like a coat you’d refresh on the interior walls. Look for chalky spots or fading colors; those are signs the protective layer is wearing thin.When you notice wear, lightly sand the area, clean it, then apply a high‑quality, UV‑resistant exterior paint. Most manufacturers recommend a fresh coat every 5‑7 years for optimal protection.Skipping this step is like letting a tiny crack grow into a canyon – the longer you wait, the more surface you have to prep later.4. Manage Moisture and DrainageWater is the enemy of any siding system. Keep gutters clear, and make sure downspouts direct water at least three feet away from the foundation.If you live near the coast, consider a breathable house wrap beneath the siding. It allows vapor to escape while keeping bulk water out.Even a small splash of water that sits on a panel for days can cause swelling in vinyl or promote mildew on fiber‑cement.5. Trim and Flashing CareTrim and flashing are the unsung heroes that guide water away from joints. Check them each spring for rust, loose fasteners, or cracked caulk.Replace any rusted aluminum flashing with a fresh piece, and re‑caulk gaps with a paint‑compatible exterior sealant. A quick touch‑up can add years to the life of the whole system.In our experience, homes that get a once‑yearly trim check avoid costly water‑damage repairs down the line.6. Seasonal Checklist – Your 5‑Step RoutineTo make maintenance painless, keep a short checklist on your fridge or phone:Spring: Clean siding, clear gutters, inspect flashing.Summer: Spot‑check for UV fading, touch up paint as needed.Fall: Remove leaves, check for wind‑driven debris, re‑seal any caulk cracks.Winter: Look for ice dams, ensure water isn’t pooling at the base.After any major weather event: Do a quick visual inspection and address any new damage.Stick to this routine and you’ll catch most issues before they become expensive repairs.And remember, a little preventive work now means you won’t have to wrestle with a full siding replacement later. It’s the homeowner’s version of an annual health check – simple, low‑cost, and hugely rewarding.Comparing Siding Options: Quick Reference TableAlright, let’s cut to the chase. You’re staring at a wall of choices and wondering which siding actually makes sense for your home, your budget, and the weather outside. Below is a quick‑reference table that distills the key trade‑offs into bite‑size nuggets you can scan in under a minute.How to read the tableFirst column: the material you’ll see on the house. Second: what you’ll likely pay per square foot (installed). Third: the R‑value you get when the product is installed the right way – higher numbers mean better insulation. Fourth: the climate where the material shines.Take a look, then ask yourself which row lines up with your priorities. Does cost dominate? Is energy efficiency the make‑or‑break factor? Or are you chasing that classic look without committing to endless repainting?MaterialTypical Cost (per sq ft)R‑Value* (installed)Best For ClimateStandard Vinyl$2‑$40.6Mild to moderate climates; low‑maintenance budgetsInsulated Vinyl$3‑$52‑2.7Anywhere you want a boost in energy savings, especially hot summers or cold wintersFiber Cement$7‑$90.5 (plain) – 3‑4 (when paired with rigid foam)Coastal, high‑wind, or termite‑prone zonesEngineered Wood$5‑$71.5‑2.5Regions with temperature swings where you still want a wood lookCedar (natural)$8‑$121.4 per inch – 2.7 (insulated)Cool, dry areas where aesthetics trump upkeep*R‑value numbers are based on industry data; insulated versions typically hit the higher end of the range. For a deeper dive into how these numbers stack up, check out the energy‑efficiency guide from Kearns Brothers. They break down why a 2‑3 R‑value can shave a few dollars off your monthly heating bill.Now, let’s add a little context. Imagine you live in Virginia Beach, where salty air loves to corrode metal fasteners. A neighbor with standard vinyl started seeing cracks after a harsh summer storm. We’ve seen that happen enough to know that swapping to fiber cement or insulated vinyl can stave off that early wear, even if the upfront cost is higher.On the other side of the state, a family in the Appalachian foothills chose cedar because the natural wood breathes better in cooler, drier air. They accept the routine of a fresh stain every four years, but the curb appeal payoff is huge – they’ve reported higher resale interest whenever they list the house.So, what should you do next? Grab a tape measure, calculate your home’s exterior square footage, and plug those numbers into the table. If the total cost for insulated vinyl comes out under $7,000 for a 1,500‑sq‑ft façade, you’re probably getting a sweet spot of affordability and energy savings.And here’s a pro tip: always pair the siding material with a quality house‑wrap. A well‑installed wrap can boost the effective R‑value by up to 0.5, according to the Modernize siding guide . It’s a tiny step that makes a big difference in moisture control and overall performance.Finally, write down three quick questions for any contractor you interview: 1) Will you install a moisture barrier behind the siding? 2) How do you handle flashing around windows and doors? 3) What warranty covers both the material and the installation? Those questions keep the conversation focused on durability rather than just price.Armed with this table and a handful of real‑world anecdotes, you should feel a lot more confident picking the siding that fits your home’s personality and your wallet’s comfort zone.FAQWhat’s the best siding material for a humid coastal climate?In salty, humid areas like Virginia Beach, fiber‑cement usually wins because it resists rot, termite damage, and the constant spray that can crack vinyl. It’s heavier, so you’ll need a crew that knows how to handle the panels, but the payoff is a wall that stays tight‑fit for decades. If you love the wood look, engineered wood with a moisture‑resistant wrap is a solid compromise.How often should I inspect my siding for damage?We recommend a quick walk‑around after every big storm and a more thorough check twice a year—once in spring after the thaw and once in fall before the first freeze. Look for cracked panels, water stains, or loose trim. A simple moisture‑meter swipe around windows can reveal hidden leaks before they turn into rot.Can I install siding myself, or do I need a pro?DIY can work for straight‑forward vinyl projects if you’ve got the right tools and a level base line. But most homeowners benefit from a professional crew when dealing with fiber‑cement, engineered wood, or any system that requires flashing and a proper house‑wrap. A mis‑aligned flash can cost you thousands in water damage down the road.What’s the role of house‑wrap behind siding?The house‑wrap acts like a breathable rain‑screen. It lets water vapor escape while keeping bulk water out, which protects the sheathing and framing. Pairing a high‑quality wrap with insulated vinyl can boost the effective R‑value by about 0.5, meaning a slight dip in your heating bill. It’s a cheap step that pays off in durability.How does insulated siding affect my energy bills?Insulated siding adds a thin layer of foam directly to the wall, raising the wall’s overall R‑value. In a typical 1,500‑sq‑ft home, that extra 2‑3 R‑points can shave a few dollars off monthly heating and cooling costs—especially noticeable in hot summers or chilly winters. The savings add up over the life of the siding, making the higher upfront price worthwhile.What maintenance does wood siding actually need?Wood siding thrives on regular care. A good rule of thumb is to clean it yearly with a mild soap solution, then inspect for any soft spots or peeling paint. Re‑stain or repaint every 3‑5 years, depending on exposure. Keep gutters clear so water doesn’t linger at the base, and replace any cracked trim before rot spreads.When should I replace my siding instead of repairing it?If you find more than a handful of panels cracked, or if moisture readings consistently hit above 15 %, it’s usually a sign the whole system is compromised. Also, if the cost of repairs starts to approach 50 % of a full replacement, you’re better off swapping the entire façade. A full replace lets you upgrade to better insulation and a fresh moisture barrier in one go.ConclusionAfter walking through the why, how, and what of siding, you probably feel a mix of excitement and a little overwhelm—totally normal.Remember, the right choice starts with your climate, your willingness to maintain, and the budget you’ve set. Insulated vinyl can shave a few dollars off your energy bill, while fiber‑cement offers that rugged, low‑maintenance vibe we love in coastal Virginia.So, what’s the next step? Grab a tape measure, sketch a quick cost matrix, and compare the R‑value numbers you’ve seen in the tables. If the math leans toward a material you’ve ruled out, ask yourself whether the hidden upkeep is worth the savings.In our experience at LGFMH Construction, homeowners who pair a quality house‑wrap with their siding see fewer moisture surprises down the road. It’s a tiny extra step that pays off in comfort and resale value.Don’t let “maybe later” become a permanent excuse. Schedule a short, no‑obligation assessment, and let a pro point out the gaps you might miss.When you’re ready to protect your home’s exterior and boost curb appeal, think of siding as an investment that keeps on giving—year after year.And remember, a well‑chosen siding system can save you time, money, and headaches for decades.


Comments