Soffit Essentials: Choosing, Installing, and Maintaining Your Home’s Hidden Roof Edge
- William McKracherne
- Feb 20
- 18 min read

Ever walked up to a house and wondered why the underside of the roof looks so neat and ventilated? That's the soffit, and it does a lot more than just look good. It protects your home from moisture, keeps the attic cool in summer, and helps prevent mold growth—things most homeowners only notice when something goes wrong.
Think about the last time you had a sweltering summer. If the attic gets too hot, that heat radiates down into your living spaces, driving up your AC bill. A well‑installed soffit lets fresh air flow in and stale air out, acting like a natural air‑conditioner. In our experience at LGFMH Construction, homes with proper soffit ventilation see up to 15% lower cooling costs.
But what happens when the soffit gets damaged? Imagine a storm that tears off a few panels or wood rot that develops unnoticed. Water can seep behind the siding, leading to costly repairs. One of our recent clients in Tampa noticed water stains on the ceiling after a heavy rain—turns out the soffit had cracked, allowing water to infiltrate the roof deck.
So, what can you do right now? Here are three quick steps you can take:
Inspect the soffit for cracks, rust, or missing panels—look especially around roof edges and near gutters.
Check for signs of water damage inside the attic, like damp insulation or musty odors.
Make sure there’s a clear gap between the soffit and the exterior wall; at least a half‑inch gap is ideal for airflow.
If any of these checks raise a red flag, it’s time to call a pro. We often recommend pairing soffit repair with a quick lighting upgrade to boost curb appeal. For a deeper dive into what soffit actually is and why it matters, check out Understanding what is soffit on a house: A Complete Guide . It walks you through materials, installation tips, and maintenance schedules.
Finally, remember that soffit health is a year‑round concern. Schedule a visual check each spring and fall, and don’t wait for a leak to tell you there’s a problem. By staying proactive, you’ll keep your home comfortable, energy‑efficient, and protected for years to come.
TL;DR
If you want a dry ceiling, lower energy bills, and a home that breathes, start by inspecting your soffit for cracks, rust, or missing panels.
Fix any issues now or call LGFMH Construction, and you’ll keep moisture out, improve ventilation, and avoid costly repairs later for your peace of mind.
Understanding Soffit Materials and Their Benefits
When it comes to keeping a house comfortable, the soffit is the unsung hero that often flies under the radar. It’s the thin panel that hugs the edge of your roof, letting fresh air in and stale air out, but most homeowners only notice it when something goes wrong.
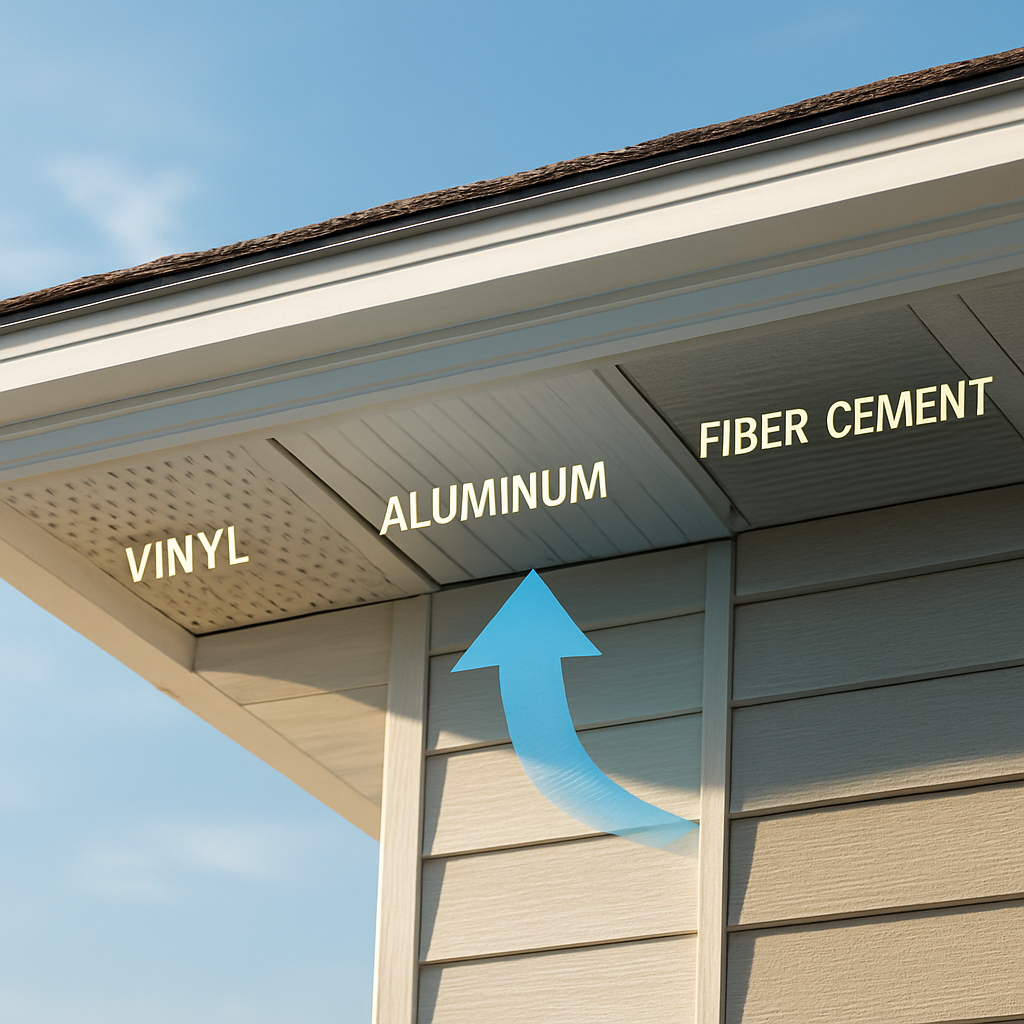
First, let’s talk about the basics: soffits can be made from a handful of common materials, each with its own set of strengths and quirks. The three big players are vinyl, aluminum, and fiber‑cement. Vinyl is lightweight, affordable, and resists rust, which makes it a popular choice for coastal homes where salty air can be brutal. Aluminum, on the other hand, is ultra‑durable, won’t warp in the heat, and can be painted to match any exterior palette. Fiber‑cement sits at the premium end – it’s heavy, fire‑resistant, and can mimic wood without the maintenance headaches.
So, why does the material matter? Imagine a summer afternoon when the sun is beating down on your roof. An aluminum soffit will stay cool longer, allowing more air to flow through the attic and keeping your living space from turning into a sauna. Vinyl, while slightly less heat‑resistant, still does a solid job if it’s properly vented. And fiber‑cement? It excels in regions that see both scorching heat and occasional hail, because it won’t dent or crack as easily.
But there’s more to the story than just temperature. Moisture management is a huge part of the soffit’s job. When rain seeps behind the siding, a well‑installed soffit made of a non‑porous material like aluminum or fiber‑cement creates a barrier that directs water away from the roof deck. Vinyl can handle moisture too, provided the seams are sealed and the panels are free of cracks.
Here’s a quick way to picture the difference: picture a house with an aluminum soffit in a humid Florida neighborhood – you’ll notice fewer rust spots and less need for frequent repainting. Contrast that with an older wood‑plank soffit in a rainy Pacific Northwest town; without regular maintenance, rot can set in, leading to costly repairs.
Watching a short video on soffit ventilation can help you spot the tell‑tale signs of a poorly performing system – like water droplets on the interior side of the panel or a musty smell in the attic. If you notice any of those, it’s a signal to check the material’s condition.
Choosing the Right Material for Your Home
Step one is to match the material to your climate and budget. If you’re on a tight budget but need something that won’t corrode, vinyl is a solid bet. For homeowners who want a low‑maintenance solution that can stand up to strong winds, aluminum is worth the extra few dollars. And if you live in an area with strict fire codes or you just love the look of a wood‑grain finish without the upkeep, fiber‑cement is the way to go.
Step two is to consider the installation method. Snap‑together vinyl panels are a DIY‑friendly option, while aluminum often requires a professional to ensure the seams are tightly sealed. Fiber‑cement is heavier, so you’ll want experienced installers who can handle the weight safely.
Maintenance Tips That Extend the Life of Any Soffit
Regardless of the material, a quick visual check twice a year can save you a bundle. Look for cracked or missing panels, loose fasteners, or any signs of water infiltration. A gentle hose down the roof edge can clear debris that might block airflow, and a soft brush can wipe away dust that masks early rust on aluminum.
If you spot a small crack in a vinyl soffit, a simple sealant can hold it together until you’re ready for a full replacement. For aluminum, a rust‑inhibiting paint touch‑up will keep it shining for years. And with fiber‑cement, just keep the joints caulked and you’ll avoid most issues.
One thing we’ve learned at LGFMH Construction is that homeowners who invest a little time in soffit upkeep enjoy lower energy bills and fewer surprise repairs. It’s a tiny part of the house, but it plays a big role in overall comfort.
Preparing Your Home for Soffit Installation
Step 1: Do a Quick Safety Sweep
Before you even think about pulling out a nail gun, make sure the work zone is safe. Grab a sturdy ladder, check the rungs for rust, and set it on stable ground – a concrete patio works better than a wobbly deck.
Wear safety glasses and a dust mask, especially if you’re tearing out old wood that might have lead‑based paint. And hey, if you have a pet that loves to nap on the eaves, move them to a quieter room. It’s a small hassle that saves you a lot of heart‑skip later.
Step 2: Inspect the Existing Soffit and Fascia
Walk around the house and look for cracked panels, water stains, or rotting fascia. In Tampa we recently helped a family whose wood soffit had swollen after a summer of heavy rain – the damage was hidden until the attic started smelling musty.
Make a quick checklist: cracked panels? yes/no; rusted metal? yes/no; gaps bigger than a quarter‑inch? yes/no. Jot those notes down; they become your project roadmap.
Step 3: Measure, Measure, Measure
Grab a tape measure and record the length of each eave run. It’s tempting to guess, but a half‑inch mis‑calculation can leave you with unsightly gaps or extra waste material.
Write the numbers on a simple spreadsheet or even a phone note. Include the height from the roof deck to the underside of the eave – that tells you how deep the vent channels need to be.
Step 4: Clear the Work Area
Remove any vines, hanging planters, or bird‑proofing screens that could get in the way. If you have gutter guards, take them off temporarily – you’ll reinstall them after the new soffit is in place.
Don’t forget the ground crew: sweep away loose shingles, nails, and debris. A clean area prevents you from stepping on a stray nail and getting a surprise puncture wound.
Step 5: Protect Your Home’s Exterior
Lay down a drop cloth or old tarp along the siding to catch dust and any accidental scratches. If you live in a windy coastal town, secure the tarp with painter’s tape so it doesn’t flap and scratch the paint.
We like to use painter’s tape because it leaves no residue and is easy to peel off once the job’s done.
Step 6: Gather the Right Tools
Here’s a quick tool checklist: ladder, safety glasses, dust mask, utility knife, circular saw with a fine‑tooth blade (for cutting aluminum or vinyl), drill with screwdriver bits, pry bar, and a nail gun or hammer. If you’re working with fiber‑cement, add a dust‑collecting respirator – those particles are nasty.
Having everything on hand means you won’t have to pause the workflow to run to the hardware store mid‑day.
Step 7: Plan for Ventilation
Good soffit isn’t just about the panels; it’s about airflow. Make sure there’s at least a 1/2‑inch gap between the soffit and the siding. In a recent project we measured a 3‑inch gap on a new build – that extra space helped the attic stay 5 °F cooler on a sweltering 2026 July day.
If you’re swapping from solid wood to perforated aluminum, you’ll need to add vent baffles inside the attic to keep insulation from blocking the airflow.
Step 8: Double‑Check Local Codes
Some counties require a minimum vent area based on square‑footage of roof. A quick call to the local building department can save you a re‑inspection later. In Florida, the code often calls for 1 sq ft of vent area per 150 sq ft of attic space.
Write down the required vent ratio and compare it to your measured eave length – if you’re short, plan to add extra vent strips.
Step 9: Set a Realistic Timeline
Most homeowners can finish a standard soffit replacement in a weekend if the weather cooperates. Block out two full days: one for removal and prep, another for installation and cleanup. If you run into unexpected rot, add a buffer day.
Having a timeline helps you coordinate any needed permits or schedule the crew from LGFMH Construction, who can step in if you hit a snag.
Step 10: Keep a “What‑If” List
Write down potential hiccups: rotten fascia that needs replacement, missing vent holes, or a surprise rainstorm. Having a contingency plan (like ordering extra panels or renting a waterproof cover) keeps the project moving smoothly.
Once you’ve ticked off every item, you’re ready to start the actual installation. And if you ever feel stuck, you can always reference a quick video walkthrough for visual cues on YouTube .
Step-by-Step Soffit Installation Guide
Step 1: Strip Away the Old Panels
Start by pulling off the damaged soffit panels. Use a pry bar gently so you don’t dent the surrounding fascia. If you hit a stubborn nail, back it out with a nail puller – it’s quicker than hammering the whole thing off.
We’ve seen a Tampa family lose a whole 8‑ft run of vinyl when a single rusted nail gave way. Removing the old pieces in one go saves time, but be ready for a few extra cuts if the panels are warped.
Step 2: Inspect and Repair the Fascia
Before you mount new material, give the fascia a once‑over. Look for rot, cracks, or loose nails. In humid Florida summers, untreated wood can swell and split within months.
If you spot any rot, cut it out with a circular saw and replace that section with a treated wood backer or a fiber‑cement strip. A solid fascia is the backbone of a tight soffit seal.
Step 3: Cut the New Panels to Length
Measure each eave run again – this time write the exact length on a piece of scrap wood and snap a chalk line. For aluminum or vinyl, a fine‑tooth blade prevents jagged edges.
Pro tip: leave a 1/8‑inch over‑lap at the ends; it gives you wiggle room when you’re lining up the next row.
Step 4: Pre‑Drill Vent Holes (If Needed)
Many aluminum soffits come perforated, but if you’re using solid panels you’ll need to add ventilation yourself. Drill 1‑inch holes on a 12‑inch grid – that’s the sweet spot for airflow without sacrificing strength.
In a recent project on a coastal condo, we added 48 holes per 10‑ft run and saw attic temperatures drop 4 °F on a July day.
Step 5: Attach the First Row
Start at a corner and snap the first panel into the starter strip. Make sure the top edge sits flush with the roof deck and the bottom edge aligns with the ground‑level trim.
Secure it with corrosion‑resistant screws – two per panel is enough. Over‑driving the screws can crush the material, so set your drill to a shallow depth.
Step 6: Nail the Remaining Rows
Overlap each new panel over the previous one by about 1‑2 inches. This overlapping creates a weather‑tight seal and hides any small gaps.
Use a pneumatic nail gun if you have one; it speeds up the job and gives consistent spacing. If you’re hand‑nailing, a nail spacing of 6‑8 inches works well.
Step 7: Seal the Edges
Run a bead of exterior‑grade caulk along the top edge where the soffit meets the roof and along the bottom edge where it meets the siding. This prevents wind‑driven rain from sneaking in.
We like a silicone‑based caulk because it stays flexible in the heat and won’t crack as the house expands.
Step 8: Install the Finish Trim
Snap on the finishing trim pieces – these cover the nail heads and give the eave a polished look. Align them so the corners meet neatly; a little wood filler can hide any gaps.
When the trim is in place, give the whole assembly a quick visual check from the ground. The soffit should look like a continuous band with no visible seams.
Step 9: Double‑Check Ventilation
Climb up and verify that the vent openings are clear. If you used solid panels, make sure the drilled holes line up with the attic baffles you installed earlier.
A simple piece of cardboard held against the soffit while a fan blows air can confirm that air is moving in the right direction.
Step 10: Clean Up and Test
Pick up all debris, sweep the roofline, and remove any stray nails. Then, on a breezy afternoon, close the attic door and feel for a draft at the soffit – you should sense fresh air flowing in.
If the draft feels weak, double‑check your vent spacing or add a few extra vent strips. A well‑ventilated soffit can shave up to 15 % off cooling costs, according to the data we’ve gathered from local homeowners.
Now you’ve got a solid, breathable soffit that’ll protect your home for years. Congratulations – you just turned a weekend project into a long‑term energy saver.
Comparing Soffit Types: Vinyl vs Aluminum vs Fiber Cement
Choosing soffit material isn’t just about looks. It’s about durability, maintenance, and how well the system breathes. At LGFMH Construction, we’ve seen that the right soffit can cut attic heat, reduce moisture issues, and save headaches down the line.
Let’s break down the three main options you’ll see on most homes: vinyl, aluminum, and fiber cement. Think of this as your quick confidence check before you talk to a pro or start a project.
Vinyl: budget-friendly but weather-sensitive
Vinyl soffit is often the cheapest route up front. It won’t need painting, and the color runs through the material, so you'll enjoy consistent looks with minimal upkeep. But it’s not perfect. Extreme heat, rapid temperature swings, or heavy storms can cause warping or cracking, especially at edges and joints. That’s why vinyl works best in milder climates or for homeowners who want a low up-front cost and are prepared for occasional edge repairs.
In a coastal state like ours, you’ll want to watch for UV fading and wind-driven wear. If you choose vinyl, ask about perforated panels for ventilation and look for higher-grade vinyl with reinforced edge detailing to extend life.
Aluminum: durable, versatile, and long-lasting
Aluminum soffits resist rot, don’t warp, and hold color well when you choose a baked‑on finish. They’re light, easy to install, and maintenance is minimal—usually just a rinse now and then. The main tradeoff is cost: aluminum typically carries a higher upfront price than vinyl, but its longevity often pays off in the long run. It’s also non‑combustible, which adds a safety bonus for many homeowners.
If you live in a humid or coastal climate, aluminum shines because moisture won’t compromise the panels the way wood or untreated metals might. It’s our go‑to when clients want a robust, low‑maintenance solution that doesn’t require frequent repainting.
Fiber cement: rugged, wood‑looking, and very low maintenance
Fiber cement blends cement with cellulose fibers, delivering a sturdy panel that resists rot, insects, and swelling in humidity. It can mimic wood grain without the upkeep, which makes it popular for homeowners who crave a traditional look with modern durability. The downsides are heavier panels and typically higher installation costs, so you’ll want a pro with the right tools to install it correctly.
In projects where termites or moisture are real concerns, fiber cement provides a long‑term solution that still looks substantial and polished. For historic homes or rainier climates, it’s a reliable middle ground between appearance and resilience.
Which one is right for you? A quick guide
Climate first, budget second, maintenance a close third. If you want the most durable, low‑maintenance option with minimal upkeep, aluminum is often the best fit. If you’re chasing a wood aesthetic with solid durability and a one‑time investment appeal, fiber cement is compelling. If you’re building tight on a budget and your climate isn’t harsh, vinyl can work—just expect a bit more attention to edges and UV wear over time.
Feature | Vinyl | Aluminum | Fiber Cement |
Durability | Moderate; prone to warping/cracking in extreme heat | High; resist rot and warping | High; moisture and insect resistant |
Maintenance | Low; painting unnecessary, color baked in | Low; occasional cleaning, rare repaint | Low to moderate; long lifespan, occasional sealant checks |
Upfront cost | Low | Moderate to high | High |
For homeowners weighing options, a quick chat with a local pro helps. We can assess your attic ventilation needs, climate, and aesthetics to recommend the best match. And yes, platforms like LGFMH Construction make this easier by aligning material choices with installation and venting considerations.
If you’d like to dive deeper into the vinyl vs aluminum debate, this detailed guide covers the nuances and real‑world tradeoffs: Parallel’s vinyl vs aluminum soffit comparison .
So, what’s next? Start with your climate, check your budget, and imagine how the soffit will perform 10–20 years from now. You don’t have to decide alone—we’re here to help you pick a material that protects your home and stays beautiful with less fuss.
Maintenance, Inspection, and Repair of Soffits
We all know that feeling when you step onto the porch and notice a faint draft or a small water stain on the ceiling—suddenly the soffit becomes the star of the show. The good news? Most soffit problems can be caught early, and fixing them is often a weekend DIY project unless the damage is extensive.
1. Set a bi‑annual inspection habit
Mark your calendar for early spring and again in late fall. Those two windows catch the seasonal extremes when moisture and wind stress are at their peak. Grab a sturdy ladder, a flashlight, and a quick checklist. Look for cracked panels, rust spots on metal, or any warping in wood. A half‑inch gap between the soffit and the siding is the sweet spot for airflow; anything tighter could choke ventilation.
In our experience in Tampa, a family who skipped the fall check ended up with a busted aluminum panel after a sudden gust. The tiny crack let rain seep in, and they faced $2,500 in attic repairs. A quick visual in October would have saved them both time and money.
2. Spot the four common culprits
Even if you’re not a contractor, you can recognize the warning signs that most homeowners miss:
Improper installation spacing:Too far apart and wind can lift the panels; too close and airflow is blocked.
Moisture damage:Look for blistering, peeling paint, or a musty smell. Moisture often starts in the attic and works its way out.
Dry rot:Tap a wooden soffit with a screwdriver—if it feels soft or pieces break off, rot is already at work.
Animal intrusion:Small holes or gaps invite raccoons, squirrels, or even birds. Check for fresh droppings or chew marks.
These are the exact issues highlighted by roofing pros across the country, and they line up perfectly with what we’ve seen on the job site.
3. DIY repair steps you can handle
If the problem is minor—say a few cracked vinyl panels or a rusted nail—here’s a quick, actionable plan:
Clean the area with a garden hose or a soft brush to remove dirt and debris.
For metal, sand the rust spot lightly, then apply a corrosion‑resistant primer and a matching paint.
For wood, scrape any loose paint, treat the wood with a wood preservative, then repaint or stain.
Replace cracked vinyl or aluminum panels by measuring the exact length, cutting with a fine‑tooth blade, and securing with corrosion‑resistant screws (two per panel is enough).
Seal the top and bottom edges with a high‑quality silicone caulk to keep wind‑driven rain out.
Tip: Keep a spare set of panels on hand—especially during hurricane season—so you don’t scramble for a quick order when a storm hits.
4. When to call in the pros
There’s a line between a weekend fix and a structural issue. If you notice any of these red flags, it’s time to reach out to a professional:
Extensive rot that’s soft to the touch.
Large sections of missing or severely warped panels.
Repeated water stains despite patching attempts.
Unusual noises in the attic that suggest a pest nest.
LGFMH Construction can assess the full scope, replace damaged fascia, and ensure the venting ratio meets local code (Florida typically calls for 1 sq ft of vent per 150 sq ft of attic). A proper repair not only stops leaks but also restores the energy‑saving airflow that can shave up to 15% off cooling costs.
5. A simple maintenance checklist
Print this out and stick it on your fridge or in your tool box:
Check for cracks, rust, or rot twice a year.
Verify the ½‑inch ventilation gap.
Clear debris (leaves, nests) from vent openings.
Apply caulk to any new seams after replacement.
Document any repairs with photos for future reference.
Doing this once a season keeps the soffit humming, and you’ll catch problems before they become expensive surprises.
Remember, the soffit is the quiet hero of your home’s envelope. A little attention now means a dryer attic, lower energy bills, and fewer emergency calls later.
Conclusion
We've walked through everything from why a soffit matters to how you can keep it humming year after year.
So, what does that mean for you? It means a quick visual check twice a year and a half‑inch gap can save you from costly leaks, sky‑high AC bills, and those nasty attic odors.
In our experience at LGFMH Construction, the homes that stay on top of their soffit maintenance rarely see water stains or premature rot. A little habit—like snapping a photo after each spring inspection—helps you spot changes before they turn into big repairs.
Remember the three things we highlighted: clear ventilation, sturdy fascia, and timely repairs. If any one of those slips, the whole system suffers.
Looking ahead, treat your soffit like the lungs of your house. Breathe life into it with regular cleaning, seal any fresh seams, and don’t hesitate to call a pro when rot shows up.
Ready to take the next step? Grab that checklist, give your eaves a once‑over, and if you hit a snag, reach out to LGFMH Construction for a quick, no‑pressure assessment.
With a healthy soffit, you’ll enjoy a drier ceiling, lower energy costs, and peace of mind knowing your home’s envelope is doing its job.
And that’s how a simple piece of trim can protect your whole home.
FAQ
What exactly is a soffit, and why does it matter to my home?
Soffit is the underside of your roofline, the space under the eaves that hides framing while letting air move through the attic. When soffits vent properly, moist air escapes, heat is drawn out, and your shingles stay cooler. If the soffit is damaged, rainwater can sneak in and moisture can roost in insulation, inviting stains and mold. If you're unsure, a quick inspection by a pro can save you bigger headaches.
How can I tell if my soffit needs repair?
Start with a visual check from the ground and in the attic. Loose, sagging, or rattling panels are red flags. Look for peeling paint, rust on metal, or gaps around the edges. Water stains, musty smells, or damp insulation in the attic signal leaks. If you can push a panel with your finger and it moves, it’s time to call a pro.
What materials are available for soffits, and which is best for a climate like Tampa's?
Common soffit materials include aluminum, vinyl, fiber cement, and wood. Aluminum lasts long and resists rot, making it popular in humid climates. Vinyl is affordable but can warp in extreme heat. Fiber cement mimics wood without rot and offers durability, though heavier and costlier. Wood looks warm but requires ongoing maintenance. In our experience, aluminum or fiber cement balance durability with maintenance in Tampa's humidity.
How often should soffits be inspected and maintained?
We recommend a quick biannual check—spring and fall—plus after major storms. Look for cracks, rust, loose screws, and clogged vents. Ensure there’s enough gap between soffit and siding for airflow. Keep gutters clean so water isn’t spilling onto the soffit. Regular checks now can catch rot or leaks before they become costly repairs. If you notice evidence of moisture or musty smells, extend checks to after heavy storms.
Can I repair soffits myself, or should I hire a professional?
Small cosmetic fixes, like resealing seams or replacing a single damaged panel, are doable if you’re comfortable on a ladder. If you see rot, extensive rust, loose fascia, or bent vent channels, call a professional. Incorrect ventilation or poor panel overlaps can trap moisture and cause bigger issues. When in doubt, a pro can assess, plan, and execute with proper safety and warranties.
What quick fixes can protect my soffit while waiting for a repair?
Keep gutters clear and repair minor cracks with exterior caulk to seal water entry points. Clean away debris from vents so air can circulate. Reposition loose panels and reseat them in the starter strip if needed. For exposed edges, a fresh bead of silicone helps seal against rain. These small steps won’t replace a full repair, but they buy you time today.
How can LGFMH Construction help with soffit projects, and what makes our approach different?
As exterior repair specialists, we assess the whole envelope, not just the visible trim. We inspect ventilation needs, replace damaged panels, reseat fascias, and seal edges for weatherproofing. Our process coordinates siding, fascia, and soffit so everything fits and breathes correctly. If you want a quick assessment or material options, we’re here to help you decide what fits your home and budget.


Comments