Stucco Repair Virginia Beach: Complete Guide for Homeowners
- William McKracherne
- Feb 7
- 17 min read


Ever walked past a home in Virginia Beach and thought the stucco looks like it’s about to peel off? You’re not alone – that cracked, water‑stained finish can make any homeowner’s heart skip a beat. In this intro we’ll unpack why stucco repair virginia beach is more than a quick fix.
But here’s the thing: stucco isn’t just a pretty façade. When moisture sneaks behind it, you can end up with mold, structural weakening, and a drop in curb appeal that hurts resale value. Have you ever wondered how a tiny crack can snowball into a costly repair?
Picture this: you’re sipping coffee on your porch, and a rainstorm rolls in. A few minutes later you notice water dripping inside the wall cavity. That’s a classic sign the stucco barrier has failed, and ignoring it only makes the problem spread.
So, what’s the smartest way to tackle it? First, you need a thorough inspection – look for hairline cracks, bulging sections, or discoloration. Next, address the root cause: is it poor drainage, salt air from the Atlantic, or simply age? Once you know the why, the how becomes clearer.
In our experience at LGFMH Construction, we start by gently cleaning the surface, then applying a high‑quality, moisture‑resistant stucco mix that matches the original texture. It’s not just about slapping on new material – we also seal joints and install proper flashing to keep future water from sneaking in.
But don’t you worry about the cost – a well‑done repair actually saves you money in the long run. By stopping water intrusion now, you avoid expensive interior wall replacements, mold remediation, and the headache of dealing with insurance claims later. Isn’t that a relief?
If you’re ready to protect your home’s curb appeal and keep the interior dry, the next step is simple: reach out to a local pro who knows the nuances of coastal weather and Virginia Beach building codes. A quick consult can pinpoint the exact repair plan and give you peace of mind.
TL;DR
If your Virginia Beach home shows cracked, water‑stained stucco, you’ve likely got a hidden moisture problem that can cost thousands if ignored.
Our quick guide shows how to spot the signs, choose the right repair method, and get reliable stucco repair Virginia Beach help before the damage spreads for you.
Understanding Stucco Damage in Virginia Beach
Let’s get real about this weather. If you live in Virginia Beach, the combination of humidity, salty sea air, and heavy rain takes a toll on exterior finishes like stucco. It’s not just about a crack that looks ugly; it’s about moisture finding a way behind the surface and doing real damage over time.
So what does stucco damage actually look like? Hairline cracks, bulging or loose sections, and water stains on the surface are the obvious red flags. Inside the wall cavity you might notice damp spots, musty odors, or more pronounced staining on interior drywall near exterior walls. Any of these signals mean moisture is creeping where it shouldn’t be.
Why coastal Virginia Beach is hard on stucco
Coastal climates pound homes with rain, wind-driven spray, and high humidity. Salt air accelerates corrosion on metal components behind the stucco and can push moisture into tiny gaps. Add aging stucco or flashing that wasn’t installed perfectly, and you’ve got a recipe for faster deterioration. In short, this isn’t a “one-and-done” fix; it’s ongoing maintenance against a very specific environment.
What happens if you ignore it
Moisture trapped behind stucco can cause wood framing to rot, mold to grow, and insulation to lose its effectiveness. That doesn’t just threaten your walls—it can drag down indoor air quality, create musty smells, and lead to bigger interior renovations that cost a lot more than a proper exterior repair today.
How we assess and approach repairs in Virginia Beach
First, you want a careful exterior inspection. Look for obvious cracks, bulges, and staining, and check drainage points like gutters and downspouts to ensure water is moving away from the wall. If you’re not sure about the moisture level behind the surface, a professional will use moisture meters and observation to guide the plan.
In our experience at LGFMH Construction, we start by gently cleaning the surface, then apply a high-quality, moisture-resistant stucco mix that matches the original texture. We don’t just patch; we seal joints and install proper flashing to keep future water from sneaking in. It’s about creating a durable barrier, not a quick cosmetic fix.
So what’s the right path for your home? Often it’s a combination of targeted repairs to the skin plus improvements to drainage and flashing so the problem doesn’t recur. The extent of repair depends on how deeply moisture has penetrated the substrate and whether there’s underlying framing damage. Coastal homes in Virginia Beach frequently benefit from a full exterior refresh that reestablishes a robust moisture barrier rather than quick patches that may fail in a few seasons.
Does that sound like a plan you can get behind? If you want a local, trusted evaluation of stucco damage and a tailored repair plan for Virginia Beach’s climate, a pro doesn’t have to be a mystery. The right team will map out root causes, costs, and timelines, so you know exactly what to expect and when.
For readers who want reliable, coastally savvy exterior work, LGFMH Construction is a natural fit. We specialize in interior and exterior repairs and replacements, with a focus on moisture management, flashing, and durable stucco finishes suitable for Virginia Beach homes.
Step-by-Step Stucco Repair Process
Alright, you’ve spotted those hairline cracks or a small chip on your home’s façade, and you’re thinking, “Do I need to call a pro, or can I tackle this myself?” The good news is that many stucco repair virginia beach jobs can be handled with a systematic approach, especially when the damage is limited to a few sections.
1. Assess the Damage and Gather Materials
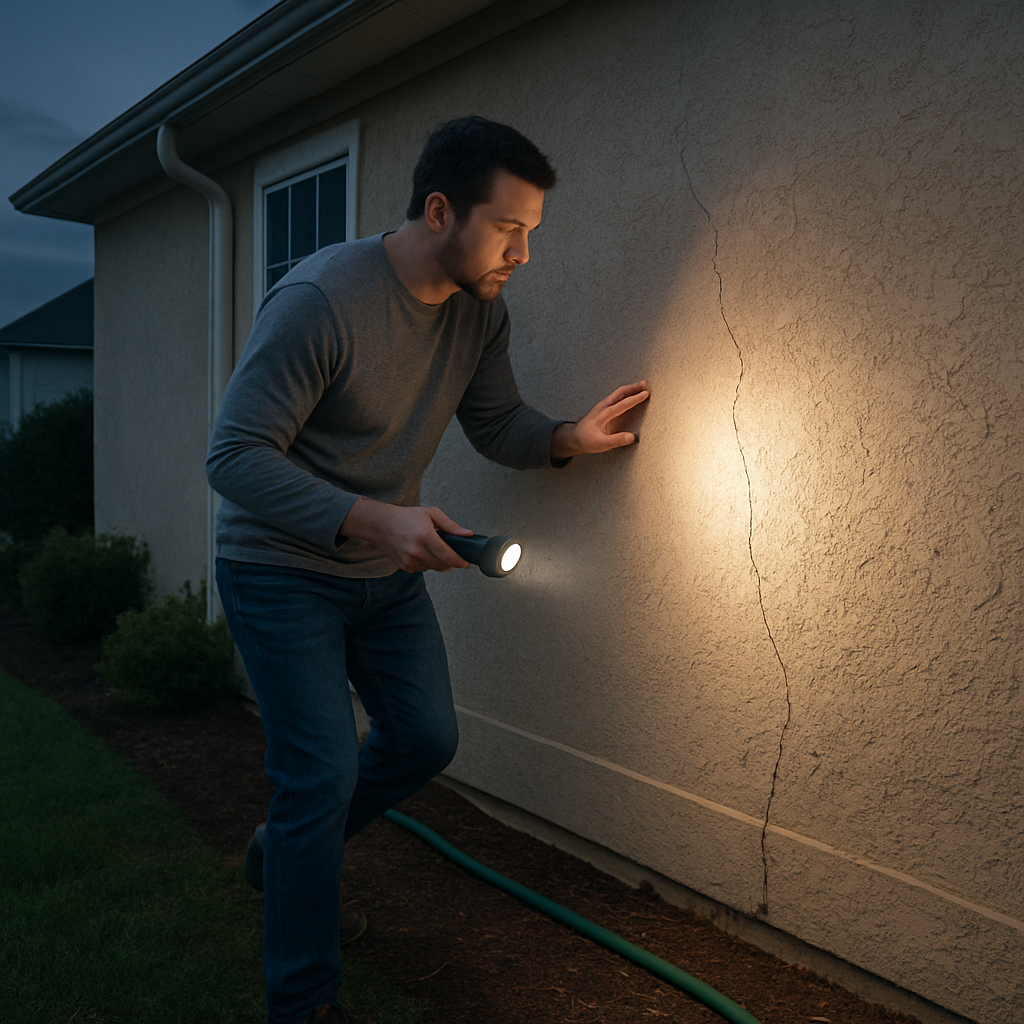
First, walk the perimeter with a flashlight and a moisture meter if you have one. Look for cracks wider than ¼ inch, spalling, or any water stains behind the stucco. In our experience, a quick visual check plus a moisture reading above 15 % usually means you need to intervene now rather than later.
Once you’ve scoped the problem, make a short checklist: safety goggles, dust mask, a hammer drill, a utility knife, a mixing bucket, a trowel, and a high‑quality, polymer‑modified stucco mix. For texture matching, keep a small sample of the existing finish – you’ll need it later to blend the repair seamlessly.
2. Prepare the Work Area
Clear any loose debris around the crack with a stiff brush. If the area is outdoors, cover nearby plants or furniture with drop cloths to protect them from dust.
Next, wet the surrounding stucco lightly. A damp surface helps the new mix bond better and reduces the chance of suction cracks. Let it sit for about five minutes, then scrape away any crumbling material using a cold‑chisel and hammer. The goal is to get back to solid, sound lath.
3. Install a Moisture Barrier (If Needed)
Sometimes you’ll uncover a gap where a flashing or waterproof membrane is missing – a common culprit in coastal Virginia Beach homes. Slip a self‑adhesive flashing tape or a thin sheet of roofing underlayment over the exposed lath. Press it firmly; this layer acts like a raincoat for the patch.
4. Mix and Apply the Scratch Coat
Follow the manufacturer’s directions – usually a 1:1 ratio of powder to water, mixed to a smooth, peanut‑butter consistency. Apply a thin “scratch coat” about ¼ inch thick using the trowel, then run a notched rake across the surface to create the familiar cross‑hatch pattern. This texture gives the next layer something to grip.
Let the scratch coat cure for 24‑48 hours, keeping it moist by misting with a spray bottle. Patience here pays off; a properly cured base prevents future cracking.
5. Feather the Finish Coat
Mix a second batch of stucco, this time adding a pigment that matches your home’s colour. Using a clean trowel, spread the finish coat over the repaired area, feathering the edges into the surrounding wall. This step is where the magic happens – you’re essentially painting with plaster.
For a textured look, press a small piece of the original stucco sample onto the wet surface, then gently roll a textured roller over it. The pattern should blend in without any obvious seams.
6. Cure and Seal
After the finish coat sets (usually 48‑72 hours), lightly mist the patch for another day to ensure proper curing. Once fully dry, apply a breathable, silicone‑based sealant around the perimeter of the patch. This extra seal helps keep moisture out, especially during hurricane season.
7. Final Walk‑Through and Maintenance Tips
Step back and inspect your work under different lighting – you’ll catch any uneven spots you might have missed. Run a garden hose along the repaired line; if water runs off cleanly, you’ve sealed it right.
To keep the repair lasting, schedule a quick visual check after each heavy rain. Clean gutters regularly and reseal window flashing annually. Small maintenance habits can extend the life of your stucco for years.
Need a quick reference? The Virginia Beach stucco patching guide breaks down the same steps with handy cost ranges, so you know exactly what to expect on the budget side.
Remember, even a modest repair can save you from a costly wall replacement down the line. By following this step‑by‑step process, you’re not just patching a crack – you’re protecting your home’s curb appeal and structural health for the long haul.
Choosing the Right Materials & Contractors
When you finally decide that your stucco needs fixing, the next big question is – what should you actually use, and who should you trust to do it? That’s the part that trips up most homeowners in Virginia Beach because the market is flooded with cheap mixes and “hand‑yman” ads that sound good on paper but fall apart when the next storm hits.
First, let’s talk material. In coastal Virginia, you want a mix that can shrug off salt air, high humidity, and occasional wind‑driven rain. Polymer‑modified stucco is the gold standard here – it adds flexibility, so the wall can expand and contract without cracking. It also improves water resistance, which is crucial when the Atlantic breeze sneaks into tiny gaps.
But you don’t have to buy a mystery bag from the big‑box store and hope for the best. Look for products that list a minimum of 10% acrylic polymer content and have been tested to ASTM C 926 standards. A quick phone call to a local supplier can confirm whether the mix is rated for “coastal exposure.”
Choosing the Right Contractor
Even the best material can fail if the crew doesn’t apply it correctly. Here’s a quick checklist you can run through on a coffee break:
License and insurance – verify the contractor’s Virginia Beach license number on the state website.
Portfolio of recent stucco jobs – ask for photos of a project completed within the last 12 months, ideally on a home similar in age and style to yours.
References that mention moisture‑resistant finishes – you’ll hear a homeowner say something like, “The patch held up through two hurricanes.”
Written warranty on both materials and labor – a 5‑year guarantee is a solid baseline.
We’ve found that local crews who specialize in exterior work tend to understand the nuances of our climate better than a generic “handyman.” For example, a contractor who also does gutter repair will usually coordinate flashing and sealant work at the same time, saving you both time and money.
One homeowner we helped had a cracked stucco band around a sliding patio door. The contractor they hired used a standard cement‑based mix and skipped the moisture barrier. Within a month, the crack re‑appeared, and water seeped into the interior. After switching to a polymer‑modified mix and a certified contractor who installed a self‑adhesive flashing tape, the repair held up through the next two heavy rain events without any sign of leakage.
Actionable Steps Before You Sign a Contract
1.Get three written estimates.Make sure each includes a line‑item breakdown: demolition, lath prep, moisture barrier, scratch coat, finish coat, sealant, and cleanup.
2.Ask for a material data sheet.The contractor should be able to hand you the product’s technical specs – look for the polymer content and water‑resistance rating.
3.Schedule a pre‑work inspection.A qualified pro will walk the site, note any underlying issues (like rot behind the lath), and adjust the scope accordingly.
4.Confirm the warranty language.It should spell out who’s responsible for material failures versus installation errors.
5.Set a realistic timeline.In Virginia Beach, the curing process often needs extra moisture control during hot July days, so a typical job takes 7‑10 business days from start to finish.
Following those steps will help you avoid the dreaded “DIY‑ish” finish that looks fine until the next tide rolls in. And if you’re still unsure, you can always lean on our own expertise – our stucco repair services in Virginia Beach are designed to walk you through every decision point.
Quick Comparison Table
Feature | Standard Cement Stucco | Polymer‑Modified Stucco | Why It Matters in Virginia Beach |
Flexibility | Low – cracks with movement | High – stretches with temperature swings | Coastal temperature changes cause expansion; flexibility reduces cracking. |
Water Resistance | Moderate – needs extra sealant | High – built‑in barrier | Salt‑laden air accelerates water penetration; higher resistance = longer life. |
Warranty Length | 1‑2 years (material) | 5+ years (material) | Longer warranty gives peace of mind during hurricane season. |
Bottom line: invest a bit more up front for a polymer‑modified mix and a licensed contractor who follows the proper prep steps, and you’ll save yourself from repeated repairs, rising energy bills, and sleepless nights watching rain seep through cracks.
Cost Estimates and Budgeting for Virginia Beach Repairs
When the first line item on your repair quote makes your heart skip a beat, you know you’ve hit that dreaded budgeting wall. It’s normal to feel a mix of anxiety and curiosity – you’re wondering if you’ll have to dip into the emergency fund or if there’s a smarter way to stretch every dollar.
Here’s the good news: stucco repair in Virginia Beach isn’t a mysterious, one‑size‑fits‑all price tag. It breaks down into a handful of predictable components, and once you understand those, you can plan with confidence instead of guesswork.
Breaking Down the Numbers
1. Inspection & moisture testing.A thorough site visit usually runs $150‑$300. That fee covers a visual assessment, a moisture meter reading, and a short report that pinpoints the exact cause – whether it’s cracked lath, failed flashing, or hidden salt damage.
2. Demolition and surface prep.Removing spalled stucco, cleaning the lath, and applying a primer can add $2‑$4 per square foot. The price varies based on how much of the façade needs work; a small patch around a window is far cheaper than stripping an entire wall.
3. Materials.Polymer‑modified stucco mix, which we recommend for coastal exposure, costs about $12‑$18 per bag. A typical 500‑sq‑ft repair might need 8‑10 bags, so material costs hover around $120‑$180. Add a moisture barrier (self‑adhesive flashing tape) at $0.50 per foot, and you’re looking at an extra $50‑$80.
4. Labor.In Virginia Beach, licensed crews charge $45‑$70 per hour. Because the curing process often needs extra misting on hot July days, a full‑scale repair (scratch coat, finish coat, sealing) usually takes 2‑3 days, translating to $800‑$1,300 for labor alone.
Putting It All Together
For a modest repair – say, a 30‑sq‑ft crack near a patio door – you might see a total bill of $1,200‑$1,500. A larger, whole‑wall job (200‑sq‑ft) can climb to $4,000‑$6,000, especially if you opt for a high‑grade polymer mix and a comprehensive moisture barrier.
Does that sound steep? Think of it this way: a well‑executed stucco repair can prevent water‑intrusion that would otherwise damage drywall, insulation, and even the foundation. One hidden leak can easily rack up $10,000‑$15,000 in interior repairs, mold remediation, and insurance headaches.
Budget‑Friendly Strategies
1.Get three estimates.Competition drives price transparency. Ask each contractor to break down every line item so you can compare apples‑to‑apples.
2.Prioritize the moisture barrier.It’s the cheapest way to protect against future salt‑air damage. Even a $100 upgrade can save you thousands down the line.
3.Schedule during the off‑season.September through November tends to be slower for exterior work in Virginia Beach, and many crews offer a 5‑10% discount.
4.Bundle services.If you also need gutter cleaning or window flashing repaired, a single contractor can often roll those tasks into one invoice, shaving off labor overhead.
5.Ask about financing.Some local lenders and credit unions provide low‑interest home‑improvement loans that spread the cost over 12‑24 months without ballooning the total.
What to Watch for in a Quote
Beware of vague line items like “materials” or “labor” without units. A trustworthy quote will specify square footage, bag counts, and hourly rates. Also, double‑check warranty language – a solid 5‑year warranty on both material and workmanship is a hallmark of confidence.
And remember, the cheapest quote isn’t always the best value. Cutting corners on the scratch coat thickness or skipping the moisture barrier can lead to repeat repairs, which ultimately cost more.
So, how do you turn these numbers into a realistic budget?
Start by measuring the affected area (or have a pro do it). Multiply that by the average per‑square‑foot cost ($4‑$7 for demolition, prep, and labor) and add a 10‑15% buffer for unexpected surprises – like hidden rot behind the lath.
Once you have a ballpark figure, line it up with your home‑maintenance fund. If the total exceeds what you’re comfortable spending, revisit the “budget‑friendly strategies” above and trim where possible.
Bottom line: understanding each cost component gives you the power to negotiate, plan, and avoid nasty surprises when the contractor swings by with the final invoice.
By treating the repair as an investment in your home’s durability – rather than a one‑off expense – you’ll protect your curb appeal, your resale value, and most importantly, your peace of mind during the next storm.
Ready to crunch the numbers? Grab a notebook, jot down the square footage, and start reaching out for those three detailed estimates. You’ll be surprised how quickly the budget starts to feel manageable.
Preventive Maintenance Tips to Extend Stucco Life
When the last storm rolls through, you want your home’s stucco to look like it survived a gentle breeze, not a battering ram. The good news is that a handful of regular habits can keep the façade humming for years, even in salty Virginia Beach air.
1. Inspect before the season shifts
Take a quick walk around the house in early spring – before the humidity spikes – and scan for any hairline cracks, loose joints, or water stains. In our experience, catching a 1‑mm fissure now saves you from a 1‑ft spall later. Grab a flashlight and a moisture meter (if you have one) and note any readings above 15 % behind the surface.
Does that sound like extra work? Think of it as a 5‑minute health check that prevents a $5,000 interior repair down the line.
2. Seal the gaps you can see
Every window, door, and roof‑to‑wall flash point is a potential entry for rain and salt. Use a high‑quality, silicone‑based sealant to fill gaps around trim, especially after a wind‑driven rain event. A thin bead of sealant takes under a minute, but it adds a protective skin that stops moisture from sneaking behind the stucco.
Pro tip: When you’re sealing, run a garden hose along the base of the house for a minute. If water climbs up any sealed joint, re‑apply – that’s the moment you know the barrier isn’t tight enough.
3. Keep the drainage system honest
Clogged gutters are the silent killers of stucco. Leaves, pine needles, and even sand from the beach can block flow, forcing water to pool against the foundation and then seep upward. Clean gutters twice a year – once in the fall after leaves drop, and again in late winter before the spring rains.
Also, make sure downspouts discharge at least three feet away from the wall. A simple extension pipe can keep that extra moisture from pooling right where the stucco meets the footing.
4. Choose the right time for any big work
If you’re planning a full‑wall repair or a fresh coat, timing matters more than you might think. According to the best time for stucco service in Virginia Beach, spring and fall offer moderate temperatures and lower humidity – the sweet spot for proper curing. Avoid the heat of July or the freeze‑risk of December; rapid drying can cause cracking, while cold can prevent the mix from adhering.
Mark your calendar for late March to early May or late September to early November, and you’ll see a smoother finish that lasts longer.
5. Conduct a “touch‑test” after rain
After a heavy downpour, run a gloved hand over the stucco surface. If it feels cool or damp, that’s a red flag that water is still lingering inside. A quick mist with a garden hose and a re‑inspection after an hour can reveal hidden seepage points that need resealing.
Imagine you’re checking a cake for doneness – you poke, you feel, you adjust. Same idea with stucco.
6. Document and schedule
Keep a simple log: date, weather conditions, what you inspected, and any repairs you made. A one‑page spreadsheet or even a notebook works. When you look back after a year, patterns emerge – maybe the north‑facing wall always needs a touch‑up after September, or the garage door frame gets a crack every summer. Those trends tell you where to focus your preventive budget.
And when you hand this log to a contractor, they’ll know exactly where to start, saving you time and money.
7. Light‑touch maintenance you can do yourself
Every six months, give the stucco a gentle rinse with a low‑pressure hose. Avoid power washers; the force can strip the finish. Follow up with a soft‑bristle brush to dislodge any salt crystals that have settled in the pores – those tiny crystals expand with moisture and can accelerate cracking.
If you notice any white powdery residue (efflorescence), a mild vinegar solution (1 part vinegar to 4 parts water) will dissolve it without harming the mix.
These small, regular actions feel like chores, but they’re actually insurance policies against major damage.
By weaving these habits into your seasonal routine, you’ll keep the stucco looking fresh, protect the structure behind it, and avoid the panic‑inducing moments when water starts leaking indoors.
FAQ
What are the first signs that my stucco needs repair in Virginia Beach?
Usually you’ll spot a hairline crack that seems to grow after a rainstorm, or a faint white powder (efflorescence) on the surface. If the stucco feels cool or damp to the touch after a downpour, that’s a red flag that moisture is seeping behind it. You might also notice water stains inside the wall or a musty smell – both tell you the barrier has been compromised and it’s time to act before the damage spreads.
How often should I schedule a professional inspection for stucco repair Virginia Beach?
We recommend a visual check at least once a year, ideally after the hurricane season. If you notice any new cracks or water stains, call a pro within a few weeks. A thorough inspection that includes moisture testing can catch problems early, saving you from costly interior repairs later on.
Can I fix small cracks in stucco myself, or do I need a contractor?
For hairline cracks under a quarter‑inch wide, a DIY patch with a polymer‑modified mix can work if you follow proper surface prep and moisture barrier steps. However, once the crack widens, or if you see spalling or water intrusion, it’s best to bring in a licensed contractor. They’ll ensure the lath is sound, install the right flashing, and apply a sealant that holds up during the salty beach breezes.
What makes polymer‑modified stucco better for coastal homes?
Polymer‑modified stucco contains acrylic polymers that give the mix flexibility, so it expands and contracts with temperature swings without cracking. It also improves water resistance, which is crucial when salty Atlantic air constantly attacks the façade. In Virginia Beach, this extra flexibility translates to fewer repair cycles and longer‑lasting protection.
How do I prevent efflorescence from reappearing after cleaning?
Efflorescence forms when salt crystals dissolve in moisture and migrate to the surface. After you clean it with a mild vinegar solution, make sure the stucco stays dry for at least 24‑48 hours. Applying a breathable silicone‑based sealant on the cleaned area helps lock out future moisture while still allowing the wall to “breathe,” which keeps new salt deposits at bay.
Is there a best time of year to do a full stucco repair in Virginia Beach?
Spring and fall are the sweet spots. Moderate temperatures and lower humidity give the mix enough time to cure without drying too fast or freezing. Avoid the peak summer heat and the occasional winter freezes – both can cause premature cracking or poor adhesion.
What should I look for in a contractor’s warranty for stucco repair Virginia Beach?
A solid warranty will cover both materials and labor for at least five years. It should spell out who’s responsible if the moisture barrier fails versus if the finish coat cracks due to improper application. Ask for a written warranty that includes a clear process for filing a claim, and make sure the contractor is fully licensed and insured in Virginia Beach.
Conclusion
After walking through the why, the how, and the cost of stucco repair Virginia Beach, you’ve probably felt the weight of that leaky wall a little less.
Think back to the moment you first spotted a hairline crack or a stubborn white stain. That uneasy feeling? It’s the same one we chase away with a solid moisture barrier, the right polymer‑modified mix, and a little bit of timing know‑how.
What’s the biggest takeaway? Prevention beats panic. A quick visual check each season, sealing gaps before the next storm, and letting a professional handle the scratch and finish coats can save you thousands down the road.
So, what’s next for you? Grab a flashlight, run a garden hose along the base of your home, and note any damp spots. If the water climbs, it’s time to call in a licensed crew – that’s where a partner like LGFMH Construction can step in, bring the proper prep, and guarantee a five‑year warranty.
Remember, stucco isn’t just a pretty façade; it’s the first line of defense against the salty Atlantic breeze. Keep it breathing, keep it sealed, and you’ll enjoy a dry, beautiful home for years to come.
Ready to put this plan into action? A quick call or a message can get the inspection scheduled before the next rain season hits.


Comments