Understanding Deck Board Replacement Cost: A Practical Guide
- William McKracherne
- Mar 1
- 20 min read

Imagine stepping onto your deck after a long summer day, only to hear that unsettling creak as a board gives way. You’ve probably felt that mix of frustration and the sudden urge to fix it, but the big question that looms is: how much will it actually cost?
In our experience at LGFMH Construction, the deck board replacement cost can vary widely because it hinges on a few key factors. First, the material you choose—pressure‑treated pine, composite, or tropical hardwood—sets the baseline. Pressure‑treated pine might run $3‑$5 per linear foot, while premium composite can climb to $12‑$15. Then there’s the size of your deck; a 200‑sq‑ft space will naturally demand more boards, labor, and fasteners than a cozy 100‑sq‑ft patio.
Let’s walk through a real‑world scenario. A family in Virginia Beach discovered several warped boards after a harsh winter. They opted for a mid‑range composite. Materials alone cost about $2,800, and labor—our crew of two professionals working two days—added $1,600. The total landed at roughly $4,400, which, after factoring in a 10% discount for early‑season scheduling, came to about $4,000. Compare that with a DIY homeowner who chose pressure‑treated pine, bought the boards for $1,200, and spent $300 on tools; the final bill was $1,500, but they also invested a weekend of sweaty elbow grease.
Here are three actionable steps to keep your budget in check:
Get a detailed, itemized quote that breaks down material, labor, disposal, and any permits.
Consider bulk‑ordering boards if you have a large deck; many suppliers offer 5‑10% savings.
Plan for a contingency of 10‑15% to cover hidden issues like sub‑deck rot or hidden fastener failures.
And don’t forget that the cost isn’t just about dollars—it’s about longevity. Higher‑end composites may bite harder up front, but they resist rot, UV damage, and splintering, often lasting 25‑30 years with minimal upkeep.
When you’re ready to dive deeper into the whole replacement process—from assessing damage to choosing the right fasteners—our Essential Guide to Deck Replacements walks you through every step, helping you avoid surprise expenses and make confident decisions.
So, what’s your next move? Grab a tape measure, jot down the square footage, and start comparing material samples. A clear picture of the deck board replacement cost will empower you to plan, budget, and enjoy a sturdy, beautiful deck for years to come.
TL;DR
Deck board replacement cost hinges on material, size, and labor, so expect $4‑$5 k for a job or $1.5 k DIY with pine.
Get an itemized quote, add a 10‑15% contingency, and compare options to keep your budget on track while ensuring a durable, low‑maintenance deck for years and peace of mind.
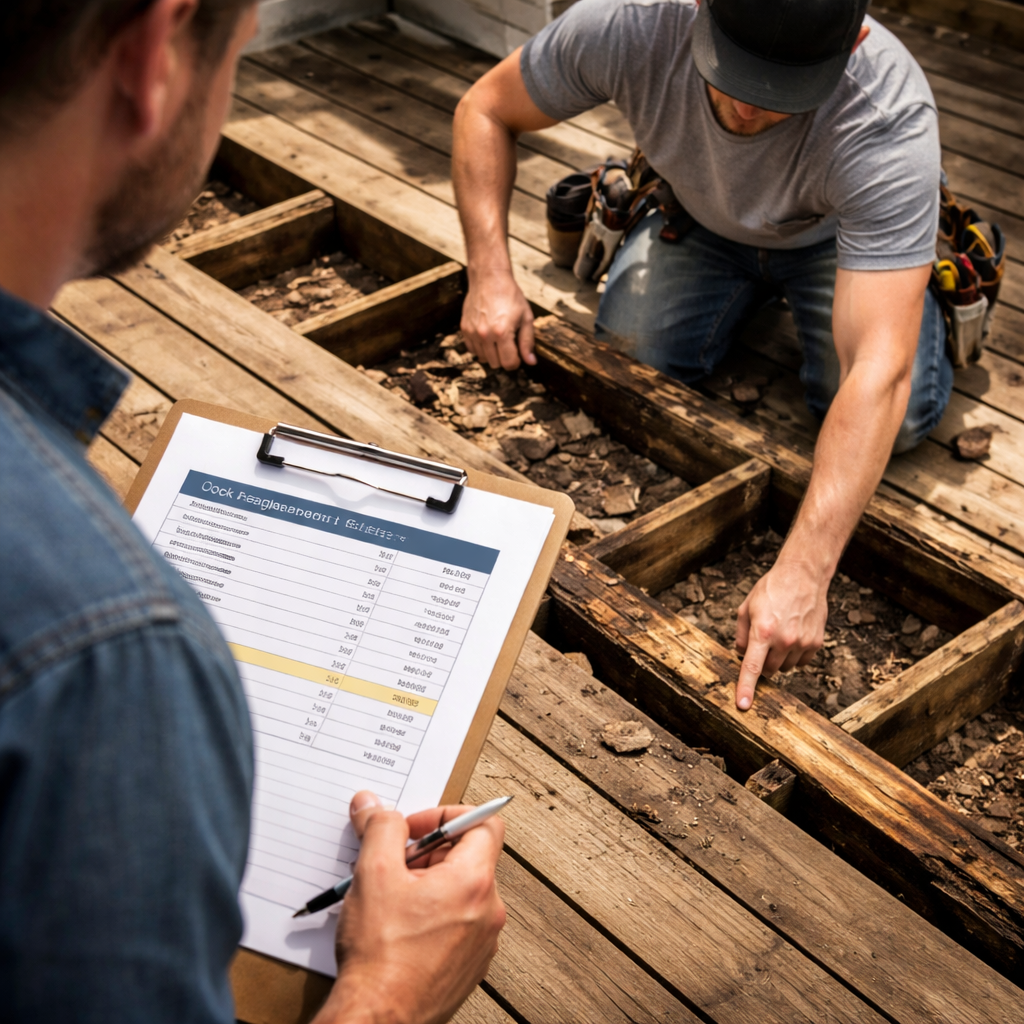
Step 1: Assess Your Existing Deck
Let’s get real for a minute. If you’re staring at warped boards or a few squeaks, it’s easy to panic about costs. In our experience at LGFMH Construction, the first move isn’t choosing materials—it's understanding what’s actually there and what could fail next.
Safety first. Start by securing the area. If a post or railing wobbles, or if a loose board sits right near a high-traffic doorway, treat it as a red flag. Shut off any nearby lighting or outlets to avoid shorts while you inspect.
Do a thorough visual check
Walk the entire deck with a critical eye. Look for warped, cupped, cracked, or splintered boards. Note any nails or screws rusted or proud of the surface; these aren’t just rough to step on—they signal fastener failure.
Check rail posts and balusters for tight fit and corrosion.
Inspect the joists near the ledger board for softness or staining—these indicate moisture damage beneath the boards.
Examine flashing where the deck meets the house; rust or peeling paint can mean water intrusion.
Spot areas where the deck sags or feels spongy—those are red flags for substructure issues.
After this pass, you should have a clear sense of scope: of the boards to replace, where joists might need sistering, and whether the ledger needs attention. If you’re not sure, think about hiring a pro to do a more precise assessment—a second pair of eyes can save you from surprises later.
Documenting your findings helps a lot when you start comparing quotes. Take photos from multiple angles, note measurements of damaged areas, and keep a running tally of what’s affected. The more you document now, the less guessing you’ll do later.
What to measure and catalog
Deck footprint in square feet (measure the overall area).
Number of boards to replace, broken down by material type and length.
Condition of the substructure: joists, ledger, and supports—note any soft spots or staining.
Fasteners and flashing: assess corrosion and installation quality.
As of 2026, this approach still holds: a meticulous assessment today prevents budget shocks tomorrow. If the findings show widespread rot or significant substructure concerns, you’ll be glad you started here rather than guessing later on material needs.
So, what should you do next? If the inspection reveals substantial damage, you’ll want a practical plan and clear cost estimates. Our team at LGFMH Construction can translate your notes into a realistic path forward—material choices, replacement priorities, and a phased timeline that fits your budget.
For a quick visual walkthrough of the concepts in this step, check out this short guide below:
Finally, keep in mind what you’re guarding here isn’t just dollars. A well-documented assessment helps you choose the right materials—balancing cost, maintenance, and longevity—so your deck stays solid and safe for years to come. If you’d rather not go it alone, we’re here to help interpret your findings and map out the next steps with you.
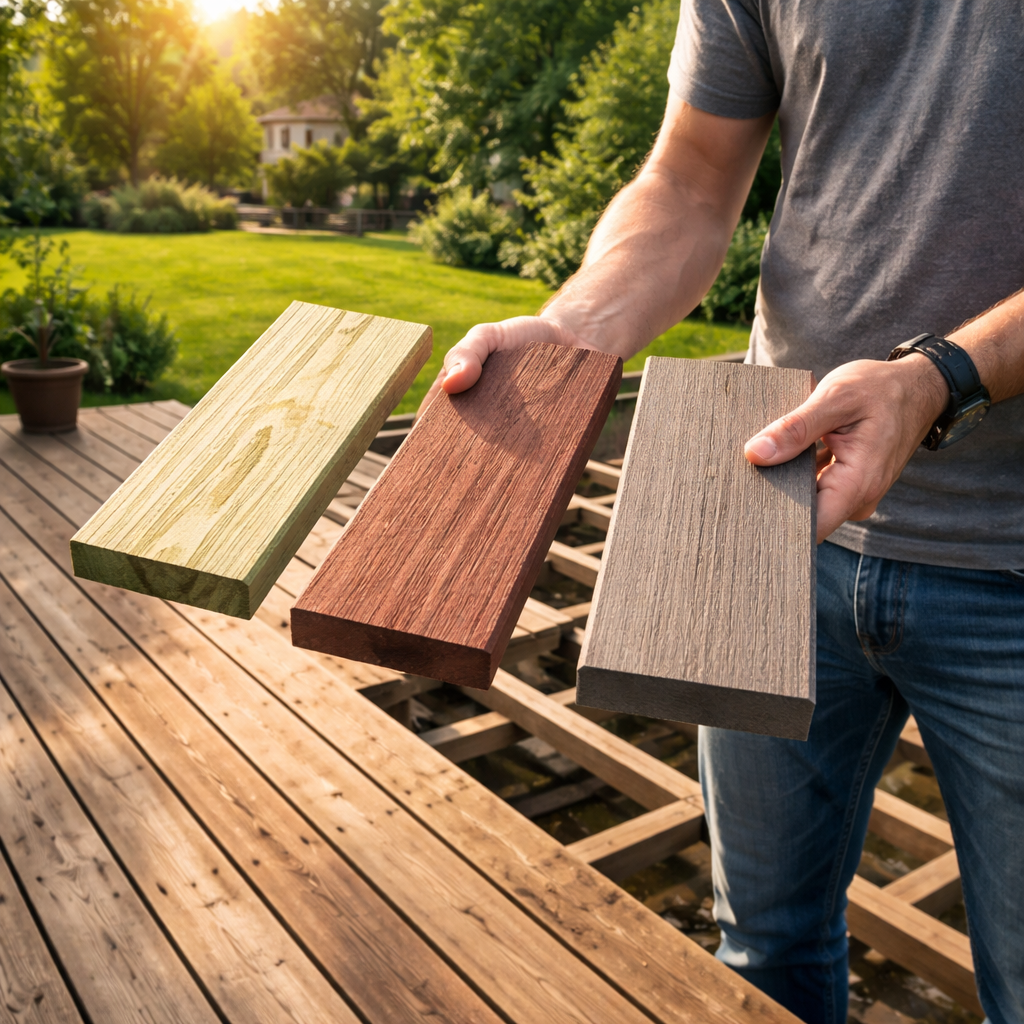
Step 2: Choose Replacement Materials
Now that you’ve scoped the damage, the next big decision is what to put back on that frame. It feels a lot like picking a new outfit for your deck – you want something that looks good, fits your budget, and can handle the weather you throw at it.
First, ask yourself: how much time do you want to spend maintaining the surface? If you’re the type who loves a quick sweep and never wants to sand every spring, a low‑maintenance composite might be worth the higher upfront cost. If you don’t mind a little occasional staining and you’re watching the price tag, pressure‑treated pine still does the job.
Material categories at a glance
Pressure‑treated pine– cheapest, easy to find, but it can warp and splinter over time. Expect a deck board replacement cost that leans toward the low end, around $3‑$5 per linear foot.
Mid‑range hardwoodslike ipe or cumaru – beautiful grain, natural rot resistance, but heavy and pricey (roughly $12‑$15 per foot). You’ll see a higher material cost but lower long‑term maintenance.
Premium composites– engineered to resist UV, moisture, and insects. Prices sit around $12‑$20 per foot, yet many homeowners find the total deck board replacement cost balances out after a decade of no staining or sealing.
Does the idea of a pricey composite scare you? Imagine you’re hosting a summer BBQ. A splintery pine board can turn a casual evening into an “ouch” moment for guests. A composite board stays smooth, so you’ll spend more time chatting and less time patching up.
How material choice impacts overall cost
Material isn’t the only driver. Think about fasteners, under‑deck ventilation, and any needed flashing. Composite boards often require hidden‑clip fastening systems that add $1‑$2 per foot, while pine works fine with standard nails or screws. Those small differences can shift your deck board replacement cost by a few hundred dollars.
And don’t forget about waste. Composite pieces are bulkier, so you might need extra disposal fees. Pine scraps are lighter and often recyclable at your local yard.
Balancing aesthetics and budget
One trick we’ve seen work is mixing materials. Use a premium composite on the high‑traffic “main” area where you entertain, and a more affordable pine on the peripheral sections you rarely walk on. That hybrid approach can shave 15‑20% off the total material expense while still giving you that polished look where it matters.
Another tip: order a full sample board and place it on your patio for a few days. Sun, rain, and shadow will reveal color shifts that photos can’t show. It also helps you gauge how the board feels underfoot – an often‑overlooked comfort factor.
What about durability? If you live in a coastal town where salt air bites wood, you’ll probably lean toward composite or a dense hardwood. Those options keep the deck board replacement cost from spiking later because you avoid premature rot.
Getting the most bang for your buck
Here’s a quick checklist you can run through while you’re at the lumberyard or browsing online:
Check the warranty – many composites come with 20‑year guarantees that cover fading and structural failure.
Ask the supplier about bulk discounts. Ordering a full 200‑sq‑ft deck at once can shave 5‑10% off the per‑foot price.
Confirm the fastener recommendation. Using the right screw or hidden‑clip system prevents warping and saves you a repair visit down the line.
Factor in disposal. Some municipalities charge per cubic yard; ask for a quote before you load the truck.
Still feeling a little stuck? Our comprehensive guide to building and maintaining decks walks you through each material’s pros, cons, and cost‑breakdowns, so you can pick the right board without second‑guessing.
Once you’ve narrowed the list, make a simple spreadsheet: column A for material type, B for cost per foot, C for fastener cost, D for expected lifespan, and E for total estimated deck board replacement cost. Seeing the numbers side‑by‑side makes the decision feel less like a gamble.
Remember, the right material choice isn’t just about the upfront price tag – it’s about how that choice ripples through your maintenance schedule, your enjoyment of the space, and ultimately the total cost of ownership.
Take a moment now to stand on your existing deck, picture the new boards you’d love, and write down the three options that feel right for you. From there, you’ll be ready to move on to the next step: budgeting the labor and installation.
By treating material selection as the foundation of your budget, you keep the deck board replacement cost predictable and set yourself up for a deck that looks great for years to come.
Step 3: Calculate Material & Labor Costs
Okay, you’ve got your three material options in a spreadsheet and you can actually see the numbers. Now it’s time to turn those figures into a realistic budget so the deck board replacement cost doesn’t catch you off guard.
Break it down into three buckets
Think of the total cost as three puzzle pieces: material, labor, and the “everything‑else” bucket (permits, disposal, fasteners). If you can estimate each piece, the whole picture becomes crystal clear.
First, grab your spreadsheet and add two new columns: one forlabor per square footand another forextra fees. It may feel a little nerdy, but trust me – the peace of mind is worth the extra keystrokes.
1. Material costs
We already have the per‑foot price from your material list. Multiply that by the total linear footage you measured earlier. For a 200‑sq‑ft deck, that usually works out to about 80 linear feet of 5‑inch boards.
Example: pressure‑treated pine at $4/ft × 80 ft = $320. Add $0.50/ft for hidden‑clip fasteners if you go composite, and you’ll see why the material bucket can swing wildly.
2. Labor rates
Labor is where most homeowners get surprised. In our experience, professional deck installers charge anywhere from $5 to $9 per square foot, depending on crew size, region, and whether any sub‑deck work is needed.
So, for a 200‑sq‑ft deck, budget $1,000‑$1,800 for labor. If you’re DIY‑inclined, factor in your own time – a weekend of two people can easily hit 20‑30 hours, which, at a modest $30/hour, adds $600‑$900 to the cost.
Pro tip: ask your contractor for a flat‑rate quote that includes removal of old boards. That way you avoid surprise line‑items later.
3. “Everything‑else” bucket
Permits are often overlooked. Many municipalities require a building permit for deck work over a certain size – usually $50‑$150. Disposal fees vary; a typical dump charge is $75‑$120 per cubic yard.
Don’t forget fasteners, flashing, and a small contingency for unexpected rot in the joists. A rule of thumb is to add 10‑15% of the subtotal as a safety net.
Quick budgeting checklist
Calculate material total (price × footage).
Estimate labor (pro rate or DIY hourly).
Add permits, disposal, fasteners.
Apply a 10‑15% contingency.
When you add those numbers together, you’ll have a solid estimate of the deck board replacement cost and can decide whether to go DIY or call in the pros.
Sample cost table
Cost Component | Estimated Range (per sq‑ft) | Tips to Reduce |
Material | $3‑$20 | Buy in bulk, ask for supplier discounts. |
Labor | $5‑$9 (pro) or $30‑$40 (DIY hourly) | Get multiple quotes, schedule during off‑season. |
Permits/Disposal | $0.30‑$0.60 | Check local code for exemptions, recycle wood scraps. |
Notice how the ranges overlap? That’s why a spreadsheet is your best friend – you can plug in the low, middle, and high ends to see a realistic budget window.
If you’d like a deeper dive into how each of these numbers interacts, our essential guide to deck replacements walks you through every line item, complete with real‑world examples from homeowners across the region.
Take a moment now, fill in those columns, and you’ll have a clear, confidence‑boosting number in front of you. No more guessing, no more budget shock – just a solid plan that lets you move forward with either a DIY crew or a professional team, knowing exactly what the deck board replacement cost will look like.
Step 4: DIY vs Professional Installation
So you’ve tallied material prices, added labor estimates, and tossed a contingency in there – now the big fork in the road appears: do you roll up your sleeves and go DIY, or do you hand the reins to a pro? That decision can swing your deck board replacement cost by a few thousand dollars, and it’s not just about money. It’s about safety, time, and the peace of mind you get when the job’s done right.
When DIY makes sense
If you’ve got a weekend free, a couple of friends who aren’t afraid of a ladder, and a basic toolset (circular saw, drill, level, safety glasses), DIY can be a rewarding way to keep costs low. You’ll be paying mostly for materials, maybe a rental truck, and a few hours of your own sweat. For a 200‑sq‑ft deck, that often translates to a deck board replacement cost that stays under $2,500 when you factor in your own labor at $30‑$40 per hour.
Here’s a quick sanity check before you grab the hammer:
Do you feel comfortable measuring, cutting, and fastening boards to a sub‑deck?
Can you safely dispose of old lumber or arrange a haul‑away service?
Are you aware of local building codes and permit requirements?
If you answered “yes” to most, DIY is worth a try. Just remember to schedule a short buffer day for unexpected hiccups – hidden rot, warped joists, or a surprise that the old fasteners are rusted solid.
When hiring a professional saves you
Professional crews bring expertise that can prevent costly re‑work. In our experience at LGFMH Construction, a common surprise is discovering that the joist framing is compromised once the old boards come off. A contractor will spot that early, suggest reinforcement, and adjust the deck board replacement cost before you’re left with a half‑finished project.
Pros also handle:
Permitting paperwork and inspections, which can add $50‑$150 but keep you on the right side of the code.
Proper disposal of debris – many municipalities charge per cubic yard, and a crew will know the most economical route.
Warranty coverage on both materials and labor, which can be a lifesaver if a board warps after a season.
If you value a guaranteed finish, want to keep your warranty intact, or simply lack the time, hiring a crew usually bumps the deck board replacement cost into the $4,000‑$6,000 range, but the risk of hidden expenses drops dramatically.
Hybrid approach: best of both worlds
Some homeowners split the difference: they do the demolition and disposal themselves, then bring in a pro for the precise installation of the new boards. That can shave $500‑$800 off a full‑service quote while still delivering a clean, code‑approved result.
Think about it like this: you handle the heavy lifting you’re comfortable with, and the pros step in for the parts that need a trained eye. It’s a smart way to keep the deck board replacement cost realistic without sacrificing quality.
Decision checklist
Grab a notebook and run through this short list. Tick the boxes that feel true for you, then compare the total cost you’ve calculated for each scenario.
Do I have the tools and safe workspace?
Am I confident I can spot hidden structural issues?
Do I have time to dedicate 2‑3 full days?
Is a warranty or code compliance a priority?
Count up the numbers – material + your labor rate vs. material + professional labor + permit fees. The option with the lower overall deck board replacement cost that still meets your safety and quality standards wins.
Still on the fence? Our Essential Guide to Deck Replacements walks you through the exact questions to ask a contractor and the red flags to watch for during a DIY install.
Bottom line: whether you swing a hammer or hire a crew, the key is a clear budget, a realistic timeline, and a plan for those “just in case” surprises. Once you’ve checked those boxes, you’ll know exactly which path keeps your deck board replacement cost in line with your expectations and gets you back to enjoying that summer evening on a solid, beautiful deck.
Step 5: Budgeting Tips & Hidden Costs
Alright, you’ve got your material list and labor estimates on paper. Now the real trick is keeping thedeck board replacement costfrom sneaking up on you after you’ve already lifted the first board. That’s where a solid budgeting plan and a few hidden‑cost safeguards come into play.
Start with a clear, line‑item budget
Grab a spreadsheet or even a simple notebook and break everything down into three buckets: material, labor, and “everything else.” Write the exact price per foot for your chosen boards, then multiply by the linear footage you measured. Next, plug in the labor rate – whether it’s your own hourly cost or a contractor’s per‑square‑foot quote. Finally, list every extra fee you can think of: permits, disposal, fasteners, flashing, and even a small tool‑rental line if you need a concrete saw.
Seeing each piece in front of you makes the total feel less like a mystery and more like a roadmap.
Don’t forget the “hidden” bucket
Here’s where most homeowners get caught off guard. The first time you pull up an old board you might discover rot in a joist, a sagging ledger, or a misaligned footings that needs correction. Those items don’t show up on a material quote, but they can add a few hundred dollars – or even a thousand – to the final tally.
To protect yourself, add a 10‑15% contingency on top of the subtotal. It’s a safety net that feels like an extra line item, but it’s actually a buffer for surprises.
Typical hidden costs to budget for
Sub‑deck rot or termite damage – you may need to replace joists or add sister boards.
Permit fees – many municipalities require a building permit for decks over a certain size; they range from $50 to $150.
Disposal and haul‑away – a dump fee is usually $75‑$120 per cubic yard, plus the cost of a rental dumpster if you’re DIY.
Fastener upgrades – hidden‑clip systems for composites can cost $1‑$2 per foot extra.
Weather‑proofing accessories – flashing, sealant, and drainage mats add $0.20‑$0.40 per square foot.
Write each of those into your “everything else” column. When the numbers start to look realistic, you’ll feel more confident moving forward.
Tips to shrink the surprise factor
First, do a quick “pre‑tear‑down” inspection. Before you start ripping out boards, lift a few in a corner and peek at the joists. If they look sound, you’ve likely avoided a major expense. If you see moisture stains or soft wood, note it and adjust your contingency.
Second, get multiple quotes. Even if you’re leaning DIY, ask a local contractor for a “full‑scope” estimate that includes potential sub‑deck work. Their numbers can serve as a benchmark for your own contingency.
Third, ask suppliers about bulk‑discounts and recycle programs. Some lumber yards will take back cut‑offs for a small credit, which can shave $50‑$100 off the disposal bucket.
Sample budget snapshot
Imagine you’re replacing a 250‑sq‑ft deck with mid‑range composite. Here’s a quick snapshot of what the numbers might look like:
Material (composite).............. $3,600
Fasteners (hidden‑clip)........... $300
Labor (pro crew).................. $1,800
Permit............................ $120
Disposal (1.5 cu yd).............. $180
Contingency (12%).................. $720
Total deck board replacement cost.. $6,720
That layout makes the hidden costs visible, and the contingency feels like a purposeful part of the plan rather than an after‑thought.
Want a deeper dive into how each line item plays out in real projects? Our Deck Repair Guide: Step‑by‑Step Solutions for Common Problems breaks down typical pitfalls and offers checklists you can copy right into your budget.
Finally, keep your budget living. As you pull up boards, update the spreadsheet. If you replace a joist, add that cost immediately. If you discover a cheap disposal option, subtract it. This real‑time tracking stops the final invoice from looking like a surprise party you didn’t want.
When you finish, you’ll have a clear, confidence‑boosting number in front of you – no guesswork, no hidden shock, just a realistic deck board replacement cost that you can live with.
Step 6: Final Checklist & Maintenance
Alright, you’ve got the numbers on the table, the boards are either waiting in the yard or already in your hands, and the big question now is: how do you make sure the project stays on budget and the deck stays solid for years to come?
Quick‑look checklist before you swing the first hammer
Grab a clipboard (or open a new tab on your phone) and run through these five items. If you can answer “yes” to each, you’re in good shape.
Did you verify the total linear footage against the material order? A mismatch of even a few feet can add $50‑$100 to the deck board replacement cost.
Are all fasteners, flashing, and sealants accounted for in your spreadsheet?
Is your permit approved and posted where the crew can see it?
Do you have a disposal plan – dumpster rental, curbside pickup, or a local recycling drop‑off?
Did you set aside a 10‑15% contingency for surprise joist rot or hidden termite damage?
Crossing each box off before the first board comes up saves you from scrambling mid‑project.
Day‑of‑project walk‑through
When the crew (or you, if you’re DIY) arrives, do a brief walk‑through. Look for any new water stains, check that the sub‑deck is dry, and make sure the work area is clear of pets or kids. A quick visual now can stop a costly re‑work later.
Ask yourself, “Do I have enough space to store the old boards until they’re hauled away?” If not, arrange a temporary storage spot or a pickup service now – otherwise you’ll end up paying extra for a last‑minute dumpster.
During installation – stay in the loop
Even if you’ve hired pros, stay present for the first couple of hours. Watch how they lay the first row, how they space the joists, and whether they’re using the right fastener type for your material. It’s not about micromanaging; it’s about catching a mistake before it becomes a $200‑$300 re‑do.
If you’re doing it yourself, take a photo of each completed section. Those pictures become your proof‑of‑progress and help you reconcile the final invoice with what you actually did.
Post‑install inspection
Once the last board is screwed down, walk the entire deck. Look for any board that feels loose, any screw that isn’t flush, and any gap that could let water seep underneath. Tightening a few screws now prevents water damage that would swell your deck board replacement cost down the road.
Don’t forget the railing. Even a small wobble can hint at a joist issue you missed earlier. Give it a firm push – it should feel solid, not like a loose hinge.
Maintenance plan that keeps costs down
Now that the deck looks brand new, set a simple schedule. In the spring, give the surface a gentle sweep and a quick wash with a hose. In the fall, inspect for any signs of wear, especially after a storm.
For composite boards, a mild soap‑water rinse is enough. For pressure‑treated pine, a yearly sealant coat extends life and keeps the deck board replacement cost from spiking in a few years.
Mark your calendar for a semi‑annual check‑up: look for splintered edges, rusted fasteners, or wood that’s starting to cup. Fixing a few nails now is pennies compared to replacing an entire board later.
When things go sideways
Even the best‑planned project can hit a snag – maybe a hidden rot spot you didn’t see until the joists were exposed. If that happens, pull the board, replace the affected joist, and update your budget sheet immediately. The contingency you set aside will cover the surprise without blowing the total deck board replacement cost.
And remember, you always have a backup: our Essential Guide to Deck Replacements walks you through troubleshooting hidden issues and adjusting your budget on the fly.
Final wrap‑up
When you’ve signed off on the last invoice, take one more photo of the finished deck. Store it with your project folder – it’s proof of the work, helps with future resale value, and makes the next deck board replacement cost estimate a breeze if you ever need to expand or repair again.
Bottom line: a solid checklist, a little on‑site vigilance, and a regular maintenance rhythm turn a one‑time expense into a long‑lasting outdoor living space. You’ve done the heavy lifting; now keep the deck happy, and the dollars will stay where they belong – in your wallet, not on surprise repairs.
Conclusion
We've walked through everything from spotting early signs of wear to choosing the right material, so now the deck board replacement cost feels less like a mystery and more like a roadmap.
Think about the last time you fixed a squeaky floorboard. You probably measured, grabbed the right screw, and hoped the fix held. Replacing an entire deck works the same way—just on a bigger scale. The numbers you saw for material per square foot, labor rates, and hidden fees are the tools you need to stay in control.
So, what's the next step? Pull out the checklist you built in Step 1, plug your deck’s square footage into the cost calculator, and add a 10‑15 % contingency. If anything looks shaky—maybe a rotting joist or an unexpected fastener cost—remember you can always call a pro like LGFMH Construction for a quick on‑site assessment.
Finally, keep the routine alive: a weekly scan, a seasonal clean, and an annual inspection will keep that deck looking fresh and the replacement cost from creeping up again.
Ready to lock in your budget and get that deck looking brand new? Grab your notes, set a reminder, and let’s turn those numbers into a finished deck you can enjoy for years.
FAQ
What factors drive the deck board replacement cost?
There are three main cost drivers: material, labor, and hidden extras. Material ranges from budget‑friendly pressure‑treated pine at roughly $3‑$5 per square foot to premium composites or tropical hardwoods that can hit $12‑$15+. Labor depends on crew size, local rates, and whether you’re DIY‑ing or hiring pros – expect $45‑$90 an hour for a two‑person crew. Then come the hidden fees – permits, disposal, fastener upgrades, and any sub‑structure repairs that pop up once you lift the old boards. Adding a 10‑15% contingency helps cushion those surprises.
How do I estimate the total deck board replacement cost for my project?
Start by measuring the deck’s square footage (length × width). Multiply that by the material’s per‑square‑foot price to get a material subtotal. Next, estimate labor hours – a typical 150 sq ft deck takes about 12 hours for a two‑person crew – and multiply by the hourly rate. Finally, add line items for permits, waste removal, fasteners, and a contingency buffer. Plug everything into a simple spreadsheet and you’ll see a realistic total before you even call a contractor.
Is it cheaper to do the deck board replacement myself?
DIY can shave off the entire labor chunk, which often represents 30‑50% of the overall cost. If you already own basic tools, you mainly need a few rentals – a power sander ($40‑$45 a day) and maybe a pressure washer ($35 a day). That said, you’ll still need to budget for fasteners, disposal, and a bit of extra time for learning curves. For a 200 sq ft deck, DIY could save you $800‑$1,200, but only if you’re comfortable handling the work safely.
What hidden costs should I watch out for when budgeting?
Permits are a common surprise – many municipalities charge $50‑$200 even for a simple board swap. Disposal fees can add $150‑$400 if you need a roll‑off dumpster. Upgrading to stainless‑steel or hidden‑clip fasteners for composites runs $0.30‑$0.60 each, quickly adding up. And don’t forget sub‑structure repairs; a single rotting joist can cost $80‑$120 in lumber plus labor. Including a $200‑$300 “unexpected joist” buffer in your budget helps avoid last‑minute overruns.
How does the choice of material affect long‑term costs?
Cheaper wood like pressure‑treated pine costs less up front but needs regular sealing and may require replacement in 5‑7 years. Higher‑end options like composite or Ipe have a bigger initial price tag but can last 20‑30 years with minimal upkeep, meaning fewer future replacement cycles. When you factor in maintenance, fastener upgrades, and the lifespan, the total cost of ownership for premium materials often evens out or even comes out lower over the deck’s life.
When should I bring in a professional instead of tackling it myself?
If you spot structural issues – rotty joists, uneven framing, or integrated railings – a pro can catch problems you might miss and fix them safely. Also, if you’re using materials that require hidden‑clip systems (many composites and PVC), the learning curve is steep and improper installation can void warranties. In those cases, hiring a crew that includes insurance and a warranty on their work can save you money and headaches down the road.
How can I keep the deck board replacement cost from creeping up after the project?
Maintenance is the secret sauce. Do a quick weekly scan for loose screws, a seasonal deep clean to remove debris and check drainage, and an annual inspection where you lift a board to look at the joists. Spotting a tiny rot spot early means you replace a small section rather than a whole joist later. Stick to that routine and you’ll protect the investment you just made, keeping future replacement costs at bay.


Comments