Understanding Gutter Downspout Replacement Cost: A Complete Guide
- William McKracherne
- Jan 31
- 14 min read


Imagine standing on your porch, watching rain drip into the gutter, only to notice a leak that drips right into your basement. Sound familiar? A busted downspout can feel like a tiny leak, but it can actually cost you a fortune in water damage if ignored.
You might think, 'Just patch that up,' but a simple seal won't fix a downspout that's warped, clogged, or corroded. The real cost comes from the hidden damage that piles up over time.
So what's the price tag? In 2026, most homeowners see a replacement cost between $200 and $800, depending on material, length, and whether you DIY or call pros.
Curious how that breaks down? A single, straight PVC line can be under $200, while a custom copper system with decorative fins can hit $700 or more. Length matters—each additional foot nudges the price up.
Now, you may wonder why this matters when you can just buy a new gutter system. The answer? Downspouts work in concert with gutters to channel water away from foundations, and a weak link can undo all your hard‑worn work.
Think about the last storm you weathered. Did you notice water pooling around the footings? If yes, you’re already paying the price, even if you haven’t opened the back door to replace that part.
But you don’t have to be a DIY wizard to manage costs. A quick inspection can reveal a clogged vent, a sagging section, or a rusted flange—issues that are inexpensive to fix before they explode.
What’s the next step? Grab a flashlight, pull out a ladder, and check each joint. Look for dents, corrosion, or any loose connections. That simple scan saves you hours of headaches later.
And if you’re ready to replace, you’ll need to choose a material that matches your home’s style and climate. PVC is great for budget and longevity, copper offers a premium look, and aluminum strikes a middle ground.
Remember, the real value isn’t just the price of new downspouts—it's the peace of mind that comes with knowing your home stays dry and protected. Ready to take the first step? Let’s dive in.
TL;DR
In 2026, a single downspout replacement can cost between $200 and $800, depending on material, length, and DIY versus professional labor in your home.
Choosing PVC for budget or copper for style, and inspecting joints before storms, keeps foundations dry and saves thousands in future repairs for peace of mind.
Step 1: Assessing the Current Downspout Condition
When you step onto the porch after a storm, you can usually hear the rain hitting the gutters. But a downspout that’s warped, clogged, or rusted will turn that sound into a silent drain to your foundation.
We’ll walk through a quick, four‑step checklist that even a novice can follow. Grab a flashlight, a ladder, and a sturdy bucket—no fancy tools needed.
Step 1a: Inspect the exterior. Look for dents, loose joints, or visible corrosion. A dented section can act like a bottle neck, forcing water to back up and seep into cracks.
Step 1b: Check the interior. Pull a small piece of debris out of the pipe with a pair of pliers. If you feel resistance, a clog is likely forming inside.
Step 1c: Test the flow. Direct a garden hose into the gutter and watch the water travel down the pipe. Does it drain cleanly, or does it splash and sputter at the bottom?
Step 1d: Examine the connections. Tighten any loose nuts, replace cracked washers, and make sure the downspout sits flush against the wall. A misaligned flange can create leaks you’ll never notice until water piles up.
You might wonder, “Why bother with this routine when I could just replace everything?” The truth is, most problems are simple to fix and far cheaper than a full install.
If you’re looking for a reliable downspout supplier, check out umbrello for quality fittings and a quick delivery turnaround.
That short clip shows the exact moment a clogged downspout can cause water to back up, a visual you’ll want to remember when you’re inspecting your own.
After the video, let’s get into the nitty‑gritty. A quick rinse with a garden sprayer can often clear out the debris you’ve just spotted inside the pipe.
If you notice any rust or scale, consider swapping the affected section for a new, corrosion‑resistant piece. A 12‑inch replacement can cost around $50 but can save you $200 in future repairs.
For a quick guide on how to replace a segment yourself, visit led artistry where step‑by‑step instructions are easy to follow.
And if you’d rather get a visual walkthrough, you can also explore teveeo for a full video tutorial that covers everything from disassembly to reassembly.
You’ve now got the basics—look out for dents, clogs, flow issues, and weak connections. Those are the red flags that tell you when it’s time to act.
The next step is to decide whether you’re fixing the issue or swapping the whole pipe. Either way, keeping a log of what you find helps you budget and schedule the job.
Remember, a well‑maintained downspout isn’t just about avoiding leaks; it’s about protecting the foundation, preserving curb appeal, and keeping your home’s resale value high.
So grab that ladder, light up the area, and start your inspection—because catching a problem early means you’re not paying that $500 repair bill later.
We’ll dive deeper into replacement options in the next section, but for now, keep your eyes peeled and your tools handy; this first step can make all the difference.
Step 2: Understanding the Factors That Drive Cost
Now that you’ve got a sense of whether a repair is enough, let’s break down what actually makes a downspout cost jump.
1. Material Matters
It’s the classic “cheap vs. premium” debate. PVC is the budget hero – easy to cut, light, and usually under $200 for a straight line.
2. Length and Complexity
Every foot of pipe adds material and labor. A single straight run of ten feet is a simple job; a zig‑zagging line that climbs a two‑story roof and bends around a chimney can double the cost just because it’s harder to install.
3. Labor – DIY vs. Pro
DIY feels empowering, but even a seasoned homeowner can miscalculate slope or miss a hidden support. Professional installers bring the right tools and know the local code, which saves headaches later. That extra labor can mean a $75‑$100 hourly rate in your region.
4. Accessibility and Safety
If you’re up on a ladder, a clear roof deck, and a safe ladder platform, the job is straightforward. Crawl spaces, tight eaves, or a sloped roof can double the time and safety precautions needed.
5. Permits and Local Codes
In places like Chicago, some gutter projects need a permit. The fee might seem small, but it’s a mandatory line item that adds to the overall bill.
6. Optional Upgrades
Gutter guards, decorative finials, or a custom color finish can add anywhere from a few hundred dollars to a thousand. These are choices that can make the system easier to maintain.
Putting It All Together
When you line up these factors, you’ll see why the “average” replacement ranges from $200 to $800. It’s not just the pipe; it’s the whole package.
Want a clearer picture? Check out this quick comparison table that lines up the main drivers with their impact on price.
Factor | Typical Cost Impact | Why It Matters |
Material (PVC vs. Copper vs. Aluminum) | $200–$800 | Durability and aesthetic |
Length & Complexity | $10–$30 per foot | More pipe = more cost |
Labor (DIY vs. Pro) | $75–$100/hr | Expert installation vs. risk of mistakes |
Here’s a quick sanity check: if you have a two‑story roof with a 15‑foot run, a copper pipe, and you hire a pro, you’re looking at roughly $1,200. Cut the copper down to PVC, shave off a few feet, or tackle the job yourself, and that number slides down to about $600.
So, how do you decide which mix of material, length, and labor fits your budget? Start by asking yourself two questions: What’s the biggest risk if this goes wrong? and How much are you comfortable spending up front to avoid future repairs? The answers will steer you toward the right balance.
Remember, the cheapest option isn’t always the smartest. A slightly higher upfront cost that guarantees a leak‑free system can save you thousands in water damage down the road.
Curious how these numbers line up with local prices? Team Gutters’ cost guide gives a good sense of regional pricing and the factors that drive it.
One trick many homeowners overlook is the “maintenance budget.” Even if you spend $800 on a new downspout today, skipping routine gutter cleanouts can turn that $800 into a $2,000 repair in a few years. Setting aside a small monthly fund for cleaning, or hiring a seasonal service, keeps the system running smoothly and protects your investment.
Finally, keep a quick photo log—images of each section make future DIY fixes a breeze.
Step 3: Choosing the Right Materials & Installation Options
Okay, now that you’ve scoped out the damage, it’s time to pick the parts that will actually keep your water where it belongs. The right material can save you a ton of headaches—and money—down the line.
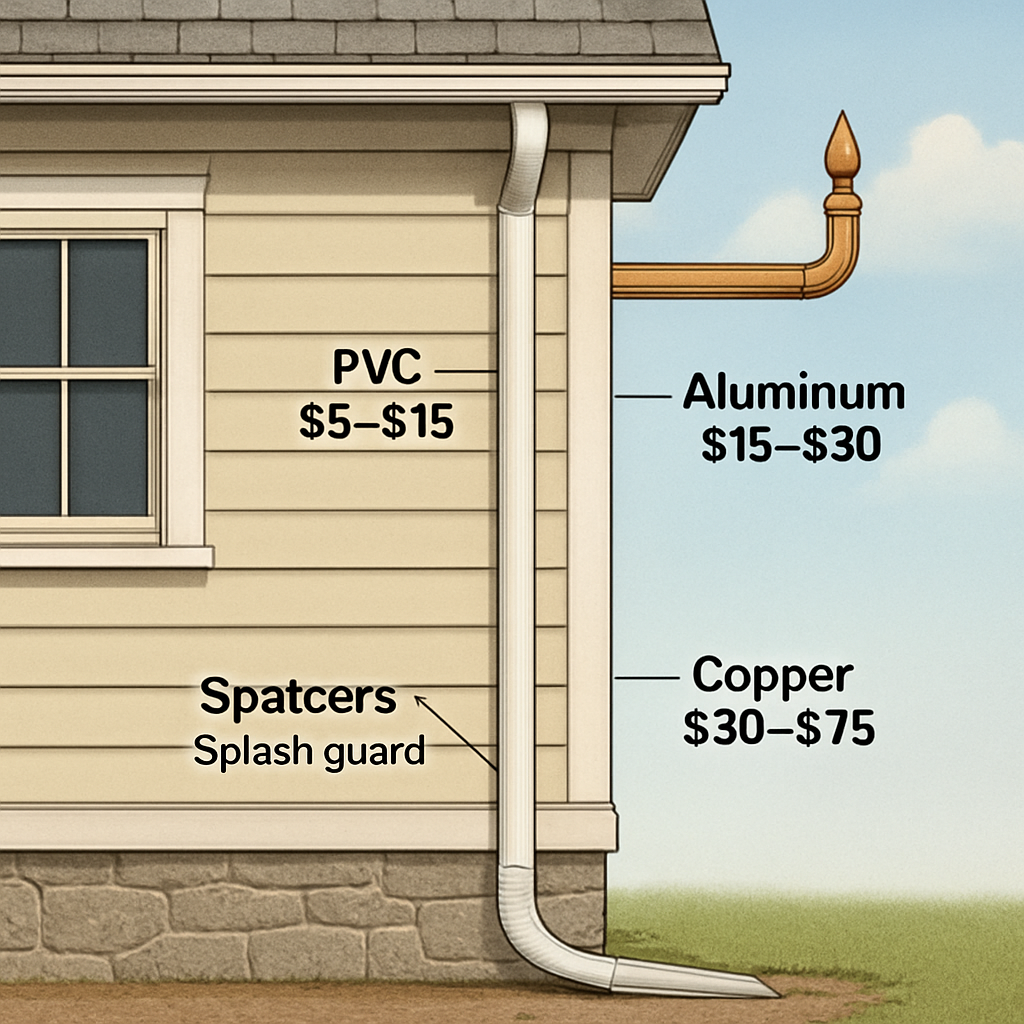
Materials that matter
There are three main families in the gutter world: PVC, aluminum, and copper. PVC is the budget champ—cheap, light, and easy to cut. Aluminum feels a bit snappier; it’s lighter than copper and can flex a touch more, which helps in windy spots. Copper is the luxury pick; it lasts a lifetime but will dent your wallet if you’re not careful with your budget.
What you choose often boils down to two things: your climate and your style. In a hot, dry spot, aluminum can expand and contract without cracking—great for Arizona‑style homes. If you live in a place that sees heavy snowfall or rust‑prone rain, a galvanized steel or copper line can outlast aluminum, even though it costs a few bucks more per foot.
Here’s a quick cost snapshot for the first 50 feet: PVC runs about $80–$100, aluminum about $120–$150, and copper roughly $200–$250. If you’ve got a 100‑foot run, those numbers double. That’s why a single decision can flip a $400 job into a $1,200 one.
Installation: DIY vs pro
Do it yourself? Sure, you’ll save on labor, but you’ll need the right tools and a steady hand. A pro knows the right slope—ideally ¼ inch per foot—and can spot hidden issues like sagging or faulty joints that you might miss.
If you’re leaning DIY, grab a sturdy ladder, a level, and a waterproof sealant kit. Measure your slope carefully; a single missing inch over 10 feet can lead to water pooling on the roof, which is a recipe for leaks.
On the flip side, a professional install can cost $75–$100 per hour, but they’ll bring a ladder rack, a proper scissor lift if needed, and the right fasteners that meet local code. In many cases, that extra cost pays for itself in fewer repairs down the road.
Accessibility matters
Some homes make the job a nightmare. Tight eaves, a steep roof, or a slanted yard can double the time a pro spends on a single run. If you have a crawl space that’s a maze, you’ll need a contractor who can maneuver around obstacles safely.
Even a small safety misstep can cost a lot. A mis‑installed downspout can leak into the crawl space, encouraging mold and wood rot. That’s a hidden cost that no DIY guide talks about.
Finishing touches that add value
Finials, splash guards, or a weather‑proof paint coat might add a few hundred dollars, but they pay for themselves by keeping the system clear of debris and protecting metal from corrosion.
For example, a splash guard can reduce gutter clogging by 40% in a leaf‑heavy neighborhood. Less clogging means less pressure on the downspout and a longer lifespan overall.
And remember, the last piece of your system is the connection where the downspout meets the wall. A proper flange—usually metal—prevents leaks and helps the water run straight into the drain. If you’re replacing a pipe, make sure to swap out the old flange as well.
When you’re ready to make a decision, it’s easy to get lost in the details. That’s why we’ve put together a quick decision matrix: material cost, climate, slope, labor, and finish. Pick the combo that gives you the best value for your budget.
Need a deeper dive into pricing? Gutter Replacement Cost Guide 2026 walks through every dollar you’ll see and offers real‑world examples from the past year.
And if you’re thinking about boosting your home’s curb appeal while you’re at it, check out Umbrello for stylish shade solutions that pair perfectly with a new gutter system.
Step 4: DIY vs Hiring a Professional
We’ve already walked through what a replacement looks like and why it matters, but the next big decision is how you get it done. The choice between DIY and professional installation isn’t just about the money you spend up front—it’s about the long‑term health of your home and your peace of mind.
When you’re on a ladder, you can feel the wind, see the gutters, and feel the weight of the pipe in your hands. That feeling is tempting, but it can also hide the hidden costs that creep in when a mistake is made.
What DIY Gets You Right Away
First, let’s talk straight: a DIY job can shave hundreds off the bill. You’ll only pay for the pipe, fittings, and the tools you already own or can borrow. Most homeowners see material costs between $200 and $600 for a straight run of PVC or aluminum.
You also get the satisfaction of a job well done—plus a few extra hours of sunshine. And if you’re handy, you’ll learn a new skill that’s handy for future projects.
Hidden Costs That DIY Can Miss
But here’s the catch. A single wrong slope, a poorly sealed joint, or a mis‑aligned elbow can turn a simple downspout into a source of basement water, mold, or even structural damage. Those problems often cost $1,000 to $5,000 in repairs, which is more than you’d spent on a pro job.
Professional installers bring a toolbox of experience and the right equipment—like a ladder rack, a digital level, and a water‑proof sealant kit that’s rated for long‑term use. They’re also familiar with local codes and building‑code‑approved fittings, which saves you from potential fines or future headaches.
When a Pro Is Worth the Investment
If your roof is steep, your home has a crawl space, or the downspout runs close to a foundation, you’re in the “harden‑it‑hard” zone. A pro can design a run that meets code, uses the right material, and ensures the slope stays at 1/8 inch per foot. That level of precision isn’t easy for a casual DIYer to replicate.
In 2026, many professionals charge between $1,000 and $2,500 for a complete installation, which includes labor, materials, and a warranty that often lasts five years or more. The extra cost is a safety net that can save you thousands in the long run.
Practical Checklist to Decide
Use this quick sheet to weigh the options:
Skill level: Can you measure, cut, and secure a 15‑foot run without mistakes?
Time: Do you have a day to devote, or do you need a quick fix?
Budget: Are you willing to pay a premium for peace of mind?
Risk tolerance: Do you want to risk future damage for a lower upfront cost?
Cross‑reference each factor with the actual cost: material, labor, permits, and potential future repairs. If the sum of potential hidden costs outweighs the upfront savings, lean toward a pro.
Real‑World Example
Imagine a 2‑story home with a 20‑foot downspout that’s currently sagging. A DIYer might cut a 20‑foot PVC piece, secure it, and feel proud. Two weeks later, a sudden storm creates a blockage, the pipe cracks, and water backs up into the crawl space. The homeowner spends $2,500 on repairs and a new pipe, plus mold remediation. Contrast that with a pro job: $1,800 upfront, properly sloped, sealed, and backed by a warranty. After a year, the system runs smoothly, and the homeowner has saved $800 in avoided damage.
So, what should you do next? Ask yourself if you’re comfortable taking the risk of future damage for the short‑term savings. If you’re on the fence, check out this guide from Green Construction that breaks down the cost comparison in detail. And if you’re still unsure, you can watch this short video that walks through the installation process, giving you a clearer idea of the time and skill required.
Remember, the goal isn’t just a lower bill; it’s a reliable system that keeps your foundation dry and your home safe. When you weigh the pros and cons with real numbers and honest self‑assessment, the right choice will surface.
FAQ
What factors drive the gutter downspout replacement cost?
The price hinges on material, length, labor, and finish. PVC is budget‑friendly, copper adds a touch of class, and aluminum sits in between. Add a few extra feet or a zig‑zag run and the cost rises because more pipe and time are required. Finally, a warranty or decorative finial can bump the price up, but it also adds long‑term peace of mind.
How much does a standard PVC downspout cost in 2026?
In 2026, a straight 20‑foot PVC line typically runs between $80 and $100 per foot when you factor in fittings. That puts a simple run at about $1,600 total. If you’re only buying the pipe and doing the job yourself, you can shave $200–$300 off the bill by skipping the labor markup. Still, make sure the pipe has the right slope, or you’ll end up paying more in water damage down the road.
Are there hidden costs I should watch for?
Yes—sealants, flashing, and a proper slope are often overlooked. If you skip the sealant, leaks can sneak in under the joint and cause rot in the crawl space. A professional will also check the fascia and add a splash guard if needed, which adds $50–$150. Ignoring these extras may save you a few bucks now but cost thousands in repairs later.
Is a DIY replacement cheaper than hiring a pro?
A DIY job can cut labor by 50‑70%, but the risk of a mis‑slope or loose joint can trigger a $2,000 mold bill down the line. Pro installers charge $75‑$100 per hour, but they bring a level and a sealant kit that guarantees proper drainage. If you’re comfortable with tools, DIY saves money; if you want a warranty, a pro is worth the extra fee.
What warranty should I expect from a professional install?
Most contractors offer a one‑to‑five‑year warranty on labor and materials. A 1‑year warranty covers sealants and fittings; a 3‑year warranty includes the pipe itself. Some firms add a free inspection after the first rainy season. When you sign, look for written details, not just a verbal promise, because that’s what protects you if a leak shows up later.
Do local building codes affect the cost?
Absolutely. Some cities require a permit for new downspouts, and the fee can range from $25 to $100. Code‑approved fittings may cost a touch more than generic ones, but they ensure a water‑tight seal. A professional will handle the paperwork and make sure the slope meets local regulations, which saves you the hassle of a potential code violation and a costly fix later.
How can I estimate my own replacement cost accurately?
Start by measuring the length of pipe needed, then multiply by the per‑foot price of your chosen material. Add 10–15% for fittings and a sealant. If you plan to hire a pro, multiply the material cost by a labor rate of $80 per hour and estimate the time required—usually 2–4 hours per 10 feet. Finally, add a small contingency for permits or unexpected rust, and you’ll have a realistic budget.
Conclusion
We’ve unpacked every angle of gutter downspout replacement cost, from the material you choose to the fine print in a warranty.
What really matters is the peace of mind a solid, properly sloped system gives you. A cracked pipe can turn a rainy night into a basement flood, and the cost of fixing that damage far exceeds the upfront $200–$800 you pay for a new downspout.
Here’s a quick checklist you can use tomorrow: measure the length, note any bends or rust, and decide if you’re comfortable with a DIY job or want a pro’s guarantee. If the job feels tricky, a professional can save you thousands in future repairs.
Don’t forget the maintenance budget. A few minutes each season to clear gutters keeps your downspout flowing and your foundation dry.
So, what’s the next step? Grab a tape measure, jot down the numbers, and set a realistic budget. If you’re unsure about the slope, reach out for a free on‑site estimate—no pressure, just a quick check.
Remember, the right downspout isn’t just a pipe; it’s your first line of defense against water damage.
Take action today, and let your home stay dry and happy always for years to come.


Comments