Best Exterior Paint for Stucco Homes: A Step-by-Step Guide
- William McKracherne
- May 12
- 12 min read

Protecting stucco starts with the right paint. Get clear, practical steps to pick, prep, prime, finish, and maintain the best exterior paint for stucco homes so you can enjoy a durable, curb-appealing look for years. This guide walks you through every step, with real-world tips and tested prep routines you can do yourself or with a pro.You’ll learn how to choose paint types that hold up to weather, how to prep textured surfaces, how to apply for best adhesion, and how to compare costs and eco-friendly options in 2026. A quick note before we dive in: to help you make the right call, we’ll reference credible sources and real industry guidance. For starters, a plaster prep resource can help you build a solid surface before paint. Essential Guide to Working with Plaster: Techniques, Tools, and Tips can be a useful companion as you plan.
The goal here is to give you a practical, no-fluff playbook for thebest exterior paint for stucco homesin 2026. We’ll cover paint types, surface prep, priming, finishes, and cost/eco choices. You’ll also see real-world notes on durability and breathability, pulled from credible manufacturer and contractor sources. By the end, you’ll know which coating to reach for depending on your climate, budget, and the condition of your stucco.
Step 1: Select the Right Paint Type for Stucco
Choosing the right paint type matters more for stucco than for many other surfaces. The texture, porosity, and potential hairline cracks all shape how a coating behaves over time. In 2026, the most durable, long-lasting picks for stucco are premium acrylics from major brands. These acrylics usually deliver longer life and easier washing than basic 100% acrylic latex or elastomeric options, especially on older stucco textures. And you’ll notice a real difference in breathability and crack-bridging behavior when you compare products side by side.
First, understand the three broad categories you’ll see in the wild:
Premium acrylics(often marketed as high-build or long-lasting): typically faster to dry, good UV stability, and strong color retention. They bridge small cracks and resist mildew when formulated for exterior use. These are your top-tier options for longevity and low maintenance.
Standard acrylic-latex(universal acrylics): a solid middle choice that’s usually easier on the wallet. They offer decent durability and washability, but may not hold color as well in harsh sun or hot, humid climates over a decade.
Elastomeric finishes(thick, flexible coatings): designed to bridge larger cracks and move with the substrate. They’re tough, but they’re often too thick for textured stucco and can reduce texture detail. Breathability can be lower, which matters in some climates.
Two big points come up in the field. One, premium acrylics (Duration/Emerald from Sherwin‑Williams, Aura/Regal from Benjamin Moore) tend to deliver the longest documented durability, commonly in the 7, 10 year range under proper prep and climate. Two, elastomeric coatings sometimes promise “crack‑bridging” but can trap moisture if not used with care on stucco. A 2024 analysis of stucco paint options highlights that elastomeric products often show lower breathability and uncertain long‑term durability, while premium acrylics deliver stronger, longer-lasting results. Klappenberger & Son: Best Paint for Stucco in 2024 provides a useful framing of these tradeoffs.
How this affects you: if your stucco is chalky, cracked, or old, you’ll likely get the most dependable, least maintenance headaches from a premium acrylic rather than a cheaper elastomeric or basic latex. If your goal is to preserve texture and you want a color that lasts, start with premium acrylics and plan for a proper prep cycle that includes cleaning, crack conditioning, and a quality primer where needed.
7, 10 yearsdurability for premium acrylics on stucco (typical range, under good prep)
"The best finish for stucco is one that lasts, breathes with the wall, and keeps dirt from staining the surface."
Key Takeaway:For most stucco homes, premium acrylics beat elastomeric and basic latex on durability and breathability, especially with thorough prep and proper priming.
Bottom line:Start with premium acrylics for the longest life and easiest upkeep on stucco, then plan rigorous prep to maximize that life.
Note on finishes and coatings: finishes vary by sheen, with satin or eggshell options often preferred on walls for a good balance of appearance and cleanability, while semi-gloss may be reserved for trim. This section sets the stage for the prep and application steps that follow, because the paint type you choose will steer how you prep and apply later.
Bottom line:The right paint type for your stucco hinges on climate, texture, and how much you want to bridge cracks without sacrificing breathability.
Step 2: Prepare the Stucco Surface Properly
Prep is the make-or-break part of a long‑lasting exterior stucco finish. A clean, sound surface helps the coating stick and age well. Start with a careful assessment: look for chalk, hairline cracks, and any old peeling paint. Hairline cracks up to a size roughly the edge of a credit card are typical, but larger, diagonal, or stair-step cracks can signal underlying issues that need repair before painting. The right prep routine varies by paint type, but there are common steps that set the stage for success.
1) Clean the surface thoroughly. A pressure wash is often recommended to remove chalk and surface grime. For very porous stucco, a light rinse followed by a dry period helps the film form evenly. 2) Address cracks. Hairline cracks can usually be bridged by the new coating, but bigger cracks require routing, patching, and priming. If you’re unsure about the crack size, test with a credit‑card gauge or a simple crack‑width measurement. 3) Patch and repair as needed. Use a masonry patch or acrylic caulk to fill larger gaps. Allow patches to cure fully before priming. 4) Prime where needed. Some paints are self-priming on sound stucco, but chalky or repaired areas often need a good primer to ensure even adhesion. 5) Test failure points. Before committing to two coats, test adhesion on a small area to confirm the prep worked. This step saves you from redoing a whole wall later.
These steps align with the practical guidance from professionals who handle stucco coatings. A Behr Pro advisory emphasizes thorough cure and compatibility with the substrate, including using a primer on uncoated or chalky spots. For fresh or hot‑stamped stucco, a dedicated primer might be required to ensure optimal bonding and hide. BEHR Behr Pro: Stucco Prep Tips
Why this matters: proper prep raises the bar for any paint system on stucco. It reduces the chance of early chalking, cracking, and peeling and helps the color stay true longer. Work in cool, dry conditions and avoid painting in direct sun when possible. The goal is a stable, clean surface that accepts the coating evenly and lasts longer.
Pro Tip:If you have chalky surfaces, scrub with a gentle masonry cleaner first, then rinse and let dry fully before priming. A swell of chalk can be a red flag that the surface needs more repair before you seal it with paint.
Key Takeaway:Thorough washing, crack repair, and proper priming create a strong base that dramatically improves the lifespan of the final paint on stucco.
Bottom line:Prep is where you win or lose long-term paint performance on stucco. Clean, repair, and prime the right way for best results.
Bottom line: If you’re following the prep steps above, you’ll be in a great spot for the next stages of painting your stucco with confidence.
Step 3: Prime and Apply the Paint
Prime then paint. The exact sequence depends on the paint you pick, but here’s a reliable workflow that works well with the common premium acrylics used on stucco. Start with priming especially on chalky surfaces or patched areas. A high‑quality primer helps seal the substrate, control porosity, and improve hide. If you’re applying a two‑coat system, plan a consistent two‑coat cycle with even application across the wall.
Primers for masonry and stucco come in solvent and water-based formulas. A modern, pigmented primer is designed to seal the substrate, resist alkali, and create a uniform surface for the topcoat. In practice, you’ll apply primer to bare concrete or patched spots and then roll or brush on the paint. Some topcoats claim self-priming properties, but if you’ve repaired the surface or if it’s chalky, a dedicated primer will yield a smoother, longer-lasting finish. When you apply the topcoat, keep coats even, avoid heavy sags, and maintain a steady hand. For best results on large walls, use a two‑coat method and back‑roll after spraying to ensure uniform finish and to press the coating into the texture of the stucco.
From a product standpoint, Acrylux UL‑200 is a pigmented primer-sealer designed for masonry and stucco, with high solids that help with hide and adhesion. It’s suitable for fresh stucco and other tough substrates, which makes it a strong choice for real-world jobs where you’re dealing with new or repaired stucco. Acrylux UL-200 Primer is a solid option to consider when planning your topcoat.
How many coats? Most premium acrylics perform best with two even coats, especially on textured stucco. If you’re covering a darker color, you may need a third coat, but plan two coats first and evaluate the coverage after the second pass. The goal is to achieve an even film without heavy buildup that could obscure texture. Two coats usually provide solid durability and washability without introducing an overly thick finish that could crack with substrate movement.
Pro Tip:After priming, let the primer dry fully per the manufacturer’s instructions before applying the topcoat. A dry primer helps the finish coat adhere better and prevents slow drying or peeling later.
2 coatstwo-coat system is standard for topcoats on stucco
Bottom line:A good primer paired with a two‑coat topcoat delivers the best mix of durability and color longevity for stucco walls.
Step 4: Choose the Ideal Finish and Protect Your Paint
Finish or sheen matters as much as the color. Exterior finishes range from flat to high gloss, with satin and semigloss offering the best blend of look and cleanability for most walls. For stucco, satin finishes often hit the sweet spot because they hide small surface flaws like a flat finish but still offer good washability and durability. If you’re painting trim, doors, or shutters, a semi-gloss or gloss finish can be a good choice to boost durability and ease of cleaning.
What finishes work best for stucco? Flat or matte finishes hide signs of aging but are more susceptible to weather and fading. Satin balances aesthetics with durability. Semi-gloss adds wipe-clean durability for trim and features. The choice also depends on climate and heat load. In coastal or humid zones, a more strong sheen can help resist dirt buildup and wash away grime after a rain. It’s common to pair a satin body with semi-gloss trim for a crisp, durable look.
From a user perspective, the Finish you pick should align with your maintenance routine. If you want a simple, durable option that hides texture and age, satin is often the best across most stucco homes. If you want to highlight details and trims, a semi-gloss for those features can deliver a sharper look. If you’re tackling an older home with many surface imperfections, a flat finish with good cleaning and maintenance can still deliver a timeless look, though you’ll need to repaint more often.
Pro guidance from professional painters emphasizes the practical side: satin is frequently the most versatile choice for stucco, offering a good balance of aesthetics and washability. For a high-end result, some pros recommend using a high-build satin or a breathable finish designed for masonry surfaces. The key is to ensure the finish chosen is compatible with the topcoat and the substrate you’re painting.
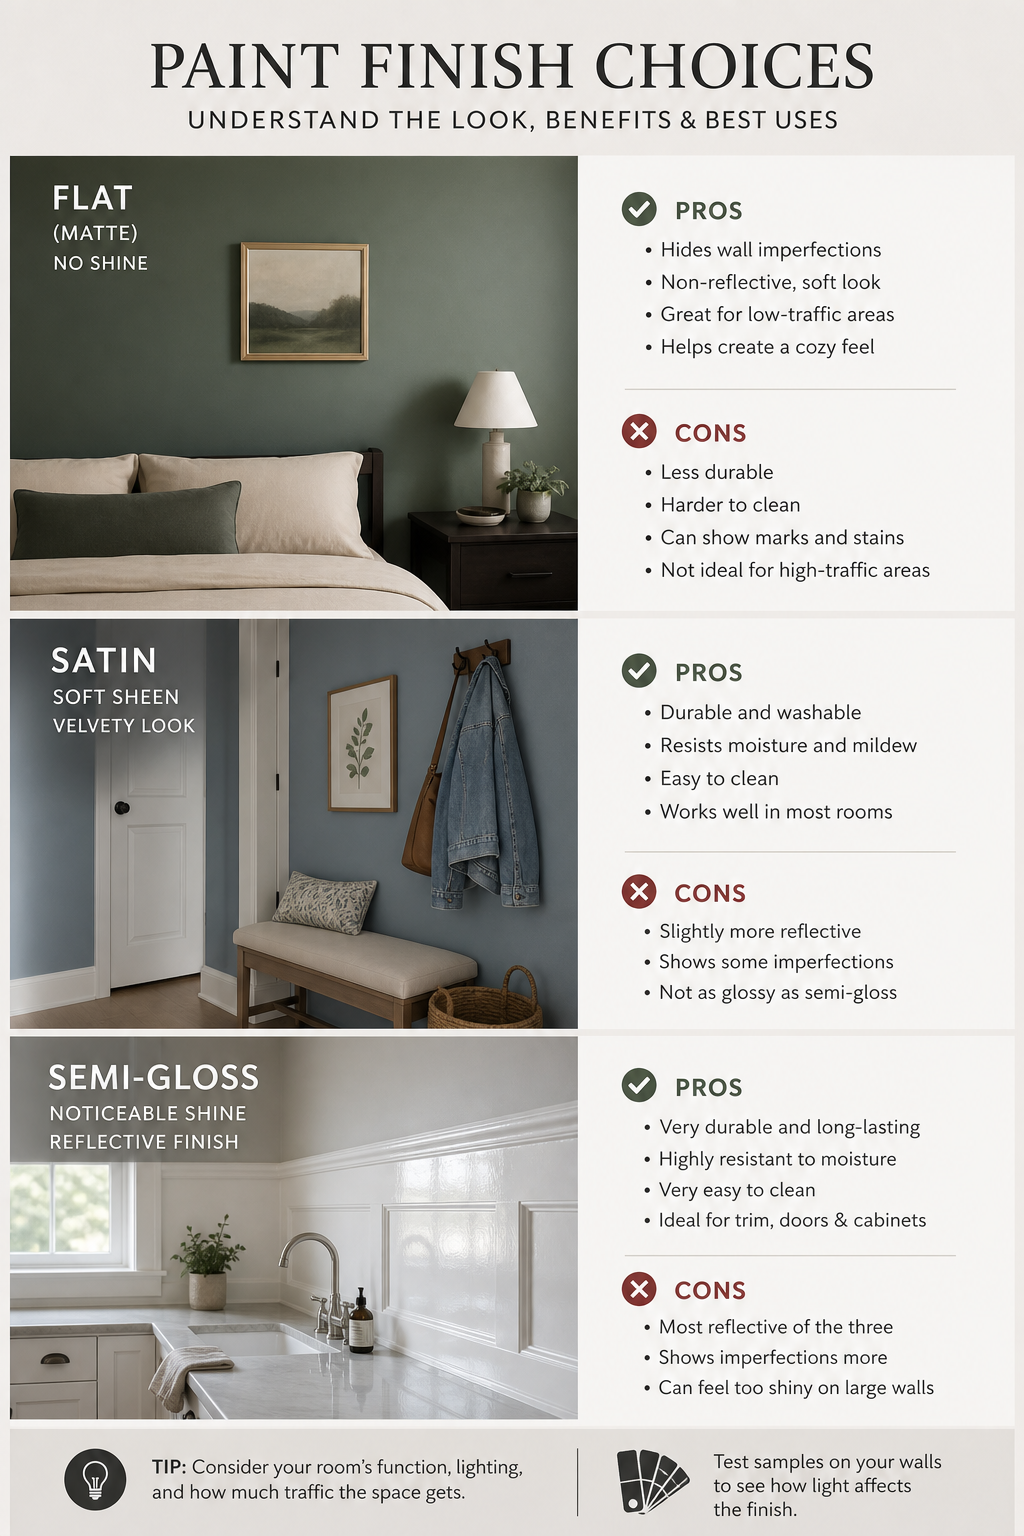
"A finish that resists dirt and can be cleaned without dulling the color is worth the added cost."Key Takeaway:Satin finishes are a reliable, versatile choice for stucco exteriors, balancing look and resilience. Reserve glossy finishes for accents and trim where appropriate.Bottom line: Pick a finish that matches how you clean the house and how you want it to look, with satin as the common default for stucco walls.Bottom line: Finish matters as much as color; satin is the most balanced choice for most stucco homes, with gloss reserved for trim or accents.Step 5: Evaluate Costs, Longevity, and Eco‑Friendly OptionsCost is more than the sticker price. It’s about long‑term value. In 2026, paint pricing and labor have shifted in response to material costs and regulatory changes. Premium acrylics tend to cost more per gallon but last longer, which can reduce the per‑year protection cost. DIY painting can save money upfront, but it also brings risks, from ladder safety to coverage issues, that can erode any savings if you don’t plan carefully. A good approach is to compare tiered options: entry, mid, and premium, then weigh their durability and needed repaint intervals against the total project cost over 8, 12 years.Reality check: the cost reality of 2026 shows a wide range by region, climate, and surface condition. A 2026 market overview suggests the following factors drive the total price: the siding type, the paint quality tier, prep work, accessibility, and color complexity. These drivers can swing a project by 30% or more. For a practical framework, use a two‑coat system with mid‑range paint on normal prep to get a realistic price baseline, then adjust for heavy prep or extra colors. FacadeColorizer: Exterior Paint Cost 2026 Guide provides a broad context for regional pricing shifts and the impact on overall value.Eco-friendly and low‑VOC options exist in every category. If you are worried about indoor air quality or environmental impact, look for paints with lower VOC levels and transparent labeling. Many premium brands offer low‑VOC lines without sacrificing durability. In hot, sunny climates, selecting formulations with UV blockers helps color stay truer longer and reduces the frequency of repainting.Here’s a compact table to help you compare the big-picture tradeoffs. It focuses on durability, breathability, and typical prep needs, not on exact square-foot coverage, which varies widely by product and texture.Paint TypeTypical Durability (years)BreathabilityPrep IntensityPremium acrylic (e.g., Sherwin Duration/Emerald, Benjamin Moore Aura/Regal)7–10HighModerate to High (wash, repairs, prime)Acrylic-latex (standard)5–7ModerateModerateElastomericVaries; some claim longer lifeLow to ModerateHigh (crack bridging, thicker film)6.6 yearsaverage durability across all reported paints in the samplePro Tip:If you plan to sell soon or live in a humid area, a premium acrylic top coat coupled with solid prep can maximize value and curb appeal with fewer touch-ups later.Key Takeaway:In 2026, premium acrylics offer the best long-term value for most stucco homes, while elastomeric options demand careful climate and crack considerations.Bottom line: Weigh product durability, prep requirements, and eco options against your budget to pick the best long-term choice for your stucco home.Bottom line: With careful planning, you can balance upfront cost with long-term durability to land the right finish for a stucco home in 2026."Durability and breathability should guide your choice more than price alone."Conclusion up ahead. The best exterior paint for stucco homes isn’t one size; it’s the right fit for your wall texture, climate, and how much you value long-term maintenance savings.FAQ PreviewThe FAQ follows. It answers common questions about choosing paints, finishes, and application for stucco exteriors, with practical steps you can take today.FAQWhat is the best paint type for stucco?The best paint type for stucco typically sits in the premium acrylic family. These paints offer strong adhesion, solid crack bridging for hairline cracks, UV resistance, and long-term color stability. They also tend to maintain breathability better than elastomeric coatings, which can trap moisture if not used properly. For most stucco surfaces, premium acrylics provide the best balance of durability and moisture management over time.Do elastomeric paints work on stucco?Elastomeric paints can bridge cracks and handle movement, but they often come with drawbacks on textured stucco. Breathability can be lower, which may trap moisture in some climates. If you’re considering elastomeric, use it only on surfaces with known movement and in climates where moisture management is well understood. In many cases, premium acrylics offer a more reliable long-term result for stucco exteriors.How many coats are needed for stucco?In most cases, two coats are enough for stucco when you start with a quality primer and a topcoat designed for masonry. A third coat may be required if you’re covering a very dark color or an uneven substrate. The key is to ensure even coverage and avoid heavy buildup that can crack with temperature swings. Ensure the coats dry lines before applying the next pass.Should you pressure wash before painting?Yes. Pressure washing is a common first step to remove dirt, chalk, and loose material. Always test a small area first to ensure the pressure won’t damage the stucco. Use a 1500, 2500 psi setting for most surfaces and avoid blasting grout lines. After washing, let the surface dry fully so the primer and paint can adhere evenly. This prep step is critical for a durable finish.What finish is best for stucco?Satin finishes are generally the most versatile for stucco because they balance aesthetics with durability and washability. Semi-gloss can be used for trims or accents where you want extra cleanability, but it will highlight surface flaws. Flat finishes hide texture or hairline cracks but fade faster and are less durable in harsh weather. The right choice depends on climate, exposure, and how often you plan to wash the home.Are there eco-friendly options for stucco paint?Yes. Look for low-VOC or zero-VOC exterior paints from premium brands. Many manufacturers now offer low‑VOC lines that don’t sacrifice durability or color retention. Eco-friendly options are especially appealing for homes near schools, parks, or coastal areas with stricter VOC rules. Compare the VOC content and read labels to verify the claims before you buy.ConclusionChoosing the best exterior paint for stucco homes in 2026 isn’t about chasing a magic coating. It’s about aligning your climate, stucco texture, and maintenance goals with a paint type that lasts. Premium acrylics win on long life and breathability, especially when you pair them with a thorough surface prep and a solid primer. Elastomeric coatings have their place, but they require careful climate and surface condition consideration. The finish you select, most often satin for stucco, marries appearance with durability for the everyday wash and weather year after year. And don’t forget to factor in cost per year of protection when you compare options. The right approach is to balance your budget with the expected life of the coating, plus the labor cost of prep and repainting over time. If you want a guided estimate or a professional touch for your home, LGFMH Construction can help you plan a step-by-step exterior painting project that respects your budget and your home’s needs.Bottom line: With the right paint type, proper prep, and a careful finish choice, your stucco home can look fresh and last longer. The picks above are a solid blueprint for 2026. If you’d like to talk through your project and get a detailed plan, reach out to LGFMH Construction for a tailored estimate and schedule.


Comments