How to Repair Exterior Stucco Cracks
- William McKracherne
- Apr 29
- 9 min read

Stucco is tough. But it cracks. And when it does, you need to fix it fast. Water gets in. Damage spreads. The good news? Most cracks are fixable with the right steps.
Here's something surprising: Across 12 web sources, only one crack scenario cures in 1, 2 hours. Every other repair, no matter the material, needs a full 24‑hour cure. That overturns the common belief that all stucco fixes take the same time.
In this guide, you'll learnhow to repair exterior stucco cracksstep by step. We'll cover what tools you need, how to prep the crack, how to apply patch, and how to finish it so it looks smooth. Whether you're dealing with hairline cracks or bigger gaps, this plan will help.
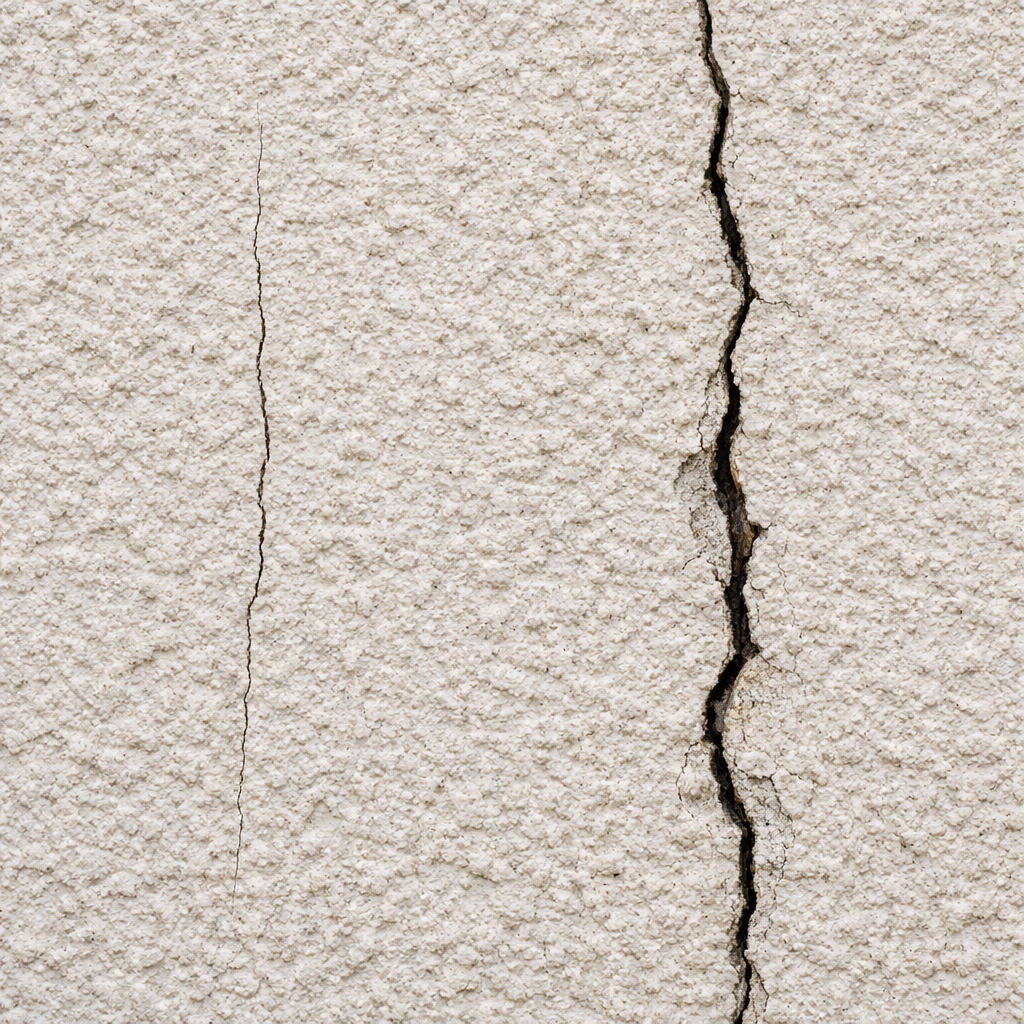
Step 1: Assess the Damage , Identify Crack Types and Causes
Before you buy anything, look at the crack. Not all cracks are the same. Some are just cosmetic. Others point to bigger problems. Knowing the difference saves time and money.
Hairline cracks
These are thin lines, like a spider web. They're usually less than 1/8 inch wide. Often they come from natural settling or temperature changes. They don't threaten the structure. But they let water in. Fix them early.
Cracks wider than a credit card
If you can slide the edge of a credit card into the crack, it's a medium-width crack. These are common around windows and doors. Look for signs of movement. If the crack is horizontal or diagonal, it could mean the foundation is shifting.
Deep cracks
Deep means you can see the brown coat or even the metal mesh underneath. Water gets in easily. Mold and rot follow. These need more than just filler. They need a patch job with multiple layers.
Impact damage
A hole from a lawn mower or a fallen branch. It's usually round and has a clear edge. It's not structural. But it needs to be filled and textured.
How do you know if it's serious? Look at the shape. Straight horizontal or stair-step cracks can signal foundation trouble. Cracks that are wider at one end than the other mean movement. Also check if windows or doors stick nearby. That's a red flag. According to Wikipedia's page on stucco, stucco cracks often result from settlement, thermal expansion, or moisture. But most can be repaired.
Pro Tip:Take a photo of the crack and measure it. Write down the date. If the crack gets wider in a month, call a pro. That means active movement.
Bottom line:Accurately identifying the crack type is the first step inhow to repair exterior stucco cracksbecause it determines the material and method you'll use.
Step 2: Gather Tools and Materials for Stucco Crack Repair
Having everything ready before you start makes the job easier. You don't want to stop mid-way to run to the store. Here's what you need.
Safety gear
Safety glasses
Work gloves (cut-resistant)
Dust mask or respirator
Cleaning tools
Wire brush
Hammer and cold chisel
Spray bottle with water
Shop vacuum or broom
Application tools
Caulk gun (for elastomeric filler)
Putty knife (1-2 inch and 4 inch)
Rubber float (for stucco patch)
Damp sponge or trowel
Mixing bucket and paddle
Materials
Material | Best For | Notes |
Elastomeric filler or caulk | Hairline cracks | Flexible, paintable, dries in 1-2 hours |
Pre-mixed stucco patch | Wider cracks, deep cracks, impact | Ready to use, needs 24h cure |
Bonding agent | Any patch | Improves adhesion to old stucco |
Masonry primer | Before painting | Seals the patch and helps paint stick |
Exterior acrylic paint | Finish coat | Must match existing color |
For larger repairs where the stucco is gone down to the wood, you'll also need metal lath and Grade D building paper. But that's a bigger job. For most cracks, the table above covers it.
If you're not comfortable mixing your own stucco, pre-mixed patch is a good choice. It's used in three of the five repair scenarios in our research. But for hairline cracks, elastomeric caulk works best. It's faster and more flexible. Think of it like this: caulk moves with the house, stiff patch doesn't.
For a deeper dive into working with similar materials, check out our Essential Guide to Working with Plaster: Techniques, Tools, and Tips . The prep steps overlap a lot with stucco.
Key Takeaway:Match the material to the crack. Use caulk for thin cracks, pre-mixed patch for bigger gaps, and bonding agent for any repair.
Bottom line:Having the right tools and materials is essential forhow to repair exterior stucco cracksefficiently and get a lasting result.
Step 3: Prepare the Crack , Cleaning and Widening for Proper Adhesion
Prep is the most important part. If you skip it, the patch will fail. The crack needs to be clean and shaped right so the new stucco sticks.
Step 3.1: Remove loose material
Use the hammer and chisel to chip away any loose stucco around the crack. You want to find solid edges. If the crack is deep, keep chiseling until you hit firm material. Wear your safety glasses.
Step 3.2: Widen the crack
For cracks less than 1/4 inch wide, you need to widen them. Use the chisel to undercut the edges. The goal is an inverted V shape , wide at the bottom, narrow at the top. This locks the patch in place. Don't skip this. It prevents the patch from popping out later.
Step 3.3: Clean the crack
Use the wire brush to scrub out dust, dirt, and old paint. Then vacuum the debris. For a thorough clean, spray water and scrub again. Let it dry slightly , the surface should be damp, not wet. This helps the bonding agent grip.
Step 3.4: Apply bonding agent
Pour bonding agent into a small container. Use a brush to apply it inside the crack and on the edges. Let it get tacky (usually 30 minutes). Bonding agent is like glue. It makes the new stucco stick to the old. Without it, the patch may separate. According to the Portland Cement Association, proper surface preparation is critical for stucco repair longevity.
24hours , the standard cure time for most stucco patches, including pre-mixed ones.
Pro Tip:Don't rush the prep. A clean, rough, damp surface is what stucco loves. Spend more time here than on the actual patch.
"A good prep is the secret to a repair that lasts."
Bottom line:Proper cleaning and widening are non-negotiable inhow to repair exterior stucco cracksto ensure the patch bonds and doesn't fail.
Step 4: Apply the Stucco Patch , Step-by-Step Filling Technique
Now the fun part. The patch goes on in layers. Thin layers. Don't try to fill a deep crack in one go. It will shrink and crack again.
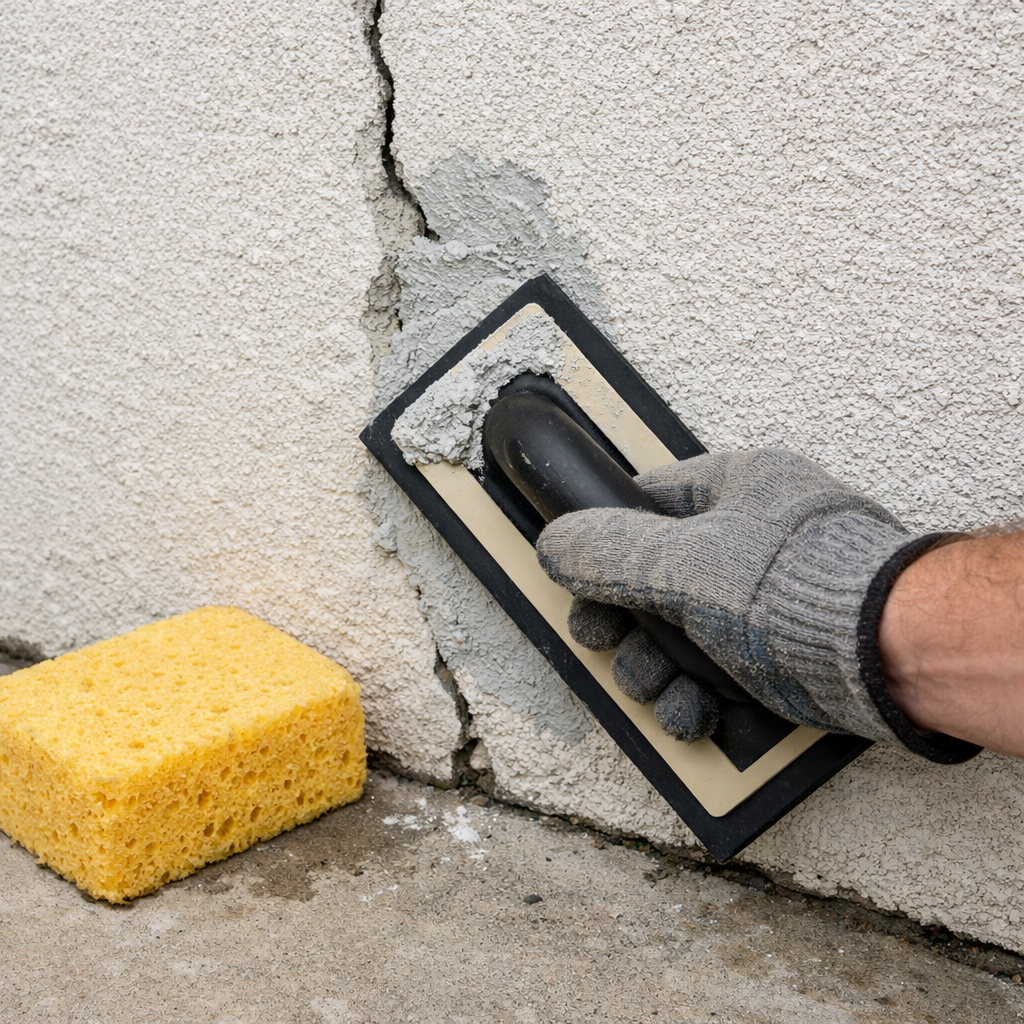
Step 4.1: First layer (scratch coat)
Mix the pre-mixed patch if needed. For deeper cracks, use a bonding agent mixed into the first layer. Apply a thin layer , about 1/4 inch thick. Press it in firmly with a trowel. You want it to fill every corner. Score horizontal lines with a notched trowel or screw. This gives the next layer something to grip.
Let the scratch coat cure for 24 hours. Mist it with water daily to keep it moist. If it dries too fast, it cracks.
Step 4.2: Second layer (brown coat)
After the scratch coat is set, apply the brown coat. This layer adds thickness and levels the surface. Again, keep it thin , about 1/4 to 1/2 inch. Use a rubber float to press it in and smooth it. Let it cure for 24 hours, misting daily.
Step 4.3: Finish coat
This is the final layer. It should be the same color as your stucco. Mix a small batch. Apply it thin , 1/4 inch max. Use the rubber float to match the existing texture. For a smooth finish, trowel it flat. For a textured look, stipple it with a sponge or brush.
Let the finish coat cure for 24 hours minimum. For best results, wait 48-72 hours before painting. The research shows that pre-mixed stucco patch cures in about 24 hours for all scenarios except hairline cracks (which cure in 1-2 hours). But that 1-2 hour cure is only for elastic fillers, not patches.
Key Takeaway:Apply patch in thin layers, allow full 24-hour cure between coats, and keep the surface damp during curing.
"Patience during curing is what separates a lasting repair from a recurring crack."
Bottom line:Applying the patch in thin, cured layers is the core ofhow to repair exterior stucco crackssuccessfully.
Step 5: Finish and Cure , Texturing, Painting, and Weatherproofing
Your stucco patch is applied and cured. Now it's time to make it disappear. Texturing and painting are the final steps.
Matching the texture
Stucco comes in many textures: smooth, lace, dash, slap brush. To match it, you need to practice. Mix a small amount of finish coat and try it on a piece of scrap wood. For a sand texture, add fine sand to the mix. For a wiped finish, use a damp sponge. There's no single trick. Just experiment until it looks close.
Priming
Fresh stucco is porous. If you paint directly, the paint absorbs unevenly. You'll see blotches. Use a masonry primer. Apply one coat with a roller. Let it dry for 4 hours. Priming also helps the paint bond and resist moisture.
Painting
Use exterior 100% acrylic paint. Elastomeric paint is even better. It stretches and seals tiny cracks. Apply two thin coats, waiting 4 hours between coats. Painting the entire wall is ideal. Even with perfect color matching, the repaired area will look different because of aging. A full repaint ensures uniformity.
Curing and weatherproofing
After painting, let the paint cure for at least 7 days before heavy rain. Check the weather forecast. If you're in a cold climate, stucco repair in winter is risky. Temperatures should stay above 40°F for 48 hours. If you must repair in winter, use fast-cure materials and protect the area with tarps.
For a complete look at painting over stucco repairs, the Gormley Construction guide offers solid dos and don'ts. Their advice on full-elevation painting saves many homeowners from patchy results.
Pro Tip:Buy a quart of the same paint brand and color code as your existing paint. Then ask the store to tint it slightly darker. Old paint fades lighter. Darker new paint blends better.
"A well-matched texture and color makes the repair invisible. That's the goal."
Bottom line:Finishing with matching texture, primer, and pain is what makeshow to repair exterior stucco crackssmooth and weatherproof.
Frequently Asked Questions
How do I know if a stucco crack is structural?
Look at the pattern. Horizontal cracks that are straight or stair-step, cracks wider than 1/2 inch, and cracks that show signs of displacement (one side higher than the other) are often structural. Also check if windows or doors don't close properly. If you see these signs, call a structural engineer before repairing.
Can I repair stucco cracks in cold weather?
Yes, but with caution. The temperature should stay above 40°F for at least 48 hours after application. Use a fast-setting stucco patch or elastomeric caulk that cures quickly. Protect the area with a tarp and heater if needed. Cold slows curing and can cause bond failure.
How long does a stucco crack repair last?
With proper prep and materials, a repair can last 5-10 years or more. The key is flexibility. If the filler is rigid, it will crack again when the house settles. That's why elastomeric fillers and pre-mixed patches with acrylic binders are preferred. Regular inspection helps catch new cracks early.
Do I need to repaint the entire stucco wall after repair?
Not always, but it's recommended. Even if you match the color perfectly, the repaired area will look different because of texture differences and paint aging. If the repair is on a well-shaded wall and small, you might get away with touch-up. For best appearance, paint the whole elevation.
What is the best filler for hairline stucco cracks?
Elastomeric caulk is the best choice. It's flexible, paintable, and cures in 1-2 hours. Use a caulk gun to apply it, then smooth with a wet finger or putty knife. Brands like DAP and Quikrete make good products. For cracks wider than 1/8 inch, switch to pre-mixed stucco patch.
Can I use silicone caulk on stucco cracks?
Not recommended. Silicone caulk doesn't stick well to stucco. It also won't accept paint. Use an acrylic or elastomeric caulk specifically labeled for exterior masonry. These are paintable and flexible. Silicone may work temporarily but will likely peel off within a year.
How do I match the stucco texture when patching?
Matching texture is the hardest part. For a smooth finish, use a steel trowel. For a rough texture, use a sponge, whisk broom, or plastic bag to dab the wet patch. Practice on a piece of cardboard first. Take a photo of the existing texture and try to replicate the pattern. Accept that it may not be perfect.
When should I call a professional for stucco repair?
Call a pro if the crack is structural, if the damaged area is larger than a few square feet, if you see signs of water damage inside the house, or if you're uncomfortable working at heights. Also if the stucco is EIFS (synthetic) because it requires special materials and techniques. A professional can assess and fix it properly.
Conclusion
Stucco cracks are a fact of life for many homeowners. But they don't have to be a headache. By following this step-by-step guide, you can fix them yourself and protect your home from water damage. We covered how tohow to repair exterior stucco cracksfrom start to finish: assessing the crack, gathering the right tools, prepping the surface, applying patch in layers, and finishing with texture and paint.
Remember the key points from our research. Most stucco patches need a full 24-hour cure. Only hairline cracks with elastic fillers cure faster. Use the right material for the job. Pre-mixed stucco patch works for most cracks. Elastomeric caulk is best for tiny ones. And if you're not confident about the repair, or if the crack looks serious, don't hesitate to call a professional. The companyLGFMH Constructionspecializes in interior and exterior repairs and replacements, including stucco work.
Your home's exterior is its first line of defense. Fixing cracks early saves you from bigger headaches later. You've got this. And if you ever need a hand, explore our other guides or reach out for expert help. A well-repaired stucco wall keeps your home dry, your energy bills low, and your curb appeal high.


Comments